EDITORIAL NOTE: In this post, we feature a comprehensive AngularJS MVC Tutorial. Model View Controller or MVC as it is popularly called, is a software design pattern for developing web applications.
1. Introduction
When I was asked to write a tutorial on MVC using Angular.js, I was not sure how to attack the subject because Angular.js is really popular and tutorials like that are everywhere on the Internet. I decided to challenge myself and do a tutorial series in 3 parts on a full stack JavaScript architecture.
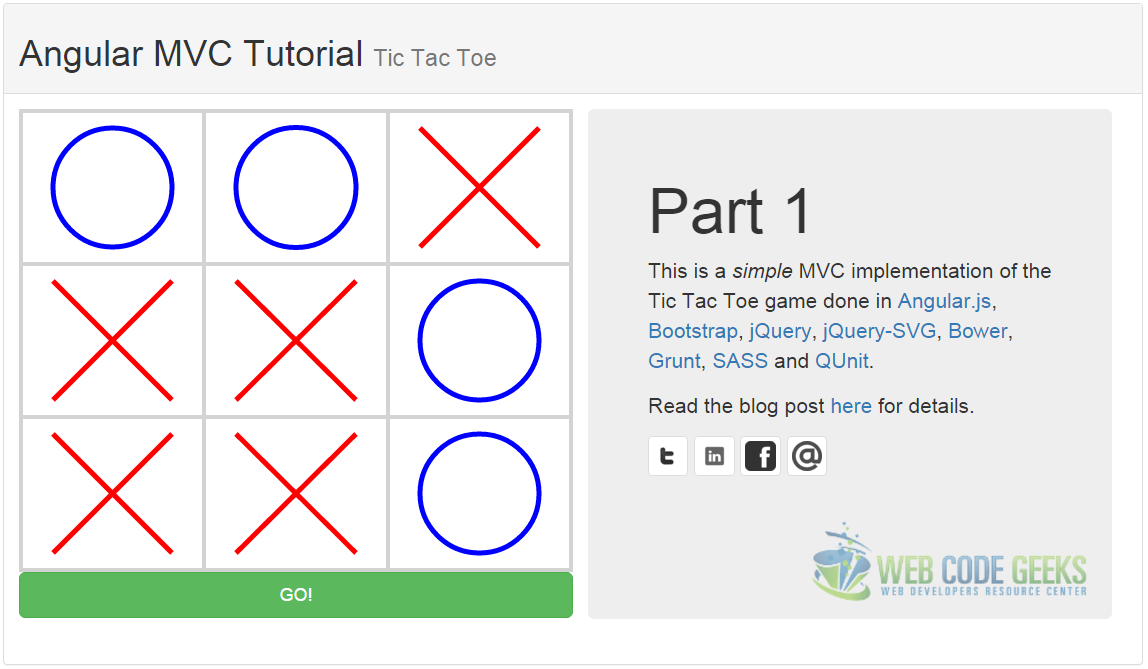
In this first part, I will show you how I created an Angular.js MVC application wrapped around a Tic Tac Toe game engine I did as a TDD kata.
Basically, I will show you how to create a grid directive for the game UI, a TicTacToeService that wraps the game engine, a DrawingService using jQuery SVG to draw the crosses and circles, and a TicTacToeController to interface between the UI and the services.
I will also explain how to have a functional development environment, that is the different tools I used to make this work. Those are Brackets, Bower, Grunt, NPM and SASS.
2. Prerequisites
To follow this tutorial, you need:
- NPM (comes with Node.js)
- SASS (needs Ruby)
- Grunt (from NPM)
- Bower (from NPM)
- Your favorite IDE (I use Adobe Brackets)
2. Folder structure
This way of storing the sources and the dependencies is something I came up with while developing the game. I think that, in the end, I ended up with something that is quite easy to work with. At the root of the project, I have NPM package.json, Bower bower.json and .bowerrc configuration files, and my Gruntfile.js. Along with those files, I have NPM modules stored in the folder node_modules and Bower modules are in bower_dependencies. Then I have a lib folder containing the tic tac toe sources in src and tests suites in test. The src folder goes like this:
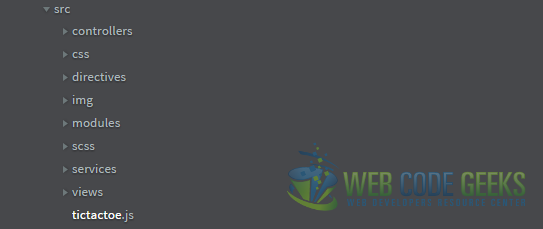
I decided to go with a folder structure that is called by layer because it’s a really small application that will not grow any bigger with different features that would necessitate a structure by feature (domain). I would not recommend doing this in a professional or open source project because one has to navigate deep inside the folder structure to see how files are grouped and what the application is about.
3. Model-View-Controller in Angular.js
With near 45k stars on GitHub, Angular.js is one of the most popular JavaScript framework (or script library) on the market. It’s a powerful tool to create MV* applications in no time. With directives and data binding, Angular gives a feeling that HTML is now something else that just a markup language. It all starts by:
var TicTacToe = angular.module("TicTacToe", []);
Let’s have a look that the other layers, from top to bottom.
3.1 The View
The view I created for this is a directive template. I also have an HTML template around it to make it look a little bit better, but the main view here is the tic tac toc grid.
grid.html
<div class="row">
    <div class="container-fluid grid">
        <div class="row">
            <div data-row="0" data-column="0" class="col-sm-4 cell"
                 ng-click="clickCell($event)"></div>
            <div data-row="0" data-column="1" class="col-sm-4 cell"
                 ng-click="clickCell($event)"></div>
            <div data-row="0" data-column="2" class="col-sm-4 cell"
                 ng-click="clickCell($event)"></div>
        </div>
        <div class="row">
            <div data-row="1" data-column="0" class="col-sm-4 cell"
                 ng-click="clickCell($event)"></div>
            <div data-row="1" data-column="1" class="col-sm-4 cell"
                 ng-click="clickCell($event)"></div>
            <div data-row="1" data-column="2" class="col-sm-4 cell"
                 ng-click="clickCell($event)"></div>
        </div>
        <div class="row">
            <div data-row="2" data-column="0" class="col-sm-4 cell"
                 ng-click="clickCell($event)"></div>
            <div data-row="2" data-column="1" class="col-sm-4 cell"
                 ng-click="clickCell($event)"></div>
            <div data-row="2" data-column="2" class="col-sm-4 cell"
                 ng-click="clickCell($event)"></div>
        </div>
    </div>
</div>

<div class="row">
    <button type="button" class="btn btn-success btn-lg col-sm-12"
            ng-click="startGame()" ng-hide="isGameInProgress()">
        GO!
    </button>
</div>
So we have a 3 by 3 grid with divs having the cell CSS class. I have bound the ng-click event to a method called clickCell($event) which we will have a closer look later. Here, $event is an Angular service allowing us to retrieve the instance of the component that was clicked. With that instance, we will be able to query it to get the HTML5 custom attributes data-row and data-column values representing the coordinates of the current grid cell. This could have been generated. Feel free to download the sources below and try to make this grid generate!
Below the grid, we have a button that the ng-click event is bound to the startGame method. This button creates a new instance of the tic tac toe game engine and starts the game. It will remain hidden for the whole game and get displayed when the game is finished.
3.2 The Controller
No surprise, the controller is the component in a software that takes the data from the view and send it to the model layer. Some kind of a translator. Too many times I have seen controllers with business logic and I think it’s simply because of its obscure suffix Controller. Naturally, I would think that the controller is something that has the control over a system, but it must be thought as a gaming console controller. Something you (UI) use to have control on the machine (Model).
That aside, as you might expect, our controller here is really small.
TicTacToeController.js
TicTacToe.controller("TicTacToeController", [
    '$scope', '$timeout', 'TicTacToeService', 'DrawingService',
    function ($scope, $timeout, TicTacToeService, DrawingService) {

        this.gameCurrentlyPlayed = TicTacToeService.makeNewGame();

        $scope.startGame = function () {
            console.log("Initializing a new game...");
            this.gameCurrentlyPlayed = TicTacToeService.makeNewGame();

            DrawingService.initialize(this.gameCurrentlyPlayed);
            DrawingService.drawBoard();
        }

        $scope.clickCell = function ($event) {
            if (this.gameCurrentlyPlayed && this.gameCurrentlyPlayed.isGameInProgress()) {
                var cellClicked = $($event.target).parent();
                var cellClickedRow = cellClicked.data("row");
                var cellClickedColumn = cellClicked.data("column");

                this.gameCurrentlyPlayed.playerMove(cellClickedRow, cellClickedColumn);
                DrawingService.drawBoard();
            }

        }

        $scope.isGameInProgress = function () {
            if (this.gameCurrentlyPlayed) {
                return this.gameCurrentlyPlayed.isGameInProgress();
            }

            return false;
        };

        $timeout($scope.startGame, 0);
    }
]);
So we create a controller using the function with the same name and pass a bunch of dependencies. The $timeout service is used at line 35 to delay the creation of a new game when the controller loads. This was needed because of jQuery SVG. I had to wait for the DOM to be completely rendered before initializing the DrawingService.
Apart from that game creation method, we have the clickCell function that, like I said earlier, fetches the row and column data attributes of the clicked cell (lines 18-19), does the move on the game engine (line 21) and tells the DrawingService to draw the board (line 22).
3.3 The Model layer as services
I decided to create a TicTacToeService even though I new I already had the game engine with the business logic in it. The reason behind that is that I have plan to make a NodeJS back-end to store the player scores and make the game playable real-time using SocketIO. The front-end – back-end communications will be done through this service, that is calling remotely the game engine methods and functions.
TicTacToeService.js
TicTacToe.service("TicTacToeService", function () {
    var game;

    this.makeNewGame = function() {
        console.log("Initializing game in service...");
        this.game = new TicTacToeGame();
        return this.game;
    };
});
No need to explain, right? Then, I needed way to draw the crosses and circles on the grid. I implemented that in a service called the DrawingService.
DrawingService.js
TicTacToe.service("DrawingService", function () {
    var CELL_PADDING = 15;

    this.initialize = function (ticTacToeBoard) {
        console.log("Initializing DrawingService...");
        $(".cell").height($(".cell").width());
        $("#descriptionJumbotron").height($(".grid").height() - 45);

        this.ticTacToeBoard = ticTacToeBoard;
        this.grid = [];

        for (var row = 0; row < 3; row++) {
            this.grid.push([]);

            for (var column = 0; column < 3; column++) {
                var cellUIComponent = $(".cell[data-row='" + row + "'][data-column='" + column + "']");
                cellUIComponent.svg();
                this.grid[row][column] = cellUIComponent;
            }
        }

    };

    this.getCellAt = function (row, column) {
        this.grid[row][column].hide();
    };

    this.drawBoard = function () {
        for (var row = 0; row < 3; row++) {
            for (var column = 0; column < 3; column++) {

                var cellUIComponent = this.grid[row][column];
                var cellInGame = this.ticTacToeBoard.getCell(row, column);
                var cellSVG = cellUIComponent.svg('get');

                cellSVG.clear();
                if (cellInGame === "X") {
                    drawCross(cellSVG, cellUIComponent);
                } else if (cellInGame === "O") {
                    drawCircledrawCross(cellSVG, cellUIComponent);
                }
            }
        }
    };

    var drawCross = function (cellSVG, cellUIComponent) {
        cellSVG.line(null, CELL_PADDING, CELL_PADDING,
                     cellUIComponent.width() - CELL_PADDING,
                     cellUIComponent.height() - CELL_PADDING, {
            stroke: 'red',
            strokeWidth: 5
        });

        cellSVG.line(null, cellUIComponent.width() - CELL_PADDING, CELL_PADDING,
                     CELL_PADDING, cellUIComponent.height() - CELL_PADDING, {
            stroke: 'red',
            strokeWidth: 5
        });
    };

    var drawCircle = function (cellSVG, cellUIComponent) {
        cellSVG.circle(cellUIComponent.width() / 2,
                       cellUIComponent.height() / 2,
                       cellUIComponent.width() / 2 - CELL_PADDING, {
            fill: 'white',
            stroke: 'blue', strokeWidth: 5
        });
    };

    return this;
});
To me, drawing is business logic and has to go in a service even though it really tight to the view. A factory would probably have been better in case I would like to draw with another plugin than jQuery SVG. There is also place for a template method pattern with drawCross and drawCircle.
If you pay a close attention, I made a really tight link with the template around the grid that I should absolutely remove. $("#descriptionJumbotron").height($(".grid").height() - 45); is a hack because I set the height of the cells dynamically based on their width. The jumbotron div beside the grid needed to be resized as well.
4. The grid directive
Angular is meant to make you feel like you are doing HTML. With directive, we can create new components as if it was pure HTML. To demonstrate this, I decided to create a grid directive.
GridDirective.js
TicTacToe.directive('grid', function () {
    return {
        restrict: 'E',
        templateUrl: 'tmpl/grid.html'
    }
});
The restrict: 'E' property tells Angular to look for the grid directive only in the elements, the tag name itself. This will simply replace the code of the new <grid> tag with the content of the view template as defined by templateUrl: 'tmpl/grid.html'.
In this case, the code to include the grid is the following:
index.html
<div class="container" ng-app="TicTacToe" ng-controller="TicTacToeController">
    <grid/>
</div>
5. Conclusion
In part 2 of this series, I will show you how I added bower for dependencies management and grunt for compilation and packaging. I will also show you how we can compile SASS to CSS with grunt. If you have any questions or comments, feel free to send me a tweet @syl20TOS!
6. Download
You can download the full source code of this example here: Angular MVC Tutorial

thank you
You’re welcome! If you have any question, feel free to email me.
I found the url to this webpage….very good. Can you post the urls for part 2 and part 3 ? Thanks.
Hey Miquel, thanks for the comment :) The part 2 is here and is about the development environment.
https://www.webcodegeeks.com/javascript/angular-js/angularjs-mvc-tutorial-part-2-bower-sass-grunt/
Part 3 has not yet been written.