Automation testing has become an integral part of the Agile way of software development. As the application grows, it becomes crucial to have a reliable testing framework to cope with the development velocity, detect the bugs at an early stage, and ensure quality. However, to achieve greater speed, scalability, wider test coverage, and a better ROI, it becomes important to adopt various testing strategies. WebdriverIO is a JavaScript testing framework extensively adopted by top-companies worldwide to simply and concisely fulfill all their testing needs quickly and efficiently.
Built on top of NodeJS and Selenium Webdriver (W3C WebDriver) API, WebdriverIO supports both web and mobile application testing. Since you are taking your time to read this article, it means you might fall into any of the below categories:
- You might be just starting with WebdriverIO and want to lay the foundation right to build a robust framework for JavaScript testing.
- You are already using WebdriverIO and seeking out how to optimize your framework and speed up the JavaScript testing.
- You might be keen on getting some idea on how to level up your JavaScript with Selenium automated testing game and extract more out of the framework.
In this article, we will be trying to cater to each of these requirements and see how to speed up JavaScript testing. With the expectation that at least a few of the tips mentioned here will save your day, let’s get started!
TABLE OF CONTENT
- Best Practices to Adopt While Developing WebdriverIO Framework
- Optimize Your Framework to Speed Up JavaScript Test Execution
- Further Enhancements to Your Test Framework
Best Practices to Adopt While Developing WebdriverIO Framework
Honestly, setting up an automated testing framework is not an easy task, especially when you are using JavaScript with Selenium. But once the foundation is laid right, with timely maintenance, the benefits that can be reaped are limitless.
In this section, we will be discussing some key points that need to be considered, especially if you are just starting up with the WebdriverIO framework setup for JavaScript testing. Let’s look into it!
1.WebdriverIO Version
First and foremost, go for the latest version of WDIO, i.e., currently v6, released in early 2020. According to official documentation, LTS will be provided for v5 till April 2021, and v4 is currently deprecated. Now let’s see some of the desirable features that v6 has to offer.
a) Natively supports Puppeteer
To run a local test case, you are free to switch between Puppeteer and WebdriverIO API as you wish. Also, you won’t need to download the browser driver anymore. With WebdriverIO, you can check if a browser driver is running and accessible at localhost:4444/. In case it doesn’t, check if it uses Puppeteer as a fallback. Being able to access Puppeteer in your tests allows you to:
- Leverage the Chrome DevTools protocol capabilities, with a much richer set of automation features.
- Run commands on Puppeteer much faster. Hence it can help speed up local execution.
b) Performance Improvements
This has been one of the primary design goals of WDIO v6. It has also come with many internal improvements that will speed up test execution and lower CPU and memory usage.
And there’s a lot more. You can always refer to the WebdriverIO official documentation to know more about WebdriverIO v6.
2. Page Object Model (POM)
POM is a framework design pattern widely adopted by Agile practitioners for easy test script maintenance and enhanced code reusability. Implementing an approach like POM will help you efficiently manage your locators, reduce duplication, and make your framework more programmer-friendly.
So even if this directly won’t speed up your execution time, in the long run, the POM approach can save your time spent on creating and maintaining test scripts for JavaScript testing. You can refer to the WebdriverIO Page Object Model page to know more about it.
3. Create Helper Methods
Now, this is also linked with code reusability and ease of maintenance. Fundamentally, the idea is to wrap the code for commonly performed actions – like logging in, clicking on something, waiting for a result, logging out, etc. into a method so that they can be shared and reused by all scripts.
Also, you can add parameters to customize these helper methods to suit various function call needs.
4. Don’t test the same functionality twice
To speed up the testing, we should be strategic in terms of test coverage. Reducing the duplicate and avoidable scenarios directly helps to bring the test case count down.
Needless to explain more, the lower the test case count, the faster the execution result.
5. Avoid Hardcoding URLs
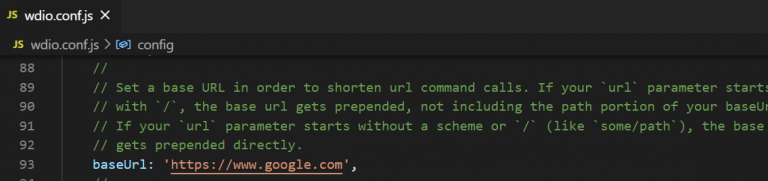
In WebdriverIO, we have a configuration file wdio.conf.js, which aids us in specifying the location of the tests, frameworks you want to use, reporters, browsers, and all other general configs of the project.
Another useful option is to configure the baseUrl of the application here so that we don’t need to specify it every time in our test scripts.
But generally, in most cases, we might need to run the application in multiple environments like – development, QA, staging, production, etc., each having different URLs. In that case, we can easily configure the URLs by declaring an environment variable and passing the detail of the environment/URL in which the test should run along with the test run command.
The configuration steps are briefly explained below:
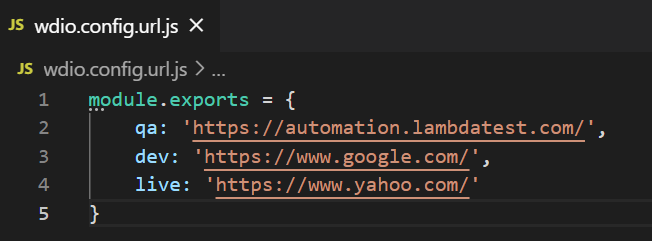
Step 1: Create a separate file to maintain the URLs and export them. Here we have created a file named ‘wdio.config.url.js’ (Give any name of choice)
Step 2: The remaining settings are to be done in the wdio.conf.js file. First of all, require the URL file.
1 | const urls = require('./wdio.config.url') |
Step 3: Create an environment variable to pass the URL values.
1 | const ENV = process.env.ENV |
Step 4: Create a condition to check if the value passed for ENV is valid.
1 2 3 4 | if (!ENV || !['qa', 'dev', 'live'].includes(ENV)) { console.log('Invalid environment! Please select : ENV=qa|dev|live') process.exit()} |
Step 5: Now, inside exports.config change the baseUrl to match the environment variable.
1 | baseUrl: url[process.env.ENV], |
Step 6: That’s pretty much it. Now along with the test run command, pass the value for ENV.
1 | npm run test ENV=dev |
Here, the URL for DEV will be mapped, and the test starts running. If any invalid value is passed or the value of ENV is skipped, corresponding logs will be generated as per the check condition we created.
6. Writing a good test script
Finally, it all comes to writing a good test script. Following are a few good practices that you can adopt while designing your test script while performing JavaScript testing.
- Writing only one test case in a test file. This helps in keeping the test cases independent of each other, analyzing failure, and also aids in parallel testing.
- Keeping it short or atomic. Reduce the number of steps to below 20 (there is no golden rule). Make use of helper methods.
Optimize Your Framework to Speed Up JavaScript Test Execution
So far, we have covered some of the best practices that can be adopted while developing the automated testing framework. Here, we will be discussing how we can optimize the WebdriverIO framework to speed up JavaScript testing while using JavaScript with Selenium.
Let’s look into some possible factors that can slow down the testing and methods that can be adopted.
1. Parallel Testing
As the application features grow, so does the test count. It becomes more and more vital to enhance the execution speed and reduce overall execution time. One way of achieving this is through parallel testing, i.e., running your test scripts concurrently.
To enable parallel testing, adjust the maxInstances property in your config file. See the below sample code.
01 02 03 04 05 06 07 08 09 10 11 12 | exports.config = { // ... // set maxInstance for all browser maxInstances: 3, // ... capabilities: [{ browserName: 'firefox' }, { browserName: 'chrome' }], // ... } |
Here the maxInstances is set to 3, and 2 capabilities are mentioned (Chrome, Firefox). The math is simple. The WDIO test runner will spawn 6 processes, i.e., 3 test files will run simultaneously in the 2 browsers. You can adjust the values according to your requirements.
2. Disabling screenshots
Screenshots are often our saviors when it comes to debugging. But it also comes with the cost of execution time and slowing down your tests. Hence, the suggestion is to enable screenshots only when test failure occurs instead of taking screenshots for each and every step.
This WebdriverIO official documentation on the screenshot will guide you on how to implement this using Hooks.
3. Error Logging
Configuring error logging doesn’t have any direct impact on execution speed up. However, the idea is to enable logs only when some error occurs, hence keeping the log data more relevant, assisting us in quick debugging.
The level of logging verbosity can be set in the wdio.conf.js file.

4. Use the right wait methods
WebdriverIO provides us with various methods to assert wait in the program. It’s good to have an idea about which is to be used when and most importantly, which to avoid.
a) pause()
This method pauses execution for a specific amount of time. To avoid flaky test results, it is recommended not to use this command to wait for an element to show up, a page to load, or an action to happen. It is better to use commands like waitUntil, waitForExist, or other waitFor* commands.
1 | browser.pause(milliseconds) |
b) waitUntil()
This wait command is your universal weapon if you want to wait on something. It expects a condition and waits until that condition is fulfilled with a truthy value.
1 | browser.waitUntil(condition, { timeout, timeoutMsg, interval }) |
c) waitFor*
WebdriverIO offers many waitFor APIs, which helps to wait until an element is displayed, exists, clickable, etc.
- waitForClickable
- waitForDisplayed
- waitForEnabled
- waitForExist
Using the waitUntil() or waitFor* methods will make the script performance better. As the elements can be accessed as soon as they are available, and no extra waiting time is required.
Do check out the official WebdriverIO API documentation for more information.
5. Use headless browsers and drivers
A headless browser is a browser that does not have a user interface. Headless testing is a way of running your test cases without browser UI, making your script run faster. This is an option you can consider if you don’t need a real browser for testing or using CI/CD.
And no need to worry! You will still be able to capture screenshots and see how your application looks in headless mode. Debugging can be done as effectively. In WDIO, by adding a few arguments in your config file, you can adopt the headless version of your favorite browser.
a) For Firefox
1 2 3 4 | browserName: 'firefox','moz:firefoxOptions': { args: ['-headless']}, |
b) For Chrome
1 2 3 4 | browserName: 'chrome', 'goog:chromeOptions': { args: ['--headless', '--disable-gpu'] } |
Further Enhancements to Your Test Framework
WebdriverIO is an extremely feature-rich framework that provides tight integration with various services. This includes Jenkins, Bamboo, along with Docker for CI/CD implementations, Applitools for Visual Testing, LambdaTest for Cross Browser Testing, etc. In this section, we will talk about a few of the widely executed strategies while using JavaScript with Selenium that will level up your automated JavaScript testing.
1) Automation Testing using CI/CD Pipeline
To achieve speedy delivery with feedback on quality, it is crucial to integrate the automated testing into the CI/CD (Continuous Integration/Continuous Delivery) pipeline. This helps in enabling Continuous Testing.
WebdriverIO provides tight integration with CI systems like Jenkins. Being open-source, Jenkins is widely preferred in the automation testing world. With some quick and easy steps, Jenkins integration can be achieved in your WebdriverIO framework. Do check out the Jenkins official guide for Jenkins set-up!
Another favored strategy is to integrate Jenkins with container technologies like Docker. With the advent of Docker, practically all necessary application dependencies can be containerized. With this WDIO-Docker service, you may run your application container in your CI and in complete isolation.
2) Cross Browser Testing with Selenium Grid
To stay ahead in a highly competitive market, it is our duty as testers to ensure the application’s quality in all scenarios, i.e., the app should behave as expected across all platforms, browsers, and devices without crashing. This is where test coverage and cross browser testing comes into the picture.
When it comes to distributed test execution, Cloud Selenium Grid is always a good call. It can run test cases on different versions of browsers and different operating systems simultaneously. While using JavaScript with Selenium, you can use Selenium Grid along with the right cloud-based solution provider for cross browser testing. This could be an optimal strategy that you can deploy to assure quality.
LambdaTest is a popular cloud-based platform that provides you access to 2000+ browsers for both mobile and desktop to help you gain the maximum test coverage during the automated browser testing. Moreover, you can choose from a wide range of Windows and Mac operating systems, along with all legacy and latest browsers.
WedriverIO provides you service to seamlessly integrate LambdaTest into your framework through a few quick and easy steps. Let’s take a look!
Step 1: In your project terminal, give the following command to save LambdaTest service as a devDependency.
1 | npm i wdio-lambdatest-service --save-dev |
Step 2: Create a free account or log in to your LambdaTest account and fetch your unique username and access key. You can fetch the details from the Profile section.
Step 3: Now let’s make some edits to the config file. In your wdio.conf.js file
01 02 03 04 05 06 07 08 09 10 11 12 13 14 15 16 17 18 19 20 21 22 23 24 25 26 27 | user= process.env.LT_USERNAME || "myusername",key= process.env.LT_ACCESS_KEY || "1234567890", exports.config = { user, key, logFile : './logDir/api.log', services: [ ['lambdatest', { tunnel: true }] ], hostname: 'hub.lambdatest.com', path: '/wd/hub', port: 80, capabilities: [{ build: ‘WebdriverIO-RemoteSelenium-Test’ maxInstances: 5, browserName: 'chrome', acceptInsecureCerts: true, network: true, video: true, visual: true, console: true }], |
These are the additional configurations to be done:
- Pass your access token and user details by creating two variables, user and key.
- Set the tunnel as true to enable routing connections from LambdaTest cloud through your computer.
- Set the hostname corresponding to LambdaTest
- Optionally, you can also enable report formats like video recording, console, network logs, etc., to be true.
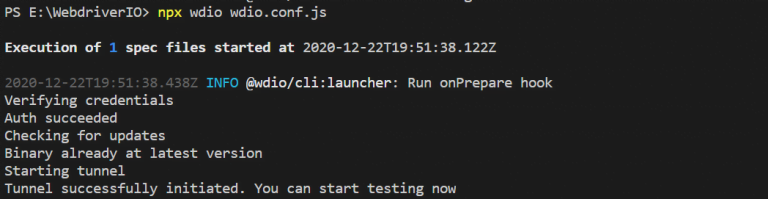
Step 4: Run your tests. Use the command appropriate to you.
1 | npx wdio wdio.conf.js |
The test starts running, and logs can be observed in the terminal.
To observe live running status, go to your Automation dashboard in LambdaTest.

We can analyze individual test run reports from Automation Logs.

We have successfully run our test cases using an automated cross browser testing solution provided by LambdaTest through a hassle-free experience!
Conclusion
Automation was introduced to accelerate the testing process and identify development bugs at the early stage. More and more companies are coming out from the shell of the traditional way of manual testing and adopting a more “shift left” approach focusing on how to leverage the benefits of automated testing in their development process.
In this article, we have looked into some of the best practices to adopt for building a robust framework using WebdriverIO while using JavaScript with Selenium. We have also discussed various methods to optimize the performance by not only reducing execution time by speeding up the test but also debugging as well as maintenance time.
Additionally, we have also covered a few of the best strategies to stay ahead, like CI/CD implementation and cross browser testing. Empowered by LambdaTest, we utilized a cloud-based solution for remote Selenium Grid to achieve parallel cross browser testing across multiple platforms.
Hopefully, this blog will enable you to optimize your framework and speed up testing. If you wish to optimize your web application quality by unlocking coverage in a wider variety of platforms or browsers or versions, please feel free to explore the LambdaTest platform.
Happy Testing!
Published on Web Code Geeks with permission by Harita Ravindranath, partner at our WCG program. See the original article here: How To Speed Up JavaScript Testing With Selenium and WebDriverIO? Opinions expressed by Web Code Geeks contributors are their own. |
