Tables are one of the things that we use extensively in our everyday life for a number of reasons. They are easy to understand and help us manipulate our data by putting everything into rows and columns. If you’re keen on notebooks, you just draw the tables in them. If you want them on your website? You code them in, of course! How to do that in Javascript? Let’s see!
1. Getting familiar with tables
We are all familiar with tables as a concept, but how do we program them? Where exactly do we start? First of all let’s explain the elements that we’d use in order to make it easier for us to code and manipulate them later on. A table is constructed by a caption, a table head (you’ll find it as thead most of the time so we’ll use that as to not get confused), a tbody and a tfoot. It can only have one of each of these, except for the tbody which can be whatever number you want them to. If you don’t specify how many tbodies you need, the cells and rows will all be placed in the tbody the DOM provides regardless of you specifying it or not. If it seems a bit intrusive on DOM’s part, you’ll just have to go with it, otherwise we’d have no table at all, so it’s for our best!

Each of these have their own text nodes, which can be directly dependent on them (as it happens with captions), or organized in cells and rows in the case of
thead, tbody and tfoot. These nodes will be where we place the text we want to display using the table. The picture below would give us a general impression of how the browser would render the table.
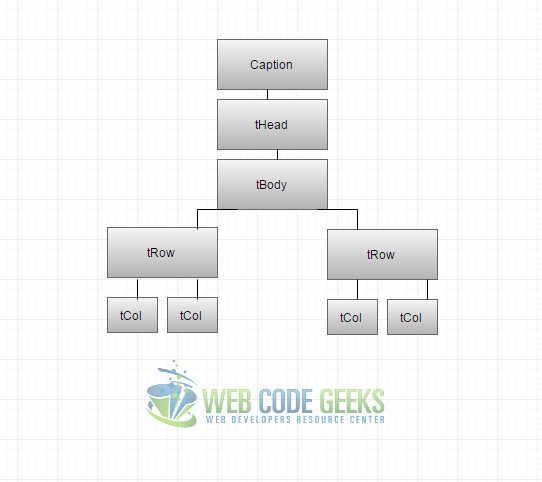
As you can see, here we’ve only used a single tbody, which in turn contains two rows. Each row contains two cells which will contain the text. However, you can alter the number of these components to your liking. Additionally, some of these components come with their own methods. For caption, thead and tfoot we have methods such as createCaption(), deleteCaption(), createTFoot(), deleteTFoot(), createTHead(), and deleteTHead() in our disposal, whose functions are pretty self-explanatory. We didn’t mention tbody because you’ll have to create you own methods for that. We’ll show you how later on.
Cool, but how to create tables? Let’s get on to it right away!
2. Creating Tables
It’s very easy to create tables, whether it’s by using HTML only or by using also Javascript. We’ll show you both ways, and you can choose whichever you like best for you own project.
2.1 Creating Tables using only HTML
Originally, tables were created only by using HTML code, but that was replaced very fast by Javascript. That is because while this way of creating them is fairly easy, it can be annoying when the dimensions of the tables grew. And you might remember that at one point even the webpages were constructed based on tables to take advantage of their grid system effect. But let’s see how we can do that by taking a look at the code snippet below:
index.html
<!DOCTYPE html>
<html lang="en">
<head>
    <meta charset="UTF-8">
    <title>Tables</title>
</head>
<body>

<table border="1"
       summary="">
    <caption><em>Test table</em></caption>

    <tr><th rowspan="2"><th colspan="2">Average
        <th rowspan="2">Green<br>eyes

    <tr>
        <th>height</th>
        <th>weight</th>
    </tr>
    <tr>
        <th>males</th>
        <td>183cm</td>
        <td>65kg</td>
        <td>40%</td>
    </tr>
    <tr>
        <th>females</th>
        <td>170cm</td>
        <td>54kg</td>
        <td>35%</td>
    </tr>
</table>

</body>
</html>
Now let’s explain what we did there. You already know what all the content within the <head> tags mean, which would be just the title and standard stuff that make a valid HTML Document. What is of interest to us is the content of the <body> tag. As you see, we’ve simply built a table using all the tags that me mentioned. We used <table> to define our table, <caption> whose content would give us the caption of the table. The latter one can be placed right below the opening tag of the table or just before the ending one. That is to your preference completely.
After doing that we’ve used <tr> to divide our table into rows, inside of which we have placed the <th> and <td> for the theads and text cells (or tdata) respectively.
It’s fairly easy when the tables we want to built are this small, but what if they become a little bigger and more complex? To avoid making everything a mess, we use Javascript.
2.2 Creating Tables using Javascript
If you know the general structure of the tables, like the one we explained in the first section, then you’ll find this part very easy. There’s a common rule that is used for this usually, which goes like this: you start to create each element starting from the bigger container, and append them starting with the smaller one.
That means that the first element we create is the <table>. After that we create the <tbody> and moreover we create <tr> elements using a loop to do that. You guessed right, those are contained in the <tbody> element and we can easily create a number of them just by changing the loop conditionals. Inside each <tr> we create a number of <td> elements, again, using a loop to do it.
Then we start appending the elements we created to one another in the opposite direction. We start with attaching the <td> elements to their parent <tr>, and the latter to their containing <tbody>. Lastly, we append the <tbody> to the <table> and our table is finally appended to the <body> of our HTML document. Let’s see it in action:
index.js
var body = document.getElementsByTagName("body")[0];


  var ourTable     = document.createElement("table");
  var ourTableBody = document.createElement("tbody");


  for (var i = 0; i < 4; i++) {

    var row = document.createElement("tr");

    for (var j = 0; j <2; j++) {


      var cell = document.createElement("td");
      var cellText = document.createTextNode("cell in row "+i+", column "+j);
      cell.appendChild(cellText);
      row.appendChild(cell);
    }


    ourTableBody.appendChild(row);
  }


  ourTable.appendChild(ourTableBody);

  body.appendChild(ourTable);

  ourTable.setAttribute("border", "2");
It’s pretty evident if you keep in mind the rule we mentioned above, right? Usually all this code snippet is placed inside a function wrapper which is triggered so that our table is created. Also, you can add whatever attributes or other table parts necessary to your table, this was only a very basic one just to illustrate what we meant.
3. Table Attributes
The table object used to come with a number of attributes, many of which became deprecated after HTML5, since they’re no longer useful as they’re replaced with other methods with the same function. The attributes that are still in usage are: caption, tFoot and tHead.
caption– returns the contents of the caption element of the tabletHead– returns a reference to the thead element of the tabletFoot– returns a reference to the tfoot element of the table
Some of the attributes that are deprecated but replaced with other methods are:
align– sets or returns the alignment of the table regarding the surrounding text. Replaced bystyle.cssFloat.background– sets or returns the background of the table. Replaced bystyle.background.border– sets or returns the width or the table border. Replaced bystyle.border.frame– sets or returns the outer borders that should be displayed.height– sets or returns the height of the table. Replaced bystyle.height.summary– sets or returns a long description of the table
There are a number of other useful attributes, which you can use according to the needs of your webpage.
4. Changing the border width of the table
In this section we will teach you to set the border width of your table, since, as we mentioned above, the attribute related to it was discarded. You can follow the same example for every other attribute related to style such as the background color, or the alignment of the table, as the procedure is essentially the same. Take a look at the code below:
index.js
function set_border() {

    myBody = document.getElementsByTagName("body")[0];

    myBodyElements = myBody.getElementsByTagName("table");

    myTable = myBodyElements[0];
    myTable.style.border = "10px";
  }
What we’ve done here is create a function that when triggered will change the border size of the table. First we get the <body> element by it’s tag name and then in the same way go to the table whose border size we want to adjust. In case you want to reach another element inside the table such as a single row or cell you can get them in the same way. After fixing in place the element we want we use the style.border method to just change it, by giving it a value. Simple, right?
5. Download the source code
This was an example of Tables in Javascript.
You can download the full source code of this example here: Tables
