Looking at the popularity of React, I thought of learning it and creating a simple UI which will render data from RESTful service.
With this post, I will try to replicate the steps I followed while writing it along with references. Before starting, let me give you a brief introduction about React.
What is React?
React is a declarative, efficient, and flexible JavaScript library for building user interfaces. It uses virtual DOM which improve apps performance since JavaScript virtual DOM is faster than the regular DOM with a limitation that it only covers view layer of the app so you still need to choose other technologies to get a complete tooling set for development.
Now, lets’ start with creating react-app running on port 8080, following below steps:
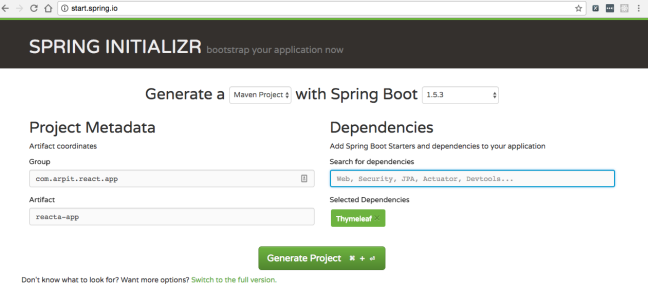
Step 1: Go to start.spring.io and create a new project react-app adding the Thymeleaf starters, based on the following image:
Step 2: Edit ReactAppApplication.java to add a method which returns a list of employee, as follows:
package com.arpit.react.app;

import java.util.ArrayList;
import java.util.List;
import org.springframework.boot.SpringApplication;
import org.springframework.boot.autoconfigure.SpringBootApplication;
import org.springframework.stereotype.Controller;
import org.springframework.web.bind.annotation.GetMapping;
import org.springframework.web.bind.annotation.RestController;

@SpringBootApplication
@RestController
public class ReactAppApplication {

	public static void main(String[] args) {
		SpringApplication.run(ReactAppApplication.class, args);
	}

	@GetMapping("/employee/get")
	public List<Employee> get() {
		List<Employee> employeeList = new ArrayList<>();
		employeeList.add(new Employee(1, "Arpit", "IT"));
		employeeList.add(new Employee(2, "Sanjeev", "IT"));
		return employeeList;
	}
}

@Controller
class IndexPageController {

	@GetMapping(value = "/")
	public String index() {
		return "index";
	}
}

final class Employee {

	private int id;
	private String name;
	private String department;

	public Employee() {

	}

	public Employee(final int id, final String name, final String department) {
		this.id = id;
		this.name = name;
		this.department = department;
	}

	public int getId() {
		return id;
	}

	public void setId(int id) {
		this.id = id;
	}

	public String getName() {
		return name;
	}

	public void setName(String name) {
		this.name = name;
	}

	public String getDepartment() {
		return department;
	}

	public void setDepartment(String department) {
		this.department = department;
	}
}
IndexPageController define index() method flagged by @GetMapping(value = “/”) to support the / route. It returns index as the name of the template, which Spring Boot’s autoconfigured view resolver will map to src/main/resources/templates/index.html.
Step 3: Define an HTML template src/main/resources/templates/index.html with the following content:
<!DOCTYPE html>
<html xmlns:th="http://www.thymeleaf.org">
<head lang="en">
<meta charset="UTF-8" />
<title>React with Spring REST</title>
</head>
<body>
	<div id="react"></div>
	<script src="package/script.js"></script>
</body>
</html>
Step 4: Move to react-app directory and run command: mvn spring-boot:run. Once running open http://localhost:8080/employee/get which will give you the list of employees we are going to render on UI built with React.
Step 5: Next we will add frontend-maven-plugin in pom.xml to install Node and NPM locally for the react-app followed by running Webpack build, as follows:
<plugin>
				<groupId>com.github.eirslett</groupId>
				<artifactId>frontend-maven-plugin</artifactId>
				<version>1.2</version>
				<configuration>
					<installDirectory>target</installDirectory>
				</configuration>
				<executions>
					<execution>
						<id>install node and npm</id>
						<goals>
							<goal>install-node-and-npm</goal>
						</goals>
						<configuration>
							<nodeVersion>v4.4.5</nodeVersion>
							<npmVersion>3.9.2</npmVersion>
						</configuration>
					</execution>
					<execution>
						<id>npm install</id>
						<goals>
							<goal>npm</goal>
						</goals>
						<configuration>
							<arguments>install</arguments>
						</configuration>
					</execution>
					<execution>
						<id>webpack build</id>
						<goals>
							<goal>webpack</goal>
						</goals>
					</execution>
				</executions>
</plugin>
Step 6: Execute npm init in the root directory to create package.json in which we specify all the dependencies required to build our react-app like React, React DOM, Webpack, Babel Loader, Babel Core, Babel Preset: ES2015, Babel Preset: React, as follows:
$ cd react-app
$ touch npm init
Copy the following content:
{
  "name": "react-app",
  "version": "1.0.0",
  "description": "Rendering RESTful service with React",
  "repository": {
    "type": "git",
    "url": "git@github.com:arpitaggarwal/react-app.git"
  },
  "keywords": [
    "rest",
    "spring",
    "react"
  ],
  "author": "Arpit Aggarwal",
  "dependencies": {
    "axios": "^0.16.1",
    "react": "^15.3.2",
    "react-dom": "^15.3.2",
    "webpack": "^1.12.2"
  },
  "scripts": {
    "watch": "webpack --watch -d"
  },
  "devDependencies": {
    "babel-core": "^6.18.2",
    "babel-loader": "^6.2.7",
    "babel-polyfill": "^6.16.0",
    "babel-preset-es2015": "^6.18.0",
    "babel-preset-react": "^6.16.0"
  }
}
Step 7: Next we will create webpack.config.js to configure webpack, as follows:
$ cd react-app
$ touch webpack.config.js
Copy the following content:
var path = require('path');

module.exports = {
    entry: './app/main.js',
    cache: true,
    debug: true,
    output: {
        path: __dirname,
        filename: './src/main/resources/static/package/script.js'
    },
    module: {
        loaders: [
            {
                test: path.join(__dirname, '.'),
                exclude: /(node_modules)/,
                loader: 'babel',
                query: {
                    cacheDirectory: true,
                    presets: ['es2015', 'react']
                }
            }
        ]
    }
};
entry option specified above is the entry point for the bundle.
cache option specified above Cache generated modules and chunks to improve performance for multiple incremental builds.
output option specified above tell Webpack how to write the compiled files to disk.
For more configuration options you can explore here.
Step 8: Next we will create entry point for the webpack which is react-app/app/main.js, as:
$ cd react-app
$ mkdir app
$ cd app
$ touch main.js
Copy the following content:
'use strict';
const React = require('react');
const ReactDOM = require('react-dom')

import ReactApp from './components/react-app.jsx'

ReactDOM.render(
		<ReactApp />,
	document.getElementById('react')
)
React is the main library from Facebook for building the app.
ReactDOM provides DOM-specific methods that can be used at the top level.
ReactApp is the top level container for all React components.
Let’s define ReactApp along with it’s child components, as:
$ cd react-app/app/
$ mkdir components
$ cd components
$ touch react-app.jsx employee-list.jsx employee.jsx
react-spring/app/components/react-app.jsx
'use strict';
const React = require('react');
var axios = require('axios');

import EmployeeList from './employee-list.jsx'

export default class ReactApp extends React.Component {

	constructor(props) {
		super(props);
		this.state = {employees: []};
		this.Axios = axios.create({
		    baseURL: "/employee",
		    headers: {'content-type': 'application/json', 'creds':'user'}
		});
	}

	componentDidMount() {
		let _this = this;
		this.Axios.get('/get')
		  .then(function (response) {
		     console.log(response);
		    _this.setState({employees: response.data});
		  })
		  .catch(function (error) {
		    console.log(error);
		  });
	}

	render() {
		return (
				<div>
				  <EmployeeList employees={this.state.employees}/>
		        </div>
			)
	}
}
react-spring/app/components/employee-list.jsx
const React = require('react');
import Employee from './employee.jsx'

export default class EmployeeList extends React.Component{

    render() {
		var employees = this.props.employees.map((employee, i) =>
			<Employee key={i} employee={employee}/>
		);

		return (
			<table>
				<tbody>
					<tr>
						<th>ID</th>
						<th>Name</th>
						<th>Department</th>
					</tr>
					{employees}
				</tbody>
			</table>
		)
	}
}
react-spring/app/components/employee.jsx
const React = require('react');

export default class Employee extends React.Component{
	render() {
		return (
			<tr>
				<td>{this.props.employee.id}</td>
				<td>{this.props.employee.name}</td>
				<td>{this.props.employee.department}</td>
			</tr>
		)
	}
}
With all this in place, your directory structure should look like:
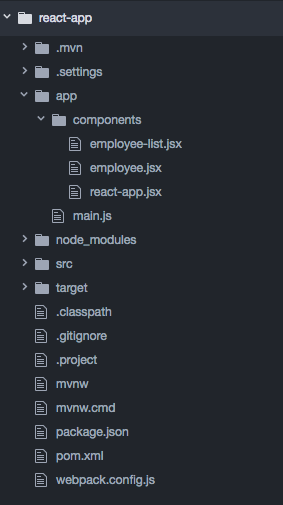
Now re-run the application and visit http://localhost:8080.
Complete source code is hosted on github.
| Reference: | Rendering RESTful service with React from our WCG partner Arpit Aggarwal at the Arpit Aggarwal blog. |
