Radio buttons are one of the basic HTML forms elements, similar to checkboxes but restricting the selection to an only choice. The most typical examples of this are the yes/no or gender questions, or any other type of quizzes. In this tutorial we will see how to deal with these with PHP.
For this example, we will use:
- Linux Mint (17.03) as Operating System.
- Apache HTTP server (2.4.7).
- PHP (5.5.9).
You may skip environment preparation and jump directly to the beginning of the example below.
1. Preparing the environment
Below, commands to install Apache and PHP are shown:
sudo apt-get update
sudo apt-get install apache2 php5 libapache2-mod-php5
sudo service apache2 restart
Note: if you want to use Windows, installing XAMPP is the fastest and easiest way to install a complete web server that meets the prerequisites.
2. HTML form
Before the PHP part, we first have to understand how radio inputs work. For this, let’s create a simple form like the following:
form.html
<!DOCTYPE html>
<head>
    <meta charset="UTF-8">
    <title>HTML form</title>
    <style>
        html {
            width: 30%;
        }
        .form-input {
            margin-bottom: 20px;
        }
    </style>
</head>
<body>
    <form method="GET" action="process.php">
        <div class="form-input">
            <label for="name">Your name</label>
            <input type="text" name="name" id="name" required>
        </div>
        <div class="form-input">
            <fieldset>
                <legend>Gender</legend>
                <div>
                    <input type="radio" name="gender" id="male" value="Male" required>
                    <label for="male">Male</label>
                </div>
                <div>
                    <input type="radio" name="gender" id="female" value="Female">
                    <label for="female">Female</label>
                </div>
            </fieldset>
        </div>
        <div class="form-input">
            <fieldset>
                <legend>Favourite programming language</legend>
                <div>
                    <input type="radio" name="programming-language" id="php" value="PHP" required>
                    <label for="php">PHP</label>
                </div>
                <div>
                    <input type="radio" name="programming-language" id="java" value="Java">
                    <label for="java">Java</label>
                </div>
                <div>
                    <input type="radio" name="programming-language" id="c" value="C">
                    <label for="c">C</label>
                </div>
                <div>
                    <input type="radio" name="programming-language" id="other" value="Other">
                    <label for="other">Other</label>
                </div>
            </fieldset>
        </div>
        <div class="form-input">
            <input type="submit" value="Submit">
        </div>
    </form>
</body>

</html>
For which the browser will generate the following rendering:
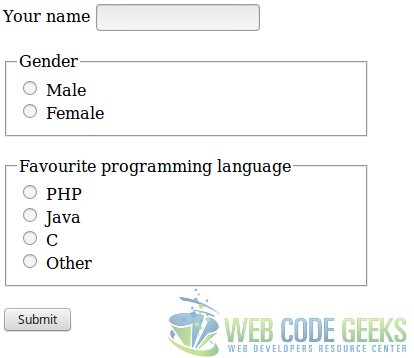
Even if you probably already are familiar to forms with radio buttons, there are a couple of things we have to mention:
- Each “radio group” is formed with the radio buttons that have the same
nameattribute value. - If a radio group’s button is required, is enough to add the
requiredattribute only to one of the buttons of the group.
3. Form handling
Handling forms with radio buttons does not differ in any way from other forms.
We have set the form method to GET to see how the data is submitted. This is an example of the data generated for a submission:
process.php?name=Julen&gender=Male&programming-language=PHP
That is, the value of the selected radio button is set to the name of the group it belongs to.
Let’s see how to process this form with a PHP script.
process.php
<?php

/**
 * Checks if the given parameters are set. If one of the specified parameters
 * is not set, die() is called.
 *
 * @param $parameters The parameters to check.
 */
function checkGETParametersOrDie($parameters) {
    foreach ($parameters as $parameter) {
        isset($_GET[$parameter]) || die("'$parameter' parameter must be set.");
    }
}

/**
 * Prints the submitted data.
 *
 * @param array $data The form data, with $name => $value format.
 */
function printData($data) {

    echo 'You have submitted the form with the following data:<br>';
    echo '<ul>';

    foreach ($data as $name => $value) {
        echo "<li>$name: <b>$value</b></li>";
    }

    echo '</ul>';
}

// Flow starts here.

checkGETParametersOrDie([
    'name',
    'gender',
    'programming-language'
]);

$name = $_GET['name'];
$gender = $_GET['gender'];
$programmingLanguage = $_GET['programming-language'];

printData([
    'Name' => $name,
    'Gender' => $gender,
    'Favourite programming language' => $programmingLanguage
]);
As you can see, the way of retrieving the data of radio buttons is the same as with other input types (lines 41, 42).
So, for the previous group data, the generated output would be the following:
You have submitted the form with the following data:
- Name: Julen
- Gender: Male
- Favourite programming language: PHP
4. Generating radio button structures dynamically
It’s worth mentioning how to generate radio button structures dynamically with PHP. This can be achieved with a simple function that parses a $group => $values array for generating the radio buttons, like with the following:
generate_radiobuttons.php
<?php

/**
 * Generates radio buttons groups HTML, for group => values structures, wrapping
 * each group in a fieldset.
 *
 * @param array $data The data to create the radio buttons for.
 * @return array The generated radio buttons.
 */
function generateRadioButtons($data) {
    $radioButtons = '';

    foreach ($data as $group => $values) {
        $radioButtons .= '<fieldset>';
        $radioButtons .= "<legend>$group</legend>";

        foreach ($values as $value) {
            $radioButtons .= '<div>';
            $radioButtons .= "<label for='$value'>$value</label>";
            $radioButtons .= "<input type='radio' name='$group' id='$value' value='$value'>";
            $radioButtons .= '</div>';
        }

        $radioButtons .= '</fieldset>';
    }

    return $radioButtons;
}
Grouping each radio group in a fieldset, as we have done in the example of the section 2.
The following input for the function would generate the same radio groups that we have generated for the previous example:
generate_radiobuttons.php
<?php

// ...

$genderButtons = [
    'Gender' => [
        'Male',
        'Female'
    ]
];

$programmingLanguageButtons = [
    'Language' => [
        'PHP',
        'Java',
        'Other'
    ]
];

$radioButtons = generateRadioButtons($genderButtons + $programmingLanguageButtons);

echo $radioButtons;

echo 'Generated HTML code:<br>';
echo "<xmp>$radioButtons</xmp>";
Generating the same output we have seen in section 2.
5. Summary
In this example we have seen how to deal with radio buttons with PHP, which is actually the same as with any other HTML form elements. Apart from that, we have also seen how to generate radio buttons groups dynamically with a simple function, to generate dynamic forms; or maybe to make easier the process of generating a static, generating the HTML code for the radio groups.
6. Download the source code
This was an example of radio buttons with PHP.
You can download the full source code of this example here: PHPRadioButtonExample
