This story started with me wanting to write a steganography tool.
Steganography is the process of hiding information inside a file, typically an image.
To do that, I had to write an image decoder first because you can’t just start changing random bytes. All that will do is make the image invalid or corrupt. I selected PNG as the image format I wanted to work with, and I found the official specification so I could get started writing code. The next thing I needed was a way to parse the binary data from an image into something I could use.
That’s when I remembered watching some conference talk on YouTube where they mentioned a bindata gem. I started reading the documentation and used this binary string as a test: "\x03\x00\x41\x42\x43".
Next, I wrote a class that inherits from BinData::Record. This class reads the first two bytes (\x03\x00) as the string size. With that information, I can tell bindata to read that many bytes and treat them as if they were part of a string.
Here is the class:
class BinaryString < BinData::Record
  endian :little
  uint16 :len
  string :name, :read_length => :len
end
But this was only the beginning of my journey… I spent the next five days learning the PNG format and writing code to decode it. For the rest of this post, I’ll share with you what I learned.
The PNG Format
Most binary file formats start with some “signature bytes,” sometimes also known as “magic numbers.” This allows decoders to quickly identify the type of file they’re dealing with. In the case of PNG, the signature bytes are: “137 80 78 71 13 10 26 10”.
After the signature, the file structure is divided into “chunks” of data. Every chunk has its own structure; in the case of PNG, the chunk structure contains:
- Type
- Length
- Data
- CRC
There are three chunks that must be present on every valid PNG image. They are called “critical chunks.” These are:
- IHDR
- IDAT
- IEND
In the IHDR chunk, you can find all the “metadata” about the image, like the image’s width and height. So the first thing I did was to write a BinData class to read the signature plus the IHDR chunk. That looks something like this:
class PNG_Image < BinData::Record
  endian :big

  array :signature, :type => :uint8, initial_length: 8

  struct :ihdr do
    uint32 :chunk_length
    uint32 :chunk_type

    uint32 :width
    uint32 :height

    uint8  :bit_depth
    uint8  :color_type
    uint8  :compression_method
    uint8  :filter_method
    uint8  :interlace

    uint32 :crc
  end
end
This can take a bit of trial and error to get right, but you only need to do it once and you’ll be able to read the image metadata once you’re done.
In case you are not familiar with this type of notation,
uint32means Unsigned int 32 bits (4 bytes).
Here’s an example:
{
  :signature=>[137, 80, 78, 71, 13, 10, 26, 10],
  :ihdr=>{
    :chunk_length=>13,
    :chunk_type=>1229472850,
    :width=>463,
    :height=>170,
    :bit_depth=>8,
    :color_type=>2,
    :compression_method=>0,
    :filter_method=>0,
    :interlace=>0,
    :crc=>1146376993
  }
}
That’s great, but how do you get to the actual image data? Well, the data is stored in a chunk, just like the image information, so we need to read all the chunks. We have the PNG_Image class, but it’s too specific — it won’t work for parsing the rest of the image.
Here’s a generic chunk class that we can use:
class Chunk < BinData::Record
  endian :big

  uint32 :chunk_length
  uint32 :type

  string :data, :read_length => :chunk_length
  uint32 :crc
end
Now we need to know what chunk we’re working with, but there’s a problem. The PNG specification doesn’t have a list of all the integer values for every chunk type. One possible solution is to print the first 10 chunks &and try to guess what’s what based on the PNG spec.
1649100612
1883789683
1950960965
1229209940
1229209940
1229209940
1229209940
1229209940
1229209940
1229278788
Since the PNG specification says that IDAT chunks have to come one after another, with no other chunk types in the middle, we can guess that ‘1229209940’ represents an IDAT chunk.
The specification also says that the IEND chunk should always come last, so ‘1229278788’ must represent that chunk type.
But what about the other chunk types? According to the specification, they are optional and include things like comments and other data. At this point, they can be ignored.
Knowing this, we can write a loop that parses chunks until the IEND chunk is found. That looks something like this:
loop { chunks << Chunk.read(f); break if chunks.last.type == 1229278788 }Now that we have all the chunks, we can select the IDATA chunks and extract all the data from those. All that data is the image data itself, but we are far from done!
Data Compression
The pixel data in most PNG images is not stored in a raw format, so we still have work to do. The PNG specification mentions that the data is compressed using the specified compression method on the IHDR chunk (where all the metadata is stored). The only “official” compression method right now is the Deflate algorithm.
This is how you can decompress the data using Zlib, which is part of the Ruby standard library.
require 'zlib'

data  = chunks.select { |ch| ch.chunk_type == 1229209940 }.map(&:data).join
data  = Zlib::Inflate.inflate(data)
You could think that at this point we finally have access to the raw pixel data that we can work with… but we’re not done yet! It turns out there is an additional step for us. PNG uses a set of algorithms that the specification calls “filters” in order to improve the compression ratio of the image data.
Recreating the Image
You will learn about filters in the next section of this post, but first let’s check that we put together all the image data and decompressed it correctly. Since we don’t know what the output should look like, the best way to check this is to do everything in reverse and visually check if the image looks like the original.
Another option could be to use
ImageMagickto strip the compression from our example image and then compare the data. Which is something I actually did as part of this process.
Compressing the data is easy:
data = Zlib::Deflate.deflate(data)
Now we need to recreate the image. First, we need the signature and the IHDR chunk.
output = File.open("test-image.png", "w")
header.write(output)
Now we need to write the image data. For simplicity, I decided to use a single IDAT chunk.
Chunk.new.tap do |ch|
  ch.data = data
  ch.crc  = Zlib.crc32("IDAT" + ch.data)

  ch.chunk_length = ch.data.size
  ch.chunk_type   = 1229209940

  ch.write(output)
end
To make this a valid image, we also need an IEND chunk to mark the end of the data.
chunks.last.write(output)
Since the IEND chunk should always be the last one, we can reuse it. Now we should have a new image that you should be able to open with any image viewer.
PNG Filters
The filtering process takes 1 to 3 bytes, does some operation with these bytes, and returns a new byte as a result. There are five filter types, which you can see in this table:
| Type | Name |
|---|---|
| 0 | None |
| 1 | Sub |
| 2 | Up |
| 3 | Average |
| 4 | Paeth Predictor |
If you want to find the filter type, you have to look at the first byte of every scanline. A scanline is one line of pixels.
We need to know what the scanline size is for the image we’re working with. The formula to calculate this is not in the PNG specification, but I found the formula in the source code for another PNG decoder written in C.
The formula is this:
1 + (( png->width * png->channels * png->depth ) + 7) / 8
This will give you the scanline size, which allows you to divide the filtered image data into scanlines and find the filter type bytes.
Now you have to iterate over every scanline, pick the filter byte, and iterate over every byte on that scanline. Inside this loop, we’ll have a case statement like this:
line[1..-1].each_char.with_index do |byte, idx| case filter_type when "\x00" unfiltered_line << byte when "\x01" unfiltered_line << [byte.bytes.first + left].pack("c") when "\x02" unfiltered_line << [byte.bytes.first + get_above(idx, last_line)].pack("c") when "\x03" unfiltered_line << [byte.bytes.first + ((get_above(idx, last_line) + left) >> 1)].pack("c") when "\x04" unfiltered_line << [byte.bytes.first + png_paeth_predictor(left, get_above(idx, last_line), get_above_left(idx, last_line))].pack("c") end endNote that every scanline can use a different filter type. This is known as “adaptive filtering.”
This is the part where I spent most of my time. The first problem was being able to convert the string "\x01" into the correct value and then convert it back to that format. I solved this using the bytes method on string, which returns an array of integers.
"abc".bytes
[97, 98, 99]
Using the pack method, you can convert this array back into a string:
[97, 98, 99].pack("c*")
"abc"
Next I had to figure out how to find the left, above, and above_left bytes. These are required for the different filtering operations. For above and above_left, you need the last scanline, so I saved that into a variable at the end of every line. To find the bytes, you can use the current byte index. For the first line, both values will be 0. For the left byte, you can do a similar thing.
At this point, I ran into two problems. First, the PNG specification made it clear that filters work in a byte-by-byte basis. So I thought that looking one byte to the left was what I needed to do. But while the filtering itself works with bytes, you need to use a pixel-size offset to find the left byte.
The png.c source code I mentioned earlier helped me figure this out again.
left = unfiltered_line[-3].bytes.first if unfiltered_line.size >= 3
The other problem was that I was sourcing the bytes from the original data, but you’re supposed to use the previously unfiltered bytes.
With these things out of the way, we should now have the image pixels, which we can modify and apply the reverse operations to convert back into a proper PNG image. Wow! We had to do a lot of stuff just get access to the raw pixel data. But now we have access to this data, and we can change it.
How Are We Doing?
Are our filtering operations being applied correctly? It’s really hard to tell by just looking at the output, but don’t worry, there is a solution. Just like with the compression step, we can recreate the image and compare it with the original.
The extra step we need to do is to reapply a filter. To keep it simple, we can just use filter type 0 (None). All we have to do is add the byte "\x00" before each scanline.
unfiltered_lines = []
index = 0

# Subtract one byte (filter type)
scanline_length -= 1

loop {
  unfiltered_lines << "\x00" + unfiltered_pixels[index, scanline_length]
  index += scanline_length

  break if unfiltered_lines.last.size < scanline_length
}
You may have noticed the comment that says “subtract one byte.” If you don’t do that, the image will have what looks like a pink triangle on the left. And if you decide to ignore the un-filtering process altogether (or do it wrong), this is what the image looks like:
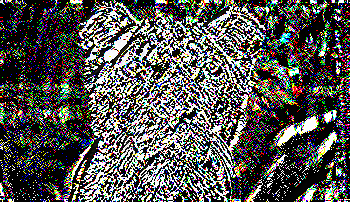
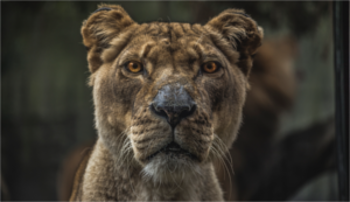
Here is the original for comparison:
Changing Pixels
Now we can mess with the raw pixel data. This means we can change the colors or really do anything we want with it.
The colors are represented in the RGB (Red-Green-Blue) format, with one byte per color. To change a pixel value, we can do this:
x = unfiltered_pixels[i].unpack("B*")

x[0] = "11111111"

unfiltered_pixels[i] = x.pack("B*")
What unpack does is convert a byte into bits. The pack method is the reverse operation:
"\xFF".unpack("B*")
["11111111"]
We’re now ready to start hiding secret messages inside PNG images!
Hiding Data in Images
Steganography is the art of hiding data in an image without visually altering the image (this technique can also be used with video and audio). The easiest thing to hide is a string, so let’s do that!
Where do we put this data? Well we could use a iTXT chunk and save it as a comment. But that would be too easy to find. What we want is to hide the data inside the image itself. This means we have to change the pixels, but how we can do that without altering the image? We can use the Least-Significant Bits (LSB) from every byte.
As you may know, every byte is composed of eight bits, so if we use the lower two bits from every byte, it won’t make a visual difference. So now we need to figure out how we can put our ‘secret’ string in there.
Here is an idea: Convert the string into a stream of bits. We can do that using the unpack method.
"test".unpack("B*")
["01110100011001010111001101110100"]
Here is how you can embed that string inside the image:
secret_string = "01110100011001010111001101110100".scan(/../)

secret_string.size.times do |i|
  x = unfiltered_pixels[i].unpack("B*")

  x[0][-2..-1] = secret_string[i]

  unfiltered_pixels[i] = x.pack("B*")
end
And to recover the secret data:
def recover_text(pixels)
  bits = []

  pixels.size.times do |i|
    x = pixels[i].unpack("B*")
    bits << x[0][-2..-1]
  end

  p Array(bits.join).pack("B*")
end
If we don’t embed some kind of “end marker” in our data, we won’t be able to know when we’re done. What I did was to just read every byte and extract the two last bits of each, but this approach is slow for big images. The challenge is: What if your “end marker” appears inside the string? One possibility could be to use the eighth bit as the marker, because normal English text only needs seven bits (ASCII encoding).
Summary
In this article you learned:
- The basics of steganography
- How to use the
bindatagem to parse binary file formats - How PNG images are structured & how to decode them
If you enjoyed this article, be sure to comment below or share it on your favorite social networks!
| Reference: | Parsing Binary Data Formats from our WCG partner Jesus Castello at the Codeship Blog blog. |
