Docker is, without any doubt, on of the most popular software at the moment, being used by almost every web developer and systems administrator. In this tutorial, we will see how to install it in Ubuntu systems.
For this tutorial, we will use Linux Mint 18 (an Ubuntu based Linux distribution) 64-bit version.
1. Prerequisites
According to Docker documentation, we must meet the following prerequisites for installing Docker:
- 64-bit distro. Obviously, we need a 64-bit microprocessor.
- At least, 3.10 kernel version. In Ubuntu, these versions are present since 13.10, so it shouldn’t be a problem.
Just in case, we can check the kernel version with the following command:
uname -r
Which will show the kernel release. For this case, the output is:
4.4.0-21-generic
Now, let’s see how we can install it.
2. Installation
We can install Docker simply via apt-get, without the need of adding any repository, just installing the docker.io package:
sudo apt-get update
sudo apt-get install docker.io
We can check that Docker has been successfully installed with executing the following:
docker -v
In this case, the following version has been installed:
Docker version 1.11.2, build b9f10c9
We can check if the Docker service was started:
● docker.service - Docker Application Container Engine
   Loaded: loaded (/lib/systemd/system/docker.service; enabled; vendor preset: enabled)
   Active: active (running) since Thu 2016-09-22 12:39:12 CEST; 4min 13s ago
     Docs: https://docs.docker.com
 Main PID: 18883 (docker)
   CGroup: /system.slice/docker.service
           ├─18883 /usr/bin/docker daemon -H fd://
           └─18891 containerd -l /var/run/docker/libcontainerd/docker-containerd.sock --runtime runc --start-timeout 2m
Finally, we can pull an image to check that Docker is working properly. For example, we will pull a BusyBox image:
docker pull busybox
And it should start to download the layers for the image.
Perhaps you got an error similar to the following:
Warning: failed to get default registry endpoint from daemon (Cannot connect to the Docker daemon. Is the docker daemon running on this host?). Using system default: https://index.docker.io/v1/
Cannot connect to the Docker daemon. Is the docker daemon running on this host?
If you got this error, don’t worry, we will see how to fix it in the following subsection.
2.1. Fixing “Cannot connect to the Docker daemon” error
Actually, is not an error itself, is just that the user we are trying to execute Docker with, has no permission to access the Docker service.
This means that, if we try the same command with sudo permissions, we won’t get the error:
sudo docker pull busybox
You will see that the image is being downloaded properly.
If we want to get rid of the sudo permissions for using Docker, we just have to add the user in question to the docker group, created by Docker during the installation. We can check that, effectively, the user we are working with is not in the group:
groups $(whoami)
And we will see that the docker group is not in the list. To add it, we can simply execute:
sudo usermod $(whoami) -G docker -a
(The -G option is for secondary groups; and the -a is for appending to the existing ones).
If we check again the groups, we will see that now the docker group is in the list. But, before anything, we have to restart the session, to make the change work.
After re-logging in again, we will see that we can run Docker without the need of root permissions:
docker pull busybox # It works!
3. Basic usage
Now that we have Docker running, we will see the most basic things we can do with it.
3.1. Pulling images
The Docker community is so big. There is a huge number of preconfigured images, many of them maintained by the official developers of the software in question (e.g. MySQL, Nginx, Jenkins, and a large etc.).
These images can be found at Docker Hub. You don’t have to create an account to pull the images from there, but you will need one if you want to host your images.
We already have seen how to pull images. For those official images, we just have to specify the name of the repository:
docker pull <repository>
For images of other users, we have to specify the username:
docker pull <username>/<repository>
By default, the latest image in the repository will be pulled (you have probably already the “Using default tag: latest” message if you have pulled the BusyBox image). But we can also pull a specific image, specified by a version tag. For that, we just have to append the tag in question after a colon:
docker pull <username>/<repository>:<tag>
For example:
docker pull busybox:1.25.0
Note: to see the images you have, you can use the images command:
docker images
3.2. Creating images from Dockerfiles
Creating files known as Dockerfiles is the way of creating our custom images, basing on an existing one.
It only consists on writing the steps to execute in a file, like in shell scripts, or scripts for Software Configuration Management tools (Ansible, Chef, etc.).
Let’s suppose that we need a simple Ubuntu image, but for which we will need Nginx. Instead of pulling the Ubuntu image, accessing it via CLI, and installing Nginx, we can write a Dockerfile for being able to build that image just with one command.
A Dockerfile for this would look like:
FROM ubuntu
MAINTAINER Julen Pardo <julen.pardo@outlook.es>

USER root

RUN DEBIAN_FRONTEND=noninteractive apt-get update
RUN DEBIAN_FRONTEND=noninteractive apt-get install -y nginx
We specify the base image with FROM; we optionally set the maintainer of the Dockerfile just in an informative way; we specify the USER used to perform the actions; and we run the commands, setting the Docker DEBIAN_FRONTEND environmental variable to noninteractive, for telling apt-get not to run interactively.
Note that building Dockerfiles can be quite different from just pulling images; this was the most basic example to see how they work.
For building an image from a Dockerfile, we have to execute the build command:
docker build path/to/dockerfile
Specifying the path to the Dockerfile. Docker expects a Dockerfile named Dockerfile, so, note that we cannot have more than one Dockerfile in the same directory.
3.3 Creating containers
We have seen how to pull images and create our own ones, but not how to use them.
When we use an image, i.e., we instantiate it, we create a container. We can have several containers from the same image. The concept is almost the same as with class and objects in Object Oriented Programming.
For creating containers, we use the run command. The easiest way is to execute it just specifying the image:
docker run busybox
Nothing seemed to happen. But, behind the scenes, Docker has created a container from the image, execute it, and then end it, as we didn’t specify nothing to do.
We can execute a command inside the container:
docker run busybox echo "Hello world!"
Not very impressive, right? But imagine doing so with a virtual machine, and compare how much time takes each one.
We can also set an interactive shell with -it option:
docker run -it busybox
To see a more complete example, we are going to pull the Nginx image:
docker pull nginx
And then we are going to run it with the following command:
docker run -p 8080:80 -d nginx
And, if we follow localhost:8080 in our browser, we will see that we have a dockerized Nginx web server!
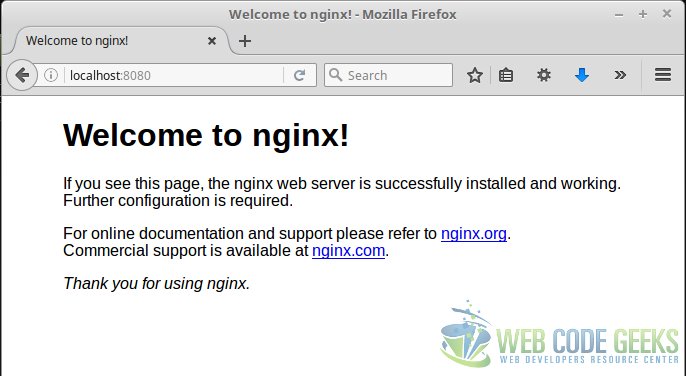
Let’s explain what we have done:
- With
-p 8080:80, we have binded to the host’s port 8080, the container’s port 80. - With
-doption, we have detached the container to run it in the background, receiving its id.
With this example, you already should have noticed the powerfulness of Docker.
Note: to stop a container, we can execute the stop command followed by the container id:
docker stop <container-id>
4. Summary
In this tutorial we have seen the installation of Docker in Ubuntu and its very basic configuration. Apart from that, we have also seen the basic usage of Docker, pulling images from the Docker Hub and creating containers from these images.
