If you are a PHP programmer, you will have probably encountered PEAR. PEAR stands for PHP Extension and Application Repository, a library of reusable PHP components, built under the same standard, that can be used in any project.
PEAR was first released in 1999, and it has been for a long time the de facto official dependency manager for PHP. But, currently, is considered deprecated, and the ruling dependency manager is now Composer. So, is important to understand that PEAR should not be used for new projects. But, even if it is deprecated, every PHP developer has to know how to use it, and this is what this tutorial will show.
For this tutorial, we will use:
- Ubuntu (14.04) as Operating System.
- Apache HTTP server (2.4.7).
- PHP (5.5.9).
- PEAR 1.10.1
Table Of Contents
- 1. Preparing the environment
- 1.1. Apache and PHP
- 1.2. PEAR
- 2. What is PEAR?
- 2.1. Warning: PEAR is considered deprecated
- 3. Configuring PEAR
- 4. Dealing with PEAR packages
- 4.1. Installing packages
- 4.2. Upgrading packages
- 4.3. Uninstalling packages
- 4.4. How PEAR organizes packages
- 4.5. Using alternative channels
- 4.6. Things to take into account when installing packages
- 5. Dependency tracking
- 6. Examples with some useful PEAR packages
- 6.1. HTML form
- 6.2. Validator
- 6.3. XML serializer
- 7. Summary
- 8. Download the source code
You may skip environment preparation and jump directly to the beginning of the tutorial below.
1. Preparing the environment
1.1. Apache and PHP
Below, commands to install Apache and PHP are show:
sudo apt-get update
sudo apt-get install apache2 php5 libapache2-mod-php5
sudo service apache2 restart
1.2. PEAR
There are several ways to install PEAR. Choose the one you prefer.
1.2.1. Via apt-get
Just type in the terminal:
sudo apt-get install php-pear
1.2.2. Downloading the phar
Alternatively, you can download the phar archive and install it, which is more flexible for choosing configuration:
wget http://pear.php.net/go-pear.phar
php go-pear.phar
And the following menu will be shown:
 1. Installation base ($prefix)                   : /home/julen/pear
 2. Temporary directory for processing            : /tmp/pear/install
 3. Temporary directory for downloads             : /tmp/pear/install
 4. Binaries directory                            : /home/julen/pear/bin
 5. PHP code directory ($php_dir)                 : /home/julen/pear/share/pear
 6. Documentation directory                       : /home/julen/pear/docs
 7. Data directory                                : /home/julen/pear/data
 8. User-modifiable configuration files directory : /home/julen/pear/cfg
 9. Public Web Files directory                    : /home/julen/pear/www
10. System manual pages directory                 : /home/julen/pear/man
11. Tests directory                               : /home/julen/pear/tests
12. Name of configuration file                    : /home/julen/.pearrc

1-12, 'all' or Enter to continue:
We will see some of the configurations in section 3.
2. What is PEAR?
To understand what PEAR is and why it was created, we first have to review briefly the history of PHP.
In the past, many PHP projects used to rely in monolithic frameworks. These frameworks were composed by components designed to perform specific operations. But each framework had their components programmed it’s way, that is, with their own coding style, interface declaration, etc. Every framework was reinventing the wheel for problems that were solved, but in other frameworks. And, if developers wanted to use a specific component, they were forced to use some framework, which is an overkill for most of the cases. And these components were not interoperable with other frameworks.
To solve this problem, PEAR (PHP Extension and Application Repository) was developed, a PHP component development and distribution environment. It was developed with three main objectives:
- Promote a well structured code library.
- Maintain a distribution and maintenance system of code packages.
- Promote a standard coding style.
With PEAR, the developers had a repository of components that would provide solutions for many areas: encryption, databases, mathematic operations, web services, and many more. And being every component usable individually, without the need of using a huge framework for very particular solutions.
2.1. Warning: PEAR is considered deprecated
Unfortunately (for PEAR), this package manager is currently (from some years ago, actually) considered deprecated, in favour of Composer. So, PEAR should also be used to deal with legacy code.
If you are starting a project and you need a dependency manager, use Composer.
3. Configuring PEAR
We can configure PEAR in several ways. We can see every configurable option by typing the following in the terminal:
pear config-show
And we will see a lot of configurations. The default configuration is fine for most cases, but we may are interested to change them.
The most likely configuration to be changed is the PEAR directory, which by default has the /usr/share/php value. This is where the PEAR PHP components will be installed.
To change the configuration, the syntax is the following:
pear config-set <config-name> <new-value>
So, for this case, we would have to type:
pear config-set php_dir /path/to/pear/dir
And the configuration will be changed.
If we change the PEAR directory, we also have to change the PHP configuration, to indicate where this directory is, to make PHP know from where it has to include the components. For that, we have to edit the /etc/php5/apache2/php.ini file, adding this path to the include_path directive, so it will remain as follows:
include_path = ".:/usr/share/php:/path/to/pear/dir"
Adding the path to the configured PEAR directory after a colon, indicating that is another directory to include.
Don’t forget to restart Apache after doing any change in PHP configuration.
4. Dealing with PEAR packages
In this section, we we will see how to install, upgrade and delete packages with PEAR, see how they are organized, and things to take into account when installing them.
4.1. Installing packages
Installing packages with PEAR is so easy. But, before installing packages, we have to know what we want to install.
The easiest way to find packages, is using the official PEAR site, and making a search in the search box. For example, if we need a component for encryption operations, we would search for encryption in the the search form. For this case, we will get the following results:
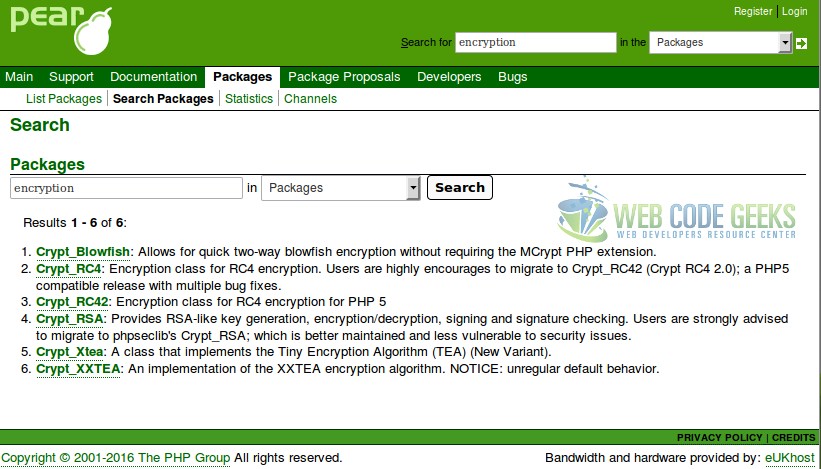
1. PEAR package search result example
To install any of the packages, is only necessary to know the package name, executing the following command:
pear install <package-name>
So, in this case, if we want to install, for example, the package for Blowfish encryption, we would just have to type.
pear install Crypt_Blowfish
PEAR will show the following output during the package installation:
downloading Crypt_Blowfish-1.0.1.tgz ...
Starting to download Crypt_Blowfish-1.0.1.tgz (11,805 bytes)
.....done: 11,805 bytes
install ok: channel://pear.php.net/Crypt_Blowfish-1.0.1
This package will now be installed in the PEAR php_dir directory.
4.1.1. Install a package for a specific version
If, for some reason, we need to install a package in a specific version, we can do it specifying the version after the package name:
pear install Crypt_Blowfish-1.0.0
4.2. Upgrading packages
Before upgrading our PEAR packages, we have to know which packages have updates available. For that, we list-upgrades option:
pear list-upgrades
And PEAR will return a list with the available updates similar to the following:
pear.php.net Available Upgrades (stable):
=========================================
Channel      Package          Local           Remote          Size
pear.php.net PEAR             1.9.4 (stable)  1.10.1 (stable) 285kB
pear.php.net XML_Util         1.2.1 (stable)  1.3.0 (stable)  16.8kB
Then, a package can be upgrade with the upgrade option:
pear upgrade <package-name>
4.3. Uninstalling packages
Package uninstalling is the same as installing and upgrading, but with uninstall option:
pear uninstall <package-name>
4.4. How PEAR organizes packages
Each package in PEAR is categorized in a parent category. If you tried to install the Blowfish package as we have done in the previous section, you may have noticed that it was installed in php_dir/Crypt/ directory, with a Blowfish.php file, which is the “main” file, and also a Blowfish/ folder. That is because the Blowfish package is categorized in Crypt category.
If we install another package of this category, for example, Crypt_RSA, the Crypt/ directory will remain as:
Crypt/
├── Blowfish/
│   └── DefaultKey.php
├── Blowfish.php
├── RSA/
│   ├── ErrorHandler.php
│   ├── KeyPair.php
│   ├── Key.php
│   ├── Math
│   │   ├── BCMath.php
│   │   ├── BigInt.php
│   │   └── GMP.php
│   └── MathLoader.php
└── RSA.php
Leaving the main files in the category directory root, and generating additional folders (if required) for package dependencies.
You may have already realized that, when we are installing a package, we are actually doing:
pear install <category>_<package>
The full list of the categories can be found in the official PEAR website, in packages section.
4.5. Using alternative channels
A channel is a site that distributes packages for installation with PEAR.
The channel by default is pear.php.net, but additional channels can be added.
To do it, first, we have to know which channel we want to add, and then, execute PEAR with channel-discover option, specifying the channel:
pear channel-discover <pear-channel>
For example, to add the Doctrine channel for PEAR:
pear channel-discover pear.doctrine-project.org
Once added, we can list the packages available in this channel:
pear remote-list -c doctrine
And, of course, install packages, specifying the channel they belong to:
pear install <remote-channel>/<package-name>
For example, to install the ORM package:
pear install doctrine/DoctrineORM
4.6 Things to take into account when installing packages
Unfortunately, not all the PEAR packages maintained, or released as stable. So, we have to take care choosing the packages we are using.
Using unmaintained packages is not generally a good idea. Using a package that is no longer maintained means that the identified bugs will not be fixed; and, of course, other unexpected bugs that may arise, neither. So, using an unmaintained package can suppose the introduction of bugs and security holes that may put in risk our system.
There other cases to take into account are the packages that are not marked as stable. These are the ones released as alpha, beta, or still being developed. This means that the package may not be fully functional or not fully tested.
By default, PEAR doesn’t allow to install non-stable packages. If we try to install a non-stable package, PEAR will say something similar to:
Failed to download <package> within preferred state “stable”
This is because PEAR is configured with stable as preferred state for the package, but it can be changed. For that, we have to change the preferred_state configuration:
pear config-set preferred_state <state>
For example, to install beta-released packages, we would have to set:
pear config-set preferred_state beta
With this configuration, we will be able to install packages with beta or “higher stability level”. So, we couldn’t install alpha or developing packages.
The available states are the following, sorted by stability:
- stable
- beta
- alpha
- devel
5. Dependency tracking
When we are using components installed with PEAR, we are creating dependencies for our project that are developed and maintained by a third party. In other words: we are using pieces of code developed by someone else.
These components (if still maintained), are being changed, adding new functionalities and fixing bugs. In the previous section of the tutorial, we have seen how to update components. But, updating each component manually, first checking if there are updates for any of it, for several components, can suppose a work overhead. And can also lead to problems if we are not using updated packages.
Apart from this, those components are being installed locally in the computer where have been installed using PEAR. A project using PEAR dependencies would be usable only in the computer for which the dependencies have been installed. So, if we would want to use our project in several computers, we would have to install each component, one by one.
To solve these problem, PEAR allows to perform a dependency tracking. This consists on writing a file, a manifest, where all the components our projects depends on are defined.
This manifest is named package.xml, which is placed in the project root. The manifest has to have the following structure:
package.xml
<?xml version="1.0" encoding="UTF-8"?>
<package xmlns="http://pear.php.net/dtd/package-2.0"
xmlns:tasks="http://pear.php.net/dtd/tasks-1.0"
xmlns:xsi="http://www.w3.org/2001/XMLSchema-instance"
packagerversion="1.8.1"
version="2.0"
xsi:schemaLocation="http://pear.php.net/dtd/tasks-1.0 http://pear.php.net/dtd/tasks-1.0.xsd http://pear.php.net/dtd/package-2.0 http://pear.php.net/dtd/package-2.0.xsd">
<name>WebCodeGeeks_PEARtutorial</name>
<uri>package.xml</uri>
<summary>This is a wrapper package for installing dependencies for PEAR tutorial for WebCodeGeeks.</summary>
<description><none></description>
<lead>
<name>Julen</name>
<user>Julen</user>
<email>julen@example.com</email>
<active>yes</active>
</lead>
<date>2016-06-21</date>
<time>11:00:00</time>
<version>
<release>0.0.1</release>
<api>0.0.1</api>
</version>
<stability>
<release>alpha</release>
<api>alpha</api>
</stability>
<license uri="http://www.gnu.org/licenses/lgpl.html">LGPL</license>
<notes><none></notes>
<contents>
<dir baseinstalldir="/dev/null" name="/">
<file baseinstalldir="/dev/null" name="package.xml" role="php" />
</dir>
</contents>
<dependencies>
<required>
<php>
<min>5.2.1</min>
</php>
<pearinstaller>
<min>1.8.0</min>
</pearinstaller>
<!-- Package dependencies -->
<!-- <package> -->
<!-- <name>Package_Name</name> -->
<!-- <channel>pear.php.net</channel> -->
<!-- </package> -->
</required>
</dependencies>
<phprelease />
<changelog>
<release>
<version>
<release>0.0.1</release>
<api>0.0.1</api>
</version>
<stability>
<release>alpha</release>
<api>alpha</api>
</stability>
<date>2016-06-21</date>
<license uri="http://www.gnu.org/licenses/lgpl.html">LGPL</license>
<notes><none></notes>
</release>
</changelog>
</package>
The manifest can describe several metadata about the project itself (name, developers, version, state, etc.), but the interesting thing is the dependencies section, in line 36. First, we have defined the required PHP and PEAR versions for this project. And, apart from these, when can specify any PEAR package between <package> tags, specifying the name and the PEAR channel. So, for example, to define Crypt_Blowfish and Crypt_RC42 as dependencies for our project, we would do:
<!-- ... -->

<dependencies>
    <required>
        <php>
            <min>5.2.1</min>
        </php>
        <pearinstaller>
            <min>1.8.0</min>
        </pearinstaller>
        <package>
            <name>Crypt_Blowfish</name>
            <channel>pear.php.net</channel>
        </package>
        <package>
            <name>Crypt_RC42</name>
            <channel>pear.php.net</channel>
        </package>
    </required>
</dependencies>

<!-- ... -->
And the dependencies will be defined in the manifest file of our project.
But, what does this XML do? Well, the magic comes when we execute the PEAR install command, but specifying the manifest file:
pear install -f package.xml
If you try to execute it without having the dependencies installed, you will see that PEAR has downloading all of them:
downloading Crypt_Blowfish-1.0.1.tgz ...
Starting to download Crypt_Blowfish-1.0.1.tgz (11,805 bytes)
.....done: 11,805 bytes
downloading Crypt_RC42-0.9.0.tgz ...
Starting to download Crypt_RC42-0.9.0.tgz (4,347 bytes)
...done: 4,347 bytes
install ok: channel://pear.php.net/Crypt_Blowfish-1.0.1
install ok: channel://pear.php.net/Crypt_RC42-0.9.0
install ok: channel://__uri/WebCodeGeeks_PEARtutorial-0.0.1
Now, the utility of defining a manifest with the dependencies is clear, isn’t it? We don’t have to install each dependency (imagine doing so with tens of them), we just have to keep a track of the dependencies our project is using, and PEAR will prepare the dependencies of our projects to be usable by it.
The -f option is to force the download, because it may occur that some package is not available in the preferred state.
And, for upgrading? The same as installing:
pear upgrade -f package.xml
Note that, if you try to uninstall some of the dependencies, PEAR won’t let you:
"pear/Crypt_Blowfish" is required by installed package __uri/WebCodeGeeks_PEARtutorial
pear/Crypt_Blowfish cannot be uninstalled, other installed packages depend on this package
That is because PEAR knows that is a dependency of a registered project. The components will be uninstallable when they are no longer declared as dependencies for any project with a defined manifest.
6. Examples with useful PEAR components
To end up with this tutorial, we will see some examples of one of the most useful PEAR components, with the manifest file. Even if PEAR is deprecated, many of its components are still available in other sources (mostly Composer).
6.1. HTML form
One of the most used packages is for building HTML forms. If you have ever worked with a PHP framework, such as Symfony, this will familiar to you.
To install it with PEAR:
pear install HTML_QuickForm2
And this is an example of how can be used it:
form.php
 <?php

require_once 'HTML/QuickForm2.php';

$form = new HTML_QuickForm2(
    'RegisterForm',
    'POST',
    [
        'action' => $_SERVER['PHP_SELF']
    ]
);

// Form field creation.

$fieldset = $form->addFieldset('Register form')
                 ->setLabel('Register');

$nickname = $fieldset->addText('nickname')
                     ->setLabel('Nickname: ');
$password = $fieldset->addPassword('password')
                     ->setLabel('Password: ');
$passwordRepeat = $fieldset->addPassword('password-repeat')
                     ->setLabel('Repeat password: ');

// Fields validation.

$nickname->addRule('required', 'Specify a nickname');
$nickname->addRule(
    'regex',
    'Nickname can only contain alphanumeric characters.',
    '/^[a-zA-Z0-9]+$/'
);
$password->addRule('required', 'Specify a password');
$password->addRule(
    'minlength',
    'Password has to be at least 8 characters long.',
    8
);
$passwordRepeat->addRule('required', 'Specify again the password');
$passwordRepeat->addRule(
    'callback',
    'The passwords do not match.',
    [
        'callback' =>
            function($arg1, $arg2) {
                return $arg1 === $arg2;
            },
         'arguments' => [
             $password->getValue(),
             $passwordRepeat->getValue()
         ]
    ]
);

$form->addSubmit('submit', ['value' => 'Register']);

if ($form->validate()) {
    echo 'Hello ' . $nickname->getValue() . ', you have been successfully registered.';
} else {
    echo $form;
}
As you can see, we can add rules to the fields very simply, including regular expressions or closures as callbacks; and the component will make every verification.
The code above will generate a form with the following appearance:
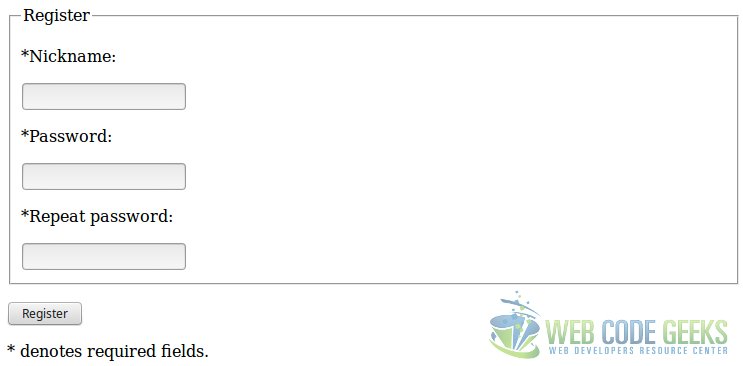
2. Form appearance using QuickForm2
6.2. Validator
One of the most repeated tasks when dealing with user input is (should be) the validation. There is also a component to perform validations of many types. It’s called Validate:
pear install Validate-0.8.5
And this is how it can be used it:
validate.php
<?php

require_once('Validate.php');

/**
 * Checks if the given parameters are set. If one of the specified parameters
 * is not set, die() is called.
 *
 * @param $parameters The parameters to check.
 */
function checkGETParametersOrDie($parameters) {
    foreach ($parameters as $parameter) {
        isset($_GET[$parameter]) || die("Provide required '$parameter' parameter.");
    }
}

// Flow starts here.

checkGETParametersOrDie(['email', 'number', 'date']);

$validator = new Validate();

$email = $_GET['email'];
$number = $_GET['number'];
$date = $_GET['date'];

if ($validator->email($email)) {
    echo 'Valid email.<br>';
} else {
    echo 'Invalid email.<br>';
}

if ($validator->number($number, ['decimal' => ','])) {
    echo 'Valid number.<br>';
} else {
    echo 'Invalid number.<br>';
}

if ($validator->date($date, ['format' => '%d-%m-%Y'])) {
    echo 'Valid date.<br>';
} else {
    echo 'Invalid date.<br>';
}
As you can see, this can be very useful to perform some specific validations, such us with emails, number formats, or dates (and more).
6.3. XML serializer
A tiring job is to parse XML files. But, yes, there’s a component to deal with this task, XML_Serializer.
Install it:
pear install XML_Serializer-0.20.2
And then use it for serialization:
xml_serializer.php
<?php

require_once('XML/Serializer.php');

$options = [
    'encoding'  => 'UTF-8',
    'indent'    => '    ',
];

$serializer = new XML_Serializer($options);

$data = [
    'XML_Serializer' => [
        'title'       => 'XML Serializer example',
        'description' => 'This is an example of XML serialization with XMl_Serializer PEAR package.',
        'link'        => 'http://pear.php.net/package/XML_Serializer',
        'attributes'  => [
            'nested element'  => 'This a nested element.',
            'another element' => 'More stuff.'
        ]
    ]
];

$serialized = $serializer->serialize($data);

if ($serialized) {
    echo 'Serialized data:<br>';
    echo '<pre>';
    echo htmlentities($serializer->getSerializedData());
    echo '</pre>';
} else {
    echo 'An error occurred serializing the data.';
}
Of course, we can do the reverse way, with the unserializer:
xml_unserializer.php
<?php

require_once('XML/Unserializer.php');

$unserializer = new XML_Unserializer();

$data = "<array>
    <XML_Serializer>
        <title>XML Serializer example</title>
        <description>This is an example of XML serialization with XMl_Serializer PEAR package.</description>
        <link>http://pear.php.net/package/XML_Serializer</link>
        <attributes>
            <XML_Serializer_Tag>This a nested element.</XML_Serializer_Tag>
            <XML_Serializer_Tag>More stuff.</XML_Serializer_Tag>
        </attributes>
    </XML_Serializer>
</array>";

$unserialized = $unserializer->unserialize($data);

if ($unserialized) {
    echo 'Unserialized data:<br>';
    echo '<pre>';
    print_r($unserializer->getUnserializedData());
    echo '</pre>';
} else {
    echo 'An error occurred unserializing.';
}
With this component, practically, XML parsing does not require any work.
7.Summary
This tutorial has shown how to use the PEAR package manager for PHP, from the installation, to the use of some of the most useful packages, seeing how they can be installed, upgraded and deleted. We have also seen how to track the dependencies using the manifest file, which is an important point, because it allows us to have all the dependencies easily available in any computer, and also upgradeable.
But the most important thing to take into account is that PEAR is not the best option as package manager for new projects, since it’s deprecated and in disuse. Instead, Composer should be used. And, PEAR, only for legacy projects that used to use it as package manager.
8. Download the source code
This was a tutorial about PEAR package manager.
You can download the full source code of this example here: PHPPearTutorial
