SQL Injection is a vulnerability that allows an attacker to interact with the victim database to perform actions that are not allowed by the application. In other words: an attacker could read, write and/or delete data that is supposed to have access to.
This is really scaring because, in the worst case, which is quite common, is incredibly easy to inject SQL instructions. Not without reason is in the first place of top 10 vulnerabilities by OWASP (Open Web Application Security Project).
The purpose of this tutorial is to learn how we can protect against these kind of dangerous attacks.
For this tutorial, we will use:
- Ubuntu (14.04) as Operating System.
- Apache HTTP server (2.4.7).
- PHP (5.5.9).
- PostgreSQL (9.3).
Table Of Contents
- 1. Preparing the environment
- 1.1. Installation
- 1.2. PHP configuration
- 1.3. PostgreSQL configuration
- 2. How SQL Injection works
- 3. Base application and table structure
- 4. First protection rule: don’t display any error message
- 4.1. Disabling error reporting
- 5. Second protection rule: restrict permissions as much as possible
- 6. Third protection rule: use Prepared Statements
- 6.1. Taking advantage of Prepared Statements’ performance
- 6.2. How NOT to use Prepared Statements
- 7. Additional security measures
- 7.1. Sanitizing manually the input
- 7.2. Black/white listing
- 7.3. Log suspicious activity
- 8. Summary
- 9. Download the source code
You may skip environment preparation and jump directly to the beginning of the tutorial below.
1. Preparing the environment
1.1. Installation
Below, commands to install Apache, PHP and PostgreSQL are shown:
sudo apt-get update
sudo apt-get install apache2 php5 postgresql libapach2-mod-php5 php5-pgsql
sudo service apache2 restart
1.2. PHP Configuration
We have to configure PHP to add the PostgreSQL driver. Open /etc/php5/apache2/php.ini, and add the following directive, if it not exists:
extension=pgsql.so
Don’t forget to restart Apache after doing any change.
1.3. PostgreSQL configuration
We are going to set a password for the default PostgreSQL superuser, because it does not have configured any by default. Type the following in a terminal:
sudo -u postgres psql
To connect to PostgreSQL command line with postgres user.
Now we can change its password with the following command:
ALTER ROLE postgres WITH ENCRYPTED PASSWORD 'postgres';
And the password will be updated. Type \q to quit.
2. How SQL Injection works
Let’s suppose that an application has a form with an input that, when the form is submitted, it will be part of a SQL sentence, for example, to make a search in a table.
The script that controls this, would do something similar to the following:
$search = $_GET['input'];

$sql = "SELECT * FROM Bar WHERE Foo = '$search'"
So, if we submit the form with, for example, baz value in the field, the constructed SQL would be:
SELECT * FROM Bar WHERE Foo = 'baz'
Everything right for the moment.
But, what would happen if the user introduces the SQL ' delimiter character in the field? The resulting SQL instruction would be the following:
SELECT * FROM Bar WHERE Foo = '''
Which will produce an error since it’s not a correct SQL sentence.
At this moment, the user realizes that the predefined interaction between the application and the database can be altered by the user. And, that if the behaviour can be subverted to generate SQL errors, it can also be done, but without generating them. So, it might try to introduce the following value in the form: ' or '1'='1. What would this generate?
SELECT * FROM Bar WHERE Foo = '' or '1'='1'
Which is a correct SQL sentence. What has done the user (who should be considered an attacker already)? It has modified the application logic to make it behave as it wants it, not as the application itself is allowing.
In the previous example we have seen how an attacker can read data, but it can do almost anything allowed by SQL language. The following sentence could also be generated:
SELECT * FROM Bar WHERE Foo = ''; DROP TABLE Admin
And any other evil actions that an attacker could think.
Scaring, isn’t it?
3. Base application and table structure
First of all, let’s create a small application. Mostly, the first barrier an attacker encounters is a login, so, that’s with we will work.
3.1 Table structure
We will create a new database, with a table for users and their passwords, and we’ll create some of them. For that, we will introduce the following sentences in the Postgres command line:
install.sql
CREATE DATABASE sql_injection;

\c sql_injection;

CREATE TABLE Users (
    username varchar(50) PRIMARY KEY NOT NULL,
    password varchar(50) NOT NULL
);

INSERT INTO Users VALUES('admin', 'adminpassword');
INSERT INTO Users VALUES('worker', 'workerpassword');
INSERT INTO Users VALUES('WebCodeGeeks', 'W38C0D3G33K5');
Then, we will have a Users table with admin, worker and WebCodeGeeks user names, with their respective passwords.
Note: please, don’t store passwords in plain text.
3.2. PHP application: login application
Let’s create a separate class for dealing with the database:
DB.php
<?php

/**
 * Database operations class.
 */
class DB {

    const DB_NAME  = 'sql_injection';
    const PORT     = 5432;            // PostgreSQL default port.
    const DB_HOST  = 'localhost';
    const USERNAME = 'postgres';
    const PASSWORD = 'postgres';

    /**
     * Database connection object.
     */
    private $connection;

    /**
     * Connects to a database with the defined class constants, constructing a connection string like
     * "host='db_host' port='port' dbname='dbname' user='user' password='password'".
     *
     * @return True if the connection was made, false if it was not.
     */
    public function connect() {
        $connectionString = 'host=' . self::DB_HOST . ' port=' . self::PORT . ' dbname=' . self::DB_NAME
            . ' user=' . self::USERNAME . ' password=' . self::PASSWORD;

        $connection = pg_connect($connectionString);

        if ($connection) {
            $connected = true;
            $this->connection = $connection;
        } else {
            $connected = false;
        }

        return $connected;
    }

    /**
     * Closes the opened connection to the database.
     *
     * @return True if the connection was closed succesfully; false if an error happened.
     */
    public function disconnect() {
        $disconnected = pg_close($this->connection);

        return $disconnected;
    }

    /**
     * Authenticates an user with its password, looking if exists a row for the given credentials.
     *
     * @param $username The user to authenticate.
     * @param $password The password to authenticate the user.
     * @return True if the user was authenticated, false if not.
     */
    public function authenticateUser($username, $password) {
        $sql = "SELECT username
                FROM   Users
                WHERE  username = '$username'
                   AND password = '$password'
                ";

        $result = pg_query($this->connection, $sql);
        $exists = pg_num_rows($result);

        return $exists;
    }
}
Now, let’s create a simple HTML form to login in our application:
login.html
<!DOCTYPE html>
<html>
<head>
    <meta charset="UTF-8">
    <title>Login form</title>
</head>
<body>
    <form action="home.php" method="POST">
        <div>
            <label for="username">Username:</label>
            <input type="text" name="username" id="username" required>
        </div>
        <div>
            <label for="password">Password:</label>
            <input type="password" name="password" id="password" required>
        </div>
        <div>
            <input type="submit" value="Login">
        </div>
    </form>
</body>
</html>
And, finally, the main application page: a page that greets the authenticated user; or that says that the authentication could not be made:
home.php
<?php

require_once('DB.php');

/**
 * Checks if the given parameters are set. If one of the specified parameters is not set,
 * die() is called.
 *
 * @param $parameters The parameters to check.
 */
function checkPOSTParametersOrDie($parameters) {
    foreach ($parameters as $parameter) {
        isset($_POST[$parameter]) || die("Please, provide a '$parameter' POST parameter.");
    }
}

// Flow starts here.

checkPOSTParametersOrDie(['username', 'password']);

$db = new DB();
$db->connect() || die('An error occured while connecting to the database.');

$username = $_POST['username'];
$password = $_POST['password'];

$authenticated = $db->authenticateUser($username, $password);

if ($authenticated) {
    $response = "Hello <b>$username</b>, you have been succesfully authenticated.";
} else {
    $response = 'Sorry, you could not be authenticated.';
}

echo $response;

$db->disconnect();
So simple, we just retrieve the username and password received from the form, and we call the authentication function of database class.
4. First protection rule: don’t display any error message
This is more crucial than what it can be thought. We should disable every error displaying in production environments. The first thing an attacker will try is to generate errors in the application that can generate error messages with valuable information. And, actually, valuable information here, means one thing: database engine (and its version).
How could we generate an error in our application? For example, submitting the form with the following values:
username: '
password: whatever
With those values, the home.php would show a screen like the following:
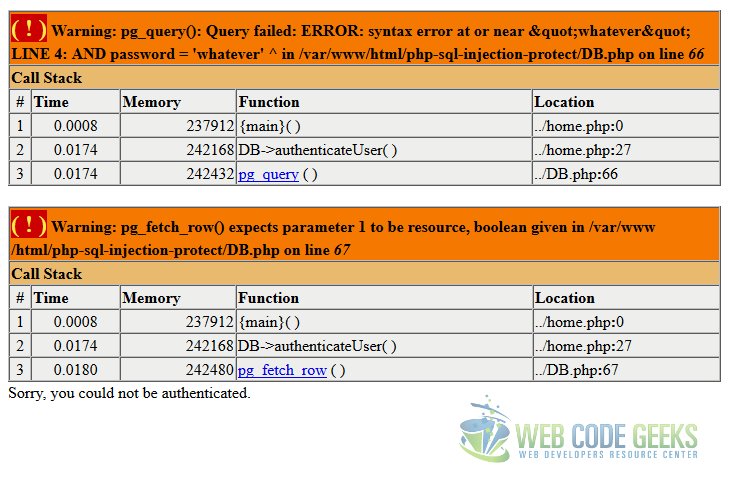
What has the attacker achieved with this? Well, that the application is vulnerable to SQL injection. And, also, the knowledge about our DBMS, which is PostgreSQL, easily deducible from the use of pg_query() or pg_fetch()_rows() functions.
How can an attacker exploit this? The possibilities are almost endless, but let’s suppose that he wants to know the database user that is handling the connection. He would just have to fill the form like:
username: whatever
password: whatever' union select current_user where '1'='1
And the output would be…
Hello postgres, you have been successfully authenticated.
The attacker knows that he’s facing a PostgreSQL database, so he knows that he can use the current_user function, only looking at the documentation. He also knows that the application is using postgres user to connect to the database, the superuser by default, so he will probably have permissions to perform any kind of operation into the database, from login into the application as the admin user, to changing database superuser’s password, for instance.
4.1. Disabling error reporting
To hide that exploitable information, we need to disable the errors. In PHP, is easy to do that. We just have to edit the /etc/php5/apache2/php.ini file, and disable the display_errors directive:
display_errors = Off
And that’s it, after restarting Apache, any error will be displayed.
Note: in this tutorial, we will keep displaying the errors, for debugging purposes.
5. Second protection rule: restrict permissions as much as possible
In the previous example we have seen that the attacker can easily deduce with which permissions is dealing to the database. Disabling the error displaying, a must-do in production environments, disallows the possibility for the attacker to acquire knowledge of that information, but it remains exploitable in that sense.
When we are developing an application that uses a database, we must take the following into account: the superuser is only for database administration and maintenance works, not for being used by applications.
So, we are going to create a user that will own the database of our application, and that will be the one used to connect to it. For PostgreSQL, syntax would be:
install.sql
CREATE ROLE sql_injection_user WITH ENCRYPTED PASSWORD 'sql_injection';
ALTER ROLE sql_injection WITH LOGIN; -- By default, roles cannot log in.

-- ...
Now, we can declare the ownership of sql_injection database to the just created user. We could do in database creation:
install.sql
-- ...

CREATE DATABASE sql_injection WITH OWNER sql_injection_user;

-- ...
Or, change it for a created database:
install.sql
-- ...

ALTER DATABASE sql_injection OWNER TO sql_injection;

-- ...
Now, we have to specify the permissions of the user. For this application, only read permissions are used, so we will only allow to make selects:
install.sql
-- ...

GRANT SELECT ON Users TO sql_injection_user;

-- ...
The last step is to change the application to use this user:
DB.php
// ...

const USERNAME = 'sql_injection_user';
const PASSWORD = 'sql_injection';

// ...
If we now try, for example, to delete all the records from that table, with the following values for the form:
username: whatever
password: whatever'; delete from users where '1'='1
We will get an error about permission denial (because we have the error display activated only for debugging purposes!):
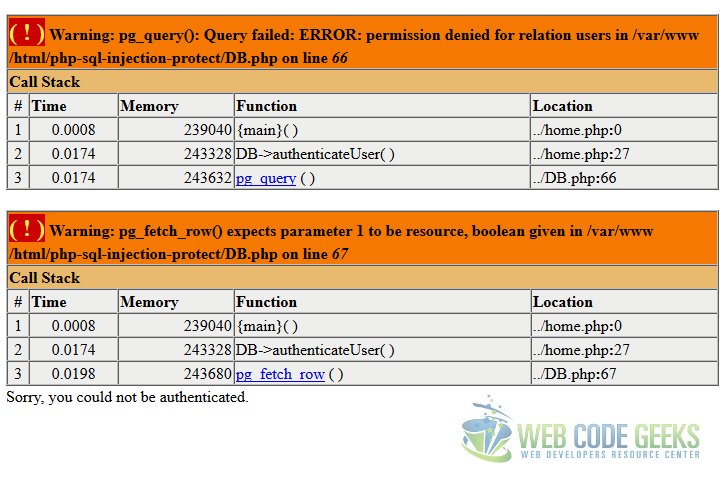
But we can do the login, since we have SELECT permissions.
6. Third protection rule: use Prepared Statements
Our application is still vulnerable to SQL injection. In a more controlled way, but it’s still vulnerable. Now, we will see how really protect against it.
The SQL injection is generated from input generated by user. So, that is where we have to focus the defence.
Using prepared statements with variable binding is the way every SQL sentence should be executed against a database. This is a must-use in every interaction with the database. The special feature of prepared statements with parameterized values is that the values are not bound directly, but they are passed with a different protocol, and it’s handled by the database engine. In other words, the database is which escapes the parameters’ values, instead of doing it manually.
Note that a prepared statement itself does not protect against SQL Injections if they are not used with parameterized values.
Let’s see how they are used:
public function authenticateUser($username, $password) {
    $sql = "SELECT username
            FROM   Users
            WHERE  username = $1
               AND password = $2
            ";

    $statement = pg_prepare($this->connection, 'authenticate', $sql);
    $result = pg_execute($this->connection, 'authenticate', [$username, $password]);
    $row = pg_fetch_row($result);

    // ...
}
This is how it works:
- We first define which will be the parameters of the query (lines 4, 5). That is, we parameterize the query. Note that we are not even wrapping the parameters between single quotes, even if they are string values.
- We submit the request for creating the prepared statement, in line 8. Note that there’s a second parameter, where a literal value is being passed,
'authenticate'. This is the name that the statement will received, necessary for the database to later identify the statement. At last, we pass the SQL sentence we want to create the prepared statement for. - Then, we execute the requested prepared statement, in line 9. We specify the same statement name we specified when creating, and we pass an array with the values, in the same order as we defined in the parameterized query. Here, the database engine identifies the previous requested statement, and it binds the parameters, internally. So, PHP has no knowledge of the final SQL query.
6.1. Taking advantage of Prepared Statements’ performance
Using prepared statements, apart from protecting us from SQL Injection, can also improve the performance if they are used properly. So, we will see how we can use them to improve the performance.
First, we will create a function only for creating the prepared statement:
DB.php
/**
 * Creates the prepared statement for user authentication.
 */
protected function createAuthenticationStatement() {
    $sql = "SELECT username
            FROM   Users
            WHERE  username = $1
               AND password = $2
            ";

    $this->authenticationStatement = pg_prepare($this->connection, 'authenticate', $sql);
}
Then, we have to call it only once, and it has to be after the connection has been established:
DB.php
public function connect() {
    $connectionString = 'host=' . self::DB_HOST . ' port=' . self::PORT . ' dbname=' . self::DB_NAME
        . ' user=' . self::USERNAME . ' password=' . self::PASSWORD;

    $connection = pg_connect($connectionString);

    if ($connection) {
        $connected = true;
        $this->connection = $connection;
        $this->createAuthenticationStatement();
    } else {
        $connected = false;
    }

    return $connected;
}
And, finally, we have just to execute the statement for the given parameters:
DB.php
public function authenticateUser($username, $password) {
    $result = pg_execute($this->connection, 'authenticate', [$username, $password]);
    $row = pg_fetch_row($result);

    // ...
}
This is because the query is already constructed in the database, with pg_prepare(), and when pg_execute() is called, the database only binds the parameters, which is faster than creating the whole query again.
For an operation like this, the performance optimization will probably be insignificant. But, for large and complex queries, it can be more significant. So, if we are using prepared statements to make our application safe, the performance optimization they can suppose is something to take into account.
Using prepared statements with parameterized values is the most important part the defence against SQL Injection. In fact, the previous measures can be considered as useless if prepared statements are not being used.
6.2. How NOT to use Prepared Statements
We have mentioned that, to make the prepared statements effective, they have to be parameterized, with those $ marks.
Is important to understand that the following won’t protect us against injections:
DB.php
<?php

// ...

public function authenticateUser($username, $password) {
    $sql = "SELECT username
            FROM   Users
            WHERE  username = '$username'
               AND password = '$password'
            ";

    $statement = pg_prepare($this->connection, 'authenticate', $sql);
    $result = pg_execute($this->connection, 'authenticate', []);
    $row = pg_fetch_row($result);

    // ...
}
Setting the values in the query that will be used for the statement request will make it exploitable.
7. Additional security measures
The prepared statements, used properly, will protect us pretty securely. But we have the possibility to add more security measures. In this section, we will see alternative techniques that may also result interesting.
7.1. Sanitizing manually the input
This option is for when we are not using prepared statements (they are not compatible), for any reason. For example, for legacy code, for which adding support for prepared statements could suppose much work.
The concept is the same as with prepared statements, to make the received input a literal string value, that is not breaking the sql sentence.
For that, PHP provides a built-in function named pg_escape_literal(). Let’s see how to use it:
DB.php
public function authenticateUser($username, $password) {
    $username = pg_escape_literal($username);
    $password = pg_escape_literal($password);

    $sql = "SELECT username
            FROM   Users
            WHERE  username = {$username}
               AND password = {$password}
            ";

    $result = pg_query($this->connection, $sql);
    $row = pg_fetch_row($result);

    // ...
}
Note that in lines 7 and 8, the values are surrounded with curly braces, instead of with single quotes. Now, every input will be fully taken as a literal string value.
7.2. Black/white listing
We could also create a register where allowed or disallowed keywords are defined.
Let’s create a simple black list to look for inputs that will probably have bad intentions:
DB.php
class DB {

    /**
     * Forbidden input tokens.
     */
    private $blacklist = "/(\s*union\s*|where\s*'1')/";

    // ...
}
This pattern will look for substrings defined inside the round braces, and separated by a pipe character. The \s* is not to take into account the whitespaces.
The function to check if given values contains any of those substrings is pretty simple:
DB.php
// ...

/**
 * Checks provided inputs to look for patterns defined in class property's black list array.
 *
 * @param $userInputs Inputs to check.
 * @return True if a positive is found, false if not.
 */
protected function blacklistPositive($userInputs) {
    foreach ($userInputs as $userInput) {
        $positive = preg_match($this->blacklist, $userInput);

        if ($positive) {
            return true;
        }
    }

    return false;
}

// ...
And, finally, we would have to call it every time before doing any query:
DB.php
// ...

public function authenticateUser($username, $password) {
    if (!$this->blacklistPositive([$username, $password])) {
        $result = pg_execute($this->connection, 'authenticate', [$username, $password]);
        $row = pg_fetch_row($result);

        if (!$row) {
            $authenticated = false;
        } else {
            $authenticated = $row[0];
        }
    } else {
        $authenticated = false;
    }

    return $authenticated;
}

// ...
The obvious disadvantage of this is that, in this case, it could haven’t a username or password that contains the union substring.
In the reverse way, we could also have a whitelist where the allowed inputs are defined. This makes more sense where the input is a literal value of an element of the database that is part of a query, e.g., table or column names.
7.3. Log suspicious activity
Another possibility that is compatible with prepared statements is to register suspicious actions. This can be considered an extension of black/white listing, since we only would have to create a record when the above defined blacklistPositive() function returns true.
This would be useful if we want to be vigilant or ban users that are triggering our alarm with a frequency above a threshold defining deliberated attacks.
We could simply save that suspicious activity with a function like the following:
DB.php
// ...

/**
 * Creates a record when blaclistPositive() function returns true.
 * Datetime, remote IP and the input that triggered the action are saved.
 */
protected function logBlacklistPositive($trigger) {
    $datetime = date('d-m-Y h:i:s');
    $ip = $_SERVER['REMOTE_ADDR'];

    file_put_contents(self::SUSPICIOUS_LOGFILE, "$datetime; $ip; $trigger\n", FILE_APPEND);
}

// ..
Of course, calling it when a positive is found:
DB.php
// ...

protected function blacklistPositive($userInputs) {
    foreach ($userInputs as $userInput) {
        $positive = preg_match($this->blacklist, $userInput);

        if ($positive) {
            $this->logBlacklistPositive($userInput);
            return true;
        }
    }

    return false;
}

// ...
Note that we are using a text file instead of a database to store that info. If we would store the attack attempts logs as same as the data we want to protect from those attacks, the log data could be easily subverted by the attacker not to leave any trace.
8. Summary
This tutorial has shown how we should protect against extremely dangerous SQL injection attacks, starting from the most generic defence lines, those that actually should be implemented not only to protect against SQL injections, but from every kind of attack; and finishing with the most specific and effective one, the prepared statements. We have also seen alternatives ways of defence, which some of them can be combined with prepared statements.
9. Download the source code
This was a tutorial of how to protect against SQL injections.
You can download the full source code of this example here: PHPSQLInjectionProtectionTutorial
