PHP (recursive acronym for PHP: Hypertext Preprocessor) is a widely-used open source general-purpose scripting language that is especially suited for web development and can be embedded into HTML. It allows web developers to create dynamic content that interacts with databases. PHP is basically used for developing web based software applications.
PHP is mainly focused on server-side scripting, so you can do anything any other CGI program can do, such as collect form data, generate dynamic page content, or send and receive cookies. Code is executed in servers, that is why you’ll have to install a sever-like environment enabled by programs like XAMPP which is an Apache distribution.
Table Of Contents
1. Introduction
Back in 1994, Rasmus Lerdorf unleashed the very first version of PHP. However, now the reference implementation is now produced by The PHP Group. The term PHP originally stood for Personal Home Page but now it stands for the recursive acronym: Hypertext Preprocessor. PHP 4 and PHP 5 are distributed under the PHP Licence v3.01, which is an Open Source licence certified by the Open Source Initiative.
1.1 Where is PHP used?
Three are the main areas where PHP scripts are used:
-
- Server-side scripting
This is the most used and main target for PHP. You need three things to make this work the way you need it. The PHP parser (CGI or server module), a web server and a web browser. You need to run the web server where. You can access the PHP program output with a web browser, viewing the PHP page through the server. All these can run on your home machine if you are just experimenting with PHP programming.
-
- Command line scripting
You can make a PHP script to run it without any server or browser. You only need the PHP parser to use it this way. This type of usage is ideal for scripts regularly executed using cron (on Linux) or Task Scheduler (on Windows). These scripts can also be used for simple text processing tasks.
-
- Writing desktop applications
PHP may not the very best language to create a desktop application with a graphical user interface, but if you know PHP very well, and would like to use some advanced PHP features in your client-side applications you can also use PHP-GTK to write such programs. You also have the ability to write cross-platform applications this way.
In this article, we’ll have a detailed look at the server-side scripting using PHP.
1.2 Why PHP?
There stand convincing arguments for all those who wonder why PHP is so popular today:
-
- Compatible with almost all servers used nowadays
A web server is an information technology that processes requests via HTTP, the basic network protocol used to distribute information on the World Wide Web. There exist many types of web servers that servers use. Some of the most important and well-known are: Apache HTTP Server, IIS (Internet Information Services), lighttpd, Sun Java System Web Server etc. As a matter of fact, PHP is compatible with all these web servers and many more.
-
- PHP will run on most platforms
Unlike some technologies that require a specific operating system or are built specifically for that, PHP is engineered to run on various platforms like Windows, Mac OSX, Linux, Unix etc)
-
- PHP supports such a wide range of databases
An important reason why PHP is so used today is also related to the various databases it supports (is compatible with). Some of these databases are: DB++, dBase, Ingres, Mongo, MaxDB, MongoDB, mSQL, Mssql, MySQL, OCI8, PostgreSQL, SQLite, SQLite3 and so on.
-
- PHP is free to download and open source
Anyone can start using PHP right now by downloading it from php.net. Millions of people are using PHP to create dynamic content and database-related applications that make for outstanding web systems. PHP is also open source, which means the original source code is made freely available and may be redistributed and modified.
-
- Easy to learn & large community
PHP is a simple language to learn step by step. This makes it easier for people to get engaged in exploring it. It also has such a huge community online that is constantly willing to help you whenever you’re stuck (which actually happens quite a lot).
The graphic below shows a basic workflow of dynamic content being passed to and from the client using PHP:

2. XAMPP Setup
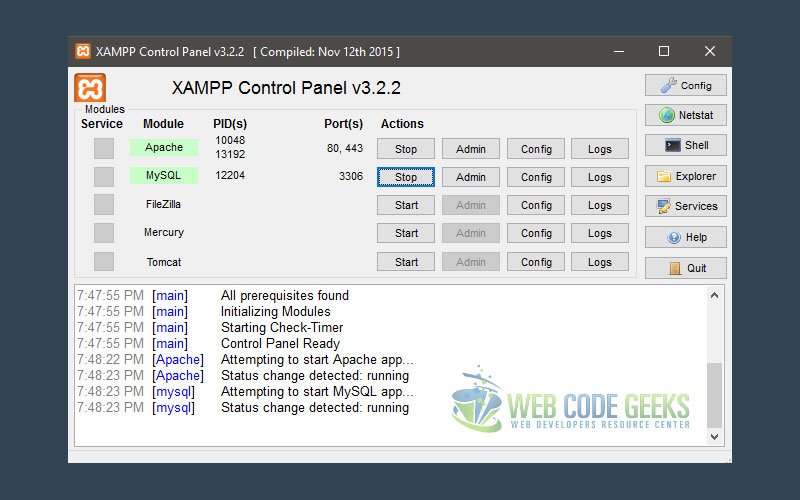
XAMPP is a free and open source cross-platform web server solution developed by Apache Friends, consisting mainly of the Apache HTTP Server, MariaDB database, and interpreters for scripts written in the PHP and Perl programming languages. In order to make your PHP code execute locally, first install XAMPP.
-
- Download XAMPP
- Install the program (check the technologies you want during installation)
- Open XAMPP and click on “Start” on Apache and MySQL (when working with databases)
-
- Place your web project inside the
htdocsdirectory. In the common case, if you installed XAMPP directly inside the C: drive of your PC, the path to this folder would be:C:\xampp\htdocs
- Place your web project inside the
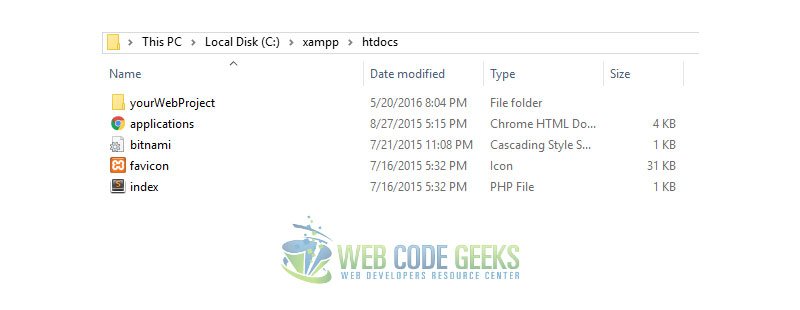
To test the services are up and running you can just enter localhost in your address bar and expect the welcoming page.
3. PHP Language Basics
The aim of this section is to introduce the general syntax you should expect in PHP.
3.1 Escaping to PHP
There are four ways the PHP parser engine can differentiate PHP code in a webpage:
-
- Canonical PHP Tags
This is the most popular and effective PHP tag style and looks like this:
<?php...?>
-
- Short-open Tags
These are the shortest option, but they might need a bit of configuration, and you might either choose the --enable-short-tags configuration option when building PHP, or set the short_open_tag setting in your php.ini file.
<?...?>
-
- ASP-like Tags
In order to use ASP-like tags, you’ll need to set the configuration option in the php.ini file:
<%...%>
-
- HTML script Tags
You can define a new script with an attribute language like so:
<script language="PHP">...</script>
3.2 Commenting PHP
Just like other languages, there are several ways to comment PHP code. Let’s have a look at the most useful ones:
-
- Use
#to write single-line comments
- Use
    <?
      # this is a comment in PHP, a single line comment
    ?>
-
- Use
//to also write single-line comments
- Use
    <?
      // this is also a comment in PHP, a single line comment
    ?>
-
- Use
/* ... */to write multi-line comments
- Use
    <?
      /*  this is a multi line comment
          Name: Web Code Geeks
          Type: Website
          Purpose: Web Development
      */
    ?>
3.3 Hello World
The very basic example of outputting a text in PHP would be:
  <?
      print("Hello World");
      echo "Hello World";
      printf("Hello World");
  ?>
The result of the above statements would be the same: “Hello World”. But why are there three different ways to output?
- print returns a value. It always returns 1.
- echo can take a comma delimited list of arguments to output.
- printf is a direct analog of C’s
printf().
3.4 Variables in PHP
Any type of variable in PHP starts with a leading dollar sign ($) and is assigned a variable type using the = (equals) sign. The value of a variable is the value of its most recent assignment. In PHP, variables do not need to be declared before assignment. The main data types used to construct variables are:
- Integers – whole numbers like 23, 1254, 964 etc
- Doubles – floating-point numbers like 46.2, 733.21 etc
- Booleans – only two possible values, true or false
- Strings – set of characters, like ‘Web Code Geeks’
- Arrays – named and indexed collections of other values
- Objects – instances of predefined classes
The following snippet shows all of these data types declared as variables:
    <?
      $intNum = 472;
      $doubleNum = 29.3;
      $boolean = true;
      $string = 'Web Code Geeks';
      $array = array("Pineapple", "Grapefruit", "Banana");

      // creating a class before declaring an object variable
      class person {
        function agePrint() {
            $age = 5;
            echo "This person is $age years old!";
        }
      }
      // creating a new object of type person
      $object = new person;
    ?>
3.5 Conditional Statements in PHP
Conditional statements are used to execute different code based on different conditions.
-
- The If statement
The if statement executes a piece of code if a condition is true. The syntax is:
  if (condition) {
    // code to be executed in case the condition is true
  }
A practical example would be:
  <?php
  $age = 18;

  if ($age < 20) {
    echo "You are a teenager";
  }
  ?>
Because the condition is true, the result would be:
You are a teenager
-
- The If…Else statement
The If…Else statement executed a piece of code if a condition is true and another piece of code if the condition is false. The syntax is:
  if (condition) {
    // code to be executed in case the condition is true
  }
  else {
    // code to be executed in case the condition is false
  }
An example of an If…Else statement would be:
  <?php
  $age = 25;

  if ($age < 20) {
    echo "You are a teenager";
  }
  else {
    echo "You are an adult";
  }
  ?>
Because the condition is false, the result in this case would be:
You are an adult
-
- The If…Elseif…Else statement
This kind of statement is used to define what should be executed in the case when two or more conditions are present. The syntax of this case would be:
  if (condition1) {
    // code to be executed in case condition1 is true
  }
  elseif (condition2) {
    // code to be executed in case condition2 is true
  }
  else {
    // code to be executed in case all conditions are false
  }
Again, a simple example to demonstrate this:
<?php
$age = 3;

if ($age < 10) {
  echo "You are a kid";
} elseif ($age < 20) {
  echo "You are a teenager";
} else {
  echo "You are an adult";
}
?>
The result, as you might expect, would be:
You are a kid
3.6 Loops in PHP
In PHP, just like any other programming language, loops are used to execute the same code block for a specified number of times. Except for the common loop types (for, while, do…while), PHP also support foreach loops, which is not only specific to PHP. Languages like Javascript and C# already use foreach loops. Let’s have a closer look at how each of the loop types works.
-
- The for loop
The for loop is used when the programmer knows in advance how many times the block of code should be executed. This is the most common type of loop encountered in almost every programming language.
    for (initialization; condition; step){
       // executable code
    }
An example where we use the for loop would be:
  for ($i=0; $i < 5; $i++) {
      echo "This is loop number $i
";
  }
The result of this code snippet would be:
    This is loop number 0
    This is loop number 1
    This is loop number 2
    This is loop number 3
    This is loop number 4
-
- The while loop
The while loop is used when we want to execute a block of code as long as a test expression continues to be true.
    while (condition){
       // executable code
    }
An example where we use the while loop would be:
  $i=0; // initialization
  while ($i < 5) {
      echo "This is loop number $i
";
      $i++; // step
  }
The result of this code snippet would be just the same as before:
    This is loop number 0
    This is loop number 1
    This is loop number 2
    This is loop number 3
    This is loop number 4
To have a clearer idea of the flow of these two loops, look at the graphic below:
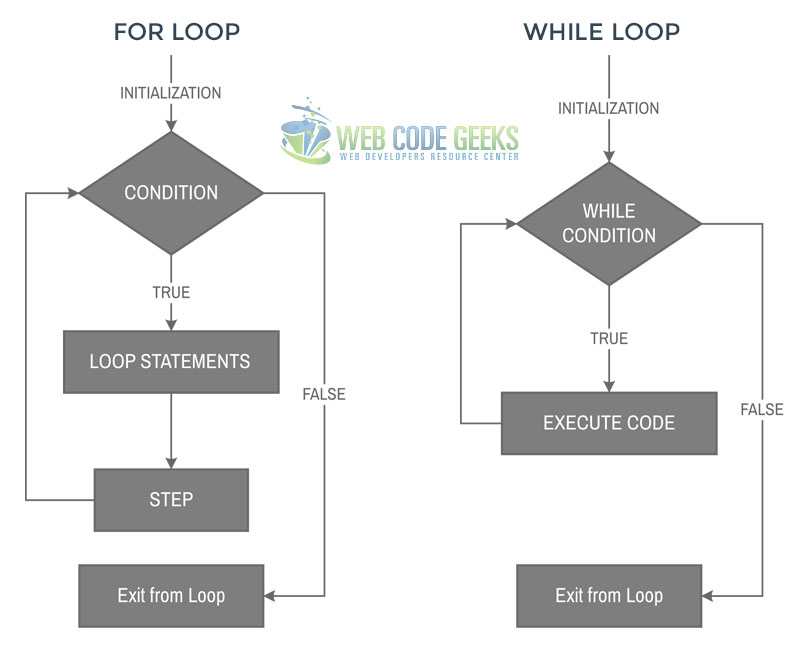
- The do…while loop
The do...while loop is used when we want to execute a block of code at least once and then as long as a test expression is true.
    do {
      // executable code
    }
    while (condition);
An example where we use the do…while loop would be:
  $i = 0; // initialization
  do {
      $i++; // step
      echo "This is loop number $i
";
  }
  while ($i < 5);  // condition
This time the first loop number would be 1, because the first echo was executed only after variable incrementation:
    This is loop number 1
    This is loop number 2
    This is loop number 3
    This is loop number 4
    This is loop number 5
- The foreach loop
The foreach loop is used to loop through arrays, using a logic where for each pass, the array element is considered a value and the array pointer is advanced by one, so that the next element can be processed.
    foreach (array as value) {
      // executable code
    }
An example where we use the foreach loop would be:
  $var = array('a','b','c','d','e');  // array declaration

  foreach ($var as $key) {
      echo "Element is $key
";
  }
This time the first loop number would be 1, because the first echo was executed only after variable incrementation:
    Element is a
    Element is b
    Element is c
    Element is d
    Element is e
4. PHP Arrays
Arrays are used to store multiple values in a single variable. A simple example of an array in PHP would be:
<?php
$languages = array("JS", "PHP", "ASP", "Java");
?>
Array elements are accessed like this: $arrayName[positionIndex]. For the above example we could access “PHP” this way: $languages[1]. Position index is 1 because in programming languages the first element is always element 0. So, PHP would be 1 in this case.
There are three types of arrays in PHP:
-
- Indexed Arrays
We can create these kind of arrays in two ways shown below:
  <?php
  $names = array("Fabio", "Klevi", "John");
  ?>
  <?php
  // this is a rather manual way of doing it
  $names[0] = "Fabio";
  $names[1] = "Klevi";
  $names[2] = "John";
  ?>
An example where we print values from the array is:
  <?php
  $names = array("Fabio", "Klevi", "John");
  echo "My friends are " . $names[0] . ", " . $names[1] . " and " . $names[2];
  ?>
  // RESULT
  My friends are Fabio, Klevi and John
Looping through an indexed array is done like so:
    <?php
    $names = array("Fabio", "Klevi", "John");
    $arrayLength = count($names);

    for($i = 0; $i < $arrayLength; $i++) {
        echo $names[$i];
        echo "
";
    }
  ?>
This would just print the values of the array.
-
- Associative Arrays
Associative arrays are arrays which use named keys that you assign. Again, there are two ways we can create them:
  <?php
  $namesAge = array("Fabio"=>"20", "Klevi"=>"16", "John"=>"43");
  ?>
  <?php
  // this is a rather manual way of doing it
  $namesAge['Fabio'] = "20";
  $namesAge['Klevi'] = "18";
  $namesAge['John'] = "43";
  ?>
An example where we print values from the array is:
  <?php
  $namesAge = array("Fabio"=>"20", "Klevi"=>"16", "John"=>"43");
  echo "Fabio's age is " . $namesAge['Fabio'] . " years old.";
  ?>
  // RESULT
  Fabio's age is 20 years old.
Looping through an associative array is done like so:
    <?php
    $namesAge = array("Fabio"=>"20", "Klevi"=>"16", "John"=>"43");

    foreach($namesAge as $i => $value) {
        echo "Key = " . $i . ", Value = " . $value;
        echo "
";
    }
  ?>
  Key = Fabio, Value = 20
  Key = Klevi, Value = 16
  Key = John, Value = 43
-
- Multidimensional Arrays
This is a rather advanced PHP stuff, but for the sake of this tutorial, just understand what a multidimensional array is. Basically, it is an arrays the elements of which are other arrays. For example, a three-dimensional array is an array of arrays of arrays. An example of this kind of array would be:
    <?php
    $socialNetowrks = array (
    array("Facebook", "feb", 21),
    array("Twitter","dec", 2),
    array("Instagram","aug", 15));
    ?>
5. PHP Functions
Functions are a type of procedure or routine that gets executed whenever some other code block calls it. PHP has over 1000 built-in functions. These functions help developers avoid redundant work and focus more on the logic rather than routine things. Apart from its own functions, PHP also let’s you create your own functions. The basic syntax of a function that we create is:
<?php
function functionName($argument1, $argument2...) {
  // code to be executed
}

functionName($argument1, $argument2...); // function call
?>
Every function needs a name, optionally has one or more arguments and most importantly, defines some kind of procedure to be followed within the body, that is, code to be executed. Let’s see some basic functions:
<?php
function showGreeting() { // function definition
  echo "Hello Chloe!";    // what this function does
}

showGreeting(); // function call
?>
This function would just print the message we wrote:
Hello Chloe!
Another example would be a function with arguments:
<?php
function greetPerson($name) { // function definition with arguments
  echo "Hi there, ".$name;    // what this function does
}

greetPerson("Fabio"); // function call
greetPerson("Michael");
?>
This time we’d have:
Hi there, Fabio
Hi there, Michael
More than one argument can be used whenever needed:
<?php
function personProfile($name, $city, $job) { // function definition with arguments
  echo "This person is ".$name." from ".$city.".";
  echo "
";
  echo "His/Her job is ".$job.".";
}

personProfile("Fabio", "Tirana", "Web Dev");
echo "
";
personProfile("Michael", "Athens", "Graphic Designer");
echo "
";
personProfile("Xena", "London", "Tailor");
?>
The result would include the printed message together with the arguments:
This person is Fabio from Tirana.
His/Her job is Web Dev.
This person is Michael from Athens.
His/Her job is Graphic Designer.
This person is Xena from London.
His/Her job is Tailor.
In PHP, just like in many other languages, we can tell functions to return a value upon executing the code. Such example would be:
<?php
function difference($a, $b) { // function definition with arguments
  $c = $a - $b;
  return $c;
}

echo "The difference of the given numbers is: ".difference(8, 3);
?>
The result would be:
The difference of the given numbers is: 5
PHP also provides quite useful functions for developers to use. One of them is the mail() function. Have a detailed look of how you can use this function to send e-mails in this article
6. Connecting to a Database
There are four ways you can generally consider when you want to connect to a previously created database. Below, we’ll explain how you can use each of them beginning with the easiest one.
6.1 Connecting to MySQL Databases
The syntax for connecting to a MySQL database would be:
<?php
$username = "your_name";
$password = "your_password";
$hostname = "localhost";

//connection to the database
$dbConnect = mysql_connect($hostname, $username, $password)
or die("Unable to connect to MySQL");
echo "Connected to MySQL";

//select a specific database
$dbSelect = mysql_select_db("dbName", $dbConnect)
or die("Could not select dbName");
?>
Considering your entered information is correct, you’d be successfully connected to the right database and ready to start writing and test your queries. Else, the respective error message would appear as defined by the die function. However, do keep in mind that the mysql extension is deprecated and will be removed in the future, so the next methods can be used for databases.
6.2 Connecting to MySQLi Databases (Procedurial)
The MySQLi stands for MySQL improved. The syntax for connecting to a database using MySQLi extension is:
<?php
$username = "your_name";
$password = "your_password";
$hostname = "localhost";

//connection to the database
$dbConnect = mysqli_connect($hostname, $username, $password)

// another way of checking if the connection was successful
if (!$dbConnect) {
  die ("Connection failed: " . mysqli_connect_error());
}
echo "Connected successfully";

//select a specific database
mysqli_select_db($dbConnect, "dbName")
?>
This is a good way to start, because it is easy to understand and gets the job done. However, object oriented logic that we’ll see below is what everyone should be getting into because of the other components of programming being used in this paradigm and also because it is kind of more structured way of doing things.
6.3 Connecting to MySQLi databases (Object-Oriented)
Although the functionality is basically the same, this is another way, the object-oriented way of connecting to a database using the MySQLi extension.
$username = "your_name";
$password = "your_password";
$hostname = "localhost";

// create connection
$dbConnect = new mysqli($hostname, $username, $password);

// check connection
if ($dbConnect->connect_error) {
    die("Connection failed: " . $dbConnect->connect_error);
}
echo "Connected successfully";

// select a specific database
$mysqli->select_db("dbName");
Even in this case, you can check to see if the database was successfully selected, but it is a matter of choice. Object-Oriented MySQLi is not a different MySQLi as far as code functionality is concerned, but rather a different way/logic of writing it.
6.4 Connecting to PDO Databases
PDO stands for PHP Data Objects and is a consistent way to access databases, which promises much easier portable code. PDO is more like a data access layer which uses a unified API rather than an abstraction layer. The syntax for connecting to a database using PDO is:
$username = "your_name";
$password = "your_password";
$hostname = "localhost";

// try to create connection
try {
    $dbConnect = new PDO("mysql:host=$hostname;dbname=myDB", $username, $password);
    // set the PDO error mode to exception
    $conn->setAttribute(PDO::ATTR_ERRMODE, PDO::ERRMODE_EXCEPTION);
    echo "Connected successfully";
}
// show an error if the connection was unsuccessful
catch(PDOException $e) {
    echo "Connection failed: " . $e->getMessage();
}
PDO is widely used today for a bunch of advantages it offers. Among them, we can mention that PDO allows for prepared statements and rollback functionality which makes it really consistent, it throws catchable exceptions which means better error handling and uses blind parameters in statements which increases security.
7. PHP Form Handling
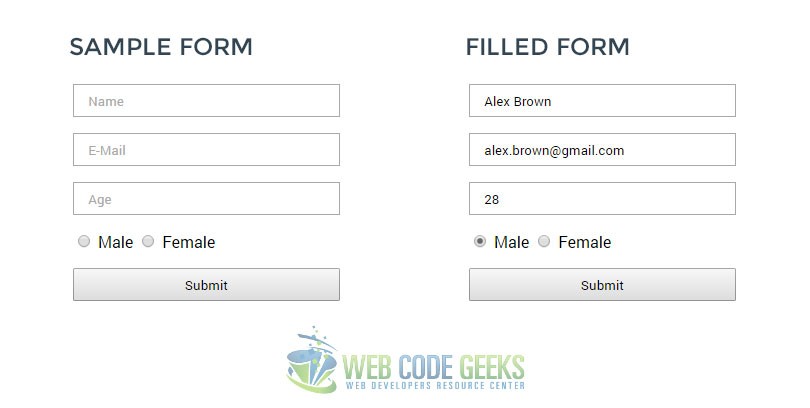
In HTML, forms are used to collect user input/information. But, as far as HTML goes, it just provides the graphical interface and the ability to write on the input fields. However, the aim we collect user information is because we need to process this information. That usually means saving the inputs to a database so that they can be accessed later for several purposes. In this section, we will not send information to the database, as that requires an active database that is already set up and includes knowledge form SQL language, but we can retrieve information that the user has given us. That being said, it is important to have a way to get information, becuase what you use it for and where you want to show/save it depends. Let’s have a look at the HTML form below:
<form method="POST" action="wcg.php">
    <p><input type="text" name="name" placeholder="Name"></p>
    <p><input type="email" name="email" placeholder="E-Mail"></p>
    <p><input type="number" name="age" placeholder="Age"></p>
    <input type="radio" name="gender" value="Male"> Male
    <input type="radio" name="gender" value="Female"> Female
    <p><input type="submit" name="submit" value="Submit"></p>
</form>
This form is just a regular one, and includes inputs for name, e-mail, age and gender. This information will be subject of a print when the Submit button is clicked. That just proves that we got the information from the user. For now, let’s see what we got and fill the form:
Next, we check each input to make sure the user has written/chosen something, and the input is not empty. We do this using two well-known functions in PHP, the isset() and empty(). After making sure we have this right, we can also validate fields. In this case, only the name input may need some sort of validation to make sure one simply doesn’t write numbers in there, while other inputs are more or less validated from HTML5, in the case of email and age.
<?php
if (isset($_POST["name"]) && !empty($_POST["name"])) {
    $name = $_POST["name"];
    if (!preg_match("/^[a-zA-Z ]*$/",$name))
    echo "Name: Only letters and whitespace allowed
";
    else
    echo "Name: ".$_POST["name"]."
";
}
if (isset($_POST["email"]) && !empty($_POST["email"])) {
    echo "E-Mail: ".$_POST["email"]."
";
}
if (isset($_POST["age"]) &&!empty($_POST["age"])) {
    echo "Age: ".$_POST["age"]."
";
}
if (isset($_POST["gender"]) && !empty($_POST["gender"])) {
    echo "Gender: ".$_POST["gender"];
}
?>
Validation is a must for all fields when considering real web projects. We recommend having a closer look to our article on PHP Form Validation Example
If the fields have been set, information about each field will be printed. After clicking the “Submit” button, the result we’d have is:
Name: Alex Brown
E-Mail: alex.brown@gmail.com
Age: 28
Gender: Male
As you may have noticed by now, we used this $_POST["name"] to get information the user posted.
What about implementing a login form in PHP? Have a look at our Login Form in PHP Example.
8. PHP Include & Require Statements
PHP code can get cluttered, which means that if you want to later change something, it becomes a hard task to do. Include and require statements are two almost identical statements that help in an important aspect of coding, the organization of code, and making it more readable and flexible. The include/require statement copies all text, code or any other markup from one existing file to the file using the statement. In a simple viewpoint, do consider these statements like this:
The include and require statements are the same, except upon failure of code execution where:
- require will produce a fatal error (E_COMPILE_ERROR) and stop the script from executing
- include will only produce a warning (E_WARNING) and the script will continue
The syntax of these two statements is as follows:
<?php
include 'file.php'; // in case of include
require 'file.php'; // in case of require
?>
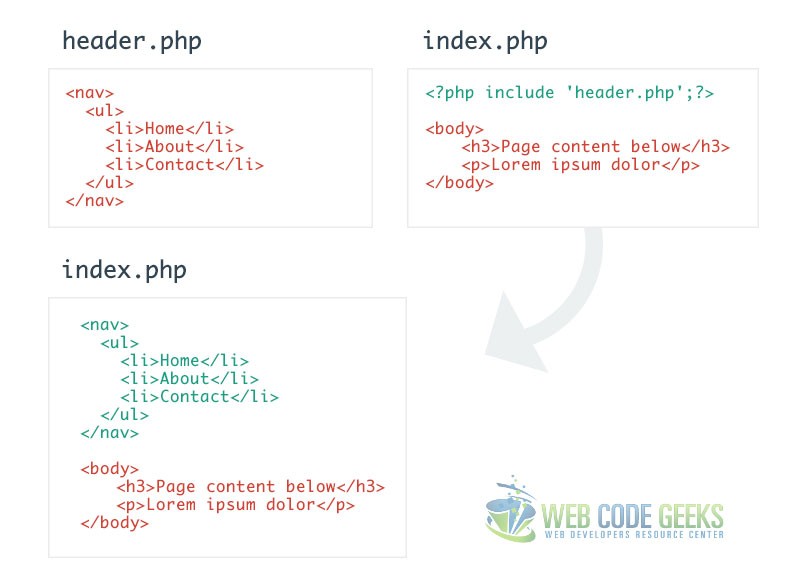
Let’s now see a real-world example where we use a header and footer using include and require into our main file:
header.php
<header>
<nav>
    <ul>
        <li><a href="#">Home</a></li>
        <li><a href="#">Profile</a></li>
        <li><a href="#">About</a></li>
        <li><a href="#">Contact</a></li>
    </ul>
</nav>
</header>
// styling to make the menu look right
<style type="text/css">
    ul, li {
        list-style-type: none;
        display: inline-block;
        margin-right: 1em;
        padding: 0;
    }
</style>
footer.php
In our main file, we’ll use require for the header.php and include for the footer.php file:
index.php
<?php require 'header.php'; ?>

<body>
    <h2>Main Content Goes Here</h2>
</body>

<?php include 'footer.php' ?>
The result, as you might have an idea by now, would be the whole code being shown as one:

9. Object Oriented Concepts
Object oriented programming is a programming language model in the center of which are objects. Let’s see some of the core concepts of classes and objects before we see actual examples of them:
-
- Class
A class is a predefined (by a programmer) data type, part of which are local data like variables, functions etc.
-
- Object
An object is an instance of a class. Objects can only be created after a class has been define. A programmer can create several objects.
-
- Constructor
A constructor refers to the concept where all data and member functions are encapsulated to form an object. A destructor, on the other hand, is called automatically whenever an object is deleted or goes out of scope.
9.1 PHP Classes
Let’s now define a new clas in PHP.
  <?php
  class myClass {         // use 'class' followed by the name of the class
    var $var1;            // declared an undefined variable
    var $var2 = 5;        // declared a number defined variable
    var $var3 = "string"; // declared a string defined variable

    function myFunction ($argument1, $argument2) {  // function definition
      // function code here
    }
  }
  ?>
But that is just how the syntax looks like. Below, we give an example of a real-world class, for example class Vehicle:
  <?php
  class Vehicle {
    var $brand;       // just a declared undefined variable
    var $speed = 80;  // a declared and defined variable

    function setSpeed($speedValue) {  // a function to change speed
      $this->speed = $speedValue;     // this will replace speed with our value
    }

    function setBrand($brandName) {   // a function to change brand
        $this->brand = $brandName;    // this will set a brand name
    }

    function printDetails(){          // a function to print details
        echo "Vehicle brand is: ".$this->brand;
        echo "
";
        echo "Vehicle speed is: ".$this->speed;
    }
  }

  $myCar = new Vehicle;       // an instance of our Vehicle class (an object)
  $myCar->setBrand("Audi");   // calling the function setBrand to define a brand
  $myCar->setSpeed(120);      // calling the function setSpeed to change speed
  $myCar->printDetails();     // calling the printDetails function to see details
  ?>
The result of this code would be:
Vehicle brand is: Audi
Vehicle speed is: 120
As you can see, the speed is changed to the latest value set by us.
9.2 PHP Constructor Function
PHP provides a special function called __construct() to define a constructor, which can take as many arguments as we want. Constructors are called automatically whenever an object is created. Let’s see how we adopt this into our previously created class. The following code snipper is found inside the class:
  <?php
  class Vehicle {
  function __construct ($brandName, $speedValue) {
    $this->brand = $brandName;  // initialize brand
    $this->speed = $speedValue; // initialize speed
    }
      function printDetails(){
          echo "Vehicle brand is: ".$this->brand;
          echo "
";
          echo "Vehicle speed is: ".$this->speed;
          echo "

";
      }
  }

    $car1 = new Vehicle("Toyota", 130);
    $car2 = new Vehicle ("Ferrari", 450);

    $car1->printDetails();
    $car2->printDetails();
  ?>
The result now is:
Vehicle brand is: Toyota
Vehicle speed is: 130

Vehicle brand is: Ferrari
Vehicle speed is: 450
PHP contains such object oriented rules just like other languages like Java, and as you go on learning it in further details, you’ll see that you can do more with those variables we declare inside a class, you can set scope to them so that they can only be accessed within a class, a function etc. Also, other concepts like methods overriding is normal when using PHP, as declaring the same method for the second time but with different arguments or code logic, will make the program execute only the latest method it finds in the file.
10. Conclusion
PHP is the fundamental back-end development technology regarding usage and learning curve. It combines such features that make for interactive web pages that people love to use everyday. In this article, we detailed the basic concepts to give you a clear idea of how it can be used in different aspects and information that you might as well relate to other programming languages like loops and conditionals, as most languages recognize these concepts and make use of them.
In the early days, everyone used PHP in a rather procedurial style, as a way to get things done when you don’t know a lot, but as you learn more and more, you’ll love working with object-oriented PHP which will make your programming life way much easier and sustainable in big projects. It is important to understand that there are many ways pages could be made dynamic in PHP, and different developers might as well have a totally distinct code that does the same task, that is some kind of flexibility that you get to decide how you are going to implement certain functions (randomly called procedures in PHP). So, just give it a try, you have nothing to lose.
11. Download
You can download the full source code of this example here: PHP-Tutorial-Samples

Because of poor guides, like this one, php newcomers start off on the wrong foot. Please, rewrite this guide considering modern php. As alternative, you should clearly state that this guide is obsolete and should be avoided.
Hello Massimiliano Arione, You cannot learn PHP 7 without knowing what objects and OOP is, and you cannot possibly start learning PDO right away without basic knowledge of MySQL (or MySQLi). If you think PHP 7 should have been taken in consideration here, you are absolutely wrong. New versions of programming languages are less preferred until the version has undergone a lot of tests by a wide community. It’s been only a few months since PHP 7 is out and guess what, no one really uses it for serious projects. Really, not for beginners. However, if you still think we… Read more »
As I already said, you should clarify that your guide is not supported on latest PHP version. Maybe someone is still learning PHP on 5.6, but 5.6 is going to be out of support on January 2017. Can you see it? It’s just 6 months from now. In 6 months, this guide (that is already ugly) will be super-ugly, and likely noob people will be frustrated because of errors. You could avoid that pain, just using something that is supported in *all* current versions (e.g. using mysqli_* instead of mysql_*). As alternative, you should specifiy in the top of your… Read more »
You have given all the basic information about PHP within one page. I’m intermediate on using PHP for web design and the information provided by you surely help to improve my knowledge. Thanks for the books too
Congratulations Fabio Cimo. All topics well explained. I feel it is a support guide with the most important points when considering starting programming in PHP.