Submit form is everywhere these days, and usually done with jQuery. This time we’ll teach you how to build them using JavaScript’s submit() function, which keeps form identity, be it class, id, tag, or name.
Setting it up
First of all we create three files: an HTML file, a JavaScript file and a CSS file with these names: index.html, submit_javascipt.js and submit_javascript.css.

The first will be the main document of our project, and the others will be the JavaScript file and the CSS file of it. But we’ll still have to script these two files into the index.html, and also we have to give a title to our project. After doing that our <head> tag will look like this:
<head>
<title>Javascript Form Submit Example</title>
<!-- Include CSS File Here -->
<link rel="stylesheet" href="submit_javascript.css"/>
<!-- Include JS File Here -->
<img src="data:image/gif;base64,R0lGODlhAQABAIAAAAAAAP///yH5BAEAAAAALAAAAAABAAEAAAIBRAA7" data-wp-preserve="%3Cscript%20src%3D%22submit_javascript.js%22%3E%3C%2Fscript%3E" data-mce-resize="false" data-mce-placeholder="1" class="mce-object" width="20" height="20" alt="<script>" title="<script>" />
</head>

Creating and styling the outline of your form
Now in the body section you put two <div>s inside of one another, one with the class="container" attribute and the one inside it with the class="main" attribute. These are purely for styling purposes. The code will look like this:
<div class="container">

<div class="main">
    </div>

</div>
While the styling for these elements can be found in the submit_javascript.css file, looking like this:
div.container{
    width: 900px;
    height: 610px;
    margin:35px auto;
    font-family: 'Raleway', sans-serif;
}
div.main{
    width: 300px;
    padding: 10px 50px 10px;
    border: 2px solid gray;
    border-radius: 10px;
    font-family: raleway;
    float:left;
    margin-top:60px;
}
Labels and Inputs
Now inside of the <div class="main"> we put this code:
<form action="#" method="post" name="form_name" id="form_id" class="form_class" ></form>
And inside this tag we put the code for the labels and inputs, which should look like this:
<h2>Javascript Form Submit Example</h2>

<label>Name :</label>
<input type="text" name="name" id="name" placeholder="Name" />
<label>Email :</label>
<input type="text" name="email" id="email" placeholder="Valid Email" />
The inputs should both have the type="text" attribute, while having names and id respectively "name" and "email". Also we can put the attribute placeholder, though it’s not obligatory.
Buttons
Now it’s time to create the submit buttons, which will be four, as we want to make make the submission once by id, once by class, once by name and once by tag.Here’s the code:
<input type="button" name="submit_id" id="btn_id" value="Submit by Id" onclick="submit_by_id()"/>
<input type="button" name="submit_name" id="btn_name" value="Submit by Name" onclick="submit_by_name()"/>
<input type="button" name="submit_class" id="btn_class" value="Submit by Class" onclick="submit_by_class()"/>
<input type="button" name="submit_tag" id="btn_tag" value="Submit by Tag" onclick="submit_by_tag()"/>
You all know the attributes given to the button, except for maybe the onclick attribute. That is the name of the JavaScript function, which tells the button what to do when clicked. With that we finish our job in the index.html file, so we can deal with those functions right now.
JavaScript functions
Every button triggers a different way of behaving for the buttons they’re attributed to, namely the submit the form by class, id, name, or tag. Also we will put out an alert which will tell us if the e-mail is valid or not. For that we’re going to have a validation function, which will look like this:
// Name and Email validation Function.
function validation() {
    var name = document.getElementById("name").value;
    var email = document.getElementById("email").value;
    var emailReg = /^([\w-\.]+@([\w-]+\.)+[\w-]{2,4})?$/;
    if (name === '' || email === '') {
        alert("Please fill all fields...!!!!!!");
        return false;
    } else if (!(email).match(emailReg)) {
        alert("Invalid Email...!!!!!!");
        return false;
    } else {
        return true;
    }
}
This function gets the name and e-mail and if those are null strings puts out “Please fill all fields……!!!!!!” or if the e-mail does not match the regular email, puts out “Invalid email…..!!!!!!”.
Let’s see first the function submit_by_tag(). The code for it will go like this:
function submit_by_tag() {
    var name = document.getElementById("name").value;
    var email = document.getElementById("email").value;
    if (validation()) // Calling validation function
    {
        var x = document.getElementsByTagName("form");
        x[0].submit(); //form submission
        alert(" Name : " + name + " \n Email : " + email + " \n Form Tag :
<form>\n\n Form Submitted Successfully......");
    }
}
After getting the name and email values and passing them through validation, the function gets the element by tag name and submits them using the submit() function. After that, it puts out an alert saying the name and email entered, the form tag, and a message saying that the form was submitted successfully.
Similar is what we’re going to do with the other three functions, except in them we’re going to get the elements by class, id, or name.
The code below is the submit_by_class() function:
function submit_by_class() {
    var name = document.getElementById("name").value;
    var email = document.getElementById("email").value;
    if (validation()) // Calling validation function
    {
        var x = document.getElementsByClassName("form_class");
        x[0].submit(); //form submission
        alert(" Name : " + name + " \n Email : " + email + " \n Form Class : " + document.getElementById("form_id").getAttribute("class") + "\n\n Form Submitted Successfully......");
    }
}
This is the code for submit_by_name() function:
function submit_by_name() {
    var name = document.getElementById("name").value;
    var email = document.getElementById("email").value;
    if (validation()) // Calling validation function
    {
        var x = document.getElementsByName('form_name');
        x[0].submit(); //form submission
        alert(" Name : " + name + " \n Email : " + email + " \n Form Name : " + document.getElementById("form_id").getAttribute("name") + "\n\n Form Submitted Successfully......");
    }
}
And finally, this is the submit_by_id() function:
function submit_by_id() {
    var name = document.getElementById("name").value;
    var email = document.getElementById("email").value;
    if (validation()) // Calling validation function
    {
        document.getElementById("form_id").submit(); //form submission
        alert(" Name : " + name + " \n Email : " + email + " \n Form Id : " + document.getElementById("form_id").getAttribute("id") + "\n\n Form Submitted Successfully......");
    }
}
Styling the form
And last but not least is styling the form. We have already styled the outer <div>s with the class="container" and class="main" attributes. Now we’re going to make everything else look as pretty.
First we put this code in the submit_javascript.css file to style the title of the form and the content separator:
h2{
    background-color: #FEFFED;
    padding: 30px 35px;
    margin: -10px -50px;
    text-align:center;
    border-radius: 10px 10px 0 0;
}
hr{
    margin: 10px -50px;
    border: 0;
    border-top: 1px solid #ccc;
    margin-bottom: 40px;
}
Now we style the inputs and labels with this CSS bit of code:
input[type=text]{
    width: 100%;
    height: 40px;
    padding: 5px;
    margin-bottom: 25px;
    margin-top: 5px;
    border: 2px solid #ccc;
    color: #4f4f4f;
    font-size: 16px;
    border-radius: 5px;
}
label{
    color: #464646;
    text-shadow: 0 1px 0 #fff;
    font-size: 14px;
    font-weight: bold;
}
Now let’s get to the buttons.We will style them differently when in standby and when hovered. The following bit of code is their normal standby state:
#btn_id,#btn_name,#btn_class,#btn_tag{
    font-size: 16px;
    background: linear-gradient(#ffbc00 5%, #ffdd7f 100%);
    border: 1px solid #e5a900;
    color: #4E4D4B;
    font-weight: bold;
    cursor: pointer;
    width: 47.5%;
    border-radius: 5px;
    margin-bottom:10px;
    padding: 7px 0;
}
Meanwhile the code for the buttons when hovered is this:
#btn_id:hover,#btn_name:hover,#btn_class:hover,#btn_tag:hover{
    background: linear-gradient(#ffdd7f 5%, #ffbc00 100%);
}
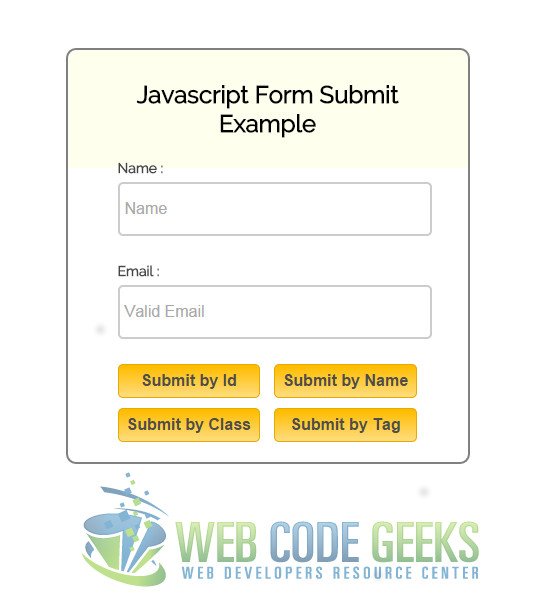
And with this we’re set. The form will look like this:
Download the source code
This was an example of form submission using JavaScript.
You can download the source code for this example here: SubmitForm

Thiswas a good experience .Was working on adding a Form ( ) but was not getting the required results So this was goodl experience forhaving this site come online