Guess how long the test and build process is for my most recent project? Twenty minutes. I’m not kidding.
It takes over 10 minutes to run my build process and another 10 to run my several thousand unit tests. Tack onto that dozens of code pushes a day, and waiting for a passing test suite means a lot of wasted time. Unfortunately for me, this time suck can only get worse because I’m not exactly about to start deleting unit tests.
So, what is a software developer to do?
Well, the obvious answer is to optimize my unit tests and build process, but let’s pretend for a minute that everything is fully optimized already. How can I make my CI/CD process better if I’m out of direct optimizations? Let’s start from the beginning. In this post, you will learn how to optimize your CI/CD process with Codeship’s Docker-based infrastructure to speed up your tests.
Getting Started
To get going, let’s take a look at an established open-source project with an existing build process and decent number of unit tests.
The Laravel Framework fits the bill quite nicely. It has a large test suite and build process, which will allow me to not only demonstrate the existing build speed but also compare it to an optimized build speed. Because we’re only benchmarking the difference between serialized and parallelized test and build processes (and not actually contributing to this project), I’ve branched off of the Laravel’s master branch into one specifically for this demonstration (called codeship-jetparallel-ci).
Dockerfile
Okay, now that we have a codebase and a Codeship-specific branch, we need to prepare it to run our tests using Docker and Codeship. (I’m not going to cover getting Docker and the Jet CLI tool installed, so I suggest you follow Codeship’s own Jet installation tutorial before moving forward.)
The first thing we need to do is set up a Dockerfile. If you are new to Docker, this file is used to configure a container that is managed by Docker.
# Start with the offical image for PHP 5.6
FROM php:5.6

# Install additonal packages
RUN apt-get update
RUN apt-get install -y git unzip libmcrypt-dev libmemcached-dev libz-dev
RUN pecl install memcached

# Install/Enable PHP extensions
RUN docker-php-ext-install pcntl mcrypt
RUN echo extension=memcached.so >> /usr/local/etc/php/conf.d/memcached.ini

# Install Composer and make it available in the PATH
RUN curl -sS https://getcomposer.org/installer | php -- --install-dir=/usr/bin/ --filename=composer

# Set the current working directory
WORKDIR /app

# Copy the source code onto the container (required by composer)
COPY src ./src

# Copy over the composer.json and run composer install.
# This is done as a separate steps so the image can be cached this step won't be
# rerun unless you change composer.json
COPY composer.json ./
RUN composer install --prefer-source --no-interaction

# Finally copy the tests onto the container
COPY phpunit.xml ./
COPY tests ./tests
Services and Steps
Now, with our Dockerfile, we are able to spin up a suitable Docker container for building and testing our codebase. However, the Dockerfile is only part of the solution. We also need to tell Codeship about our Dockerfile, as well as which steps to take in order to run our test suite. This is accomplished using two files: codeship_services.yml and codeship_steps.yml.
The codeship-services.yml file is essentially a Docker Compose file, which defines any services, networks, and volumes our build process might need. To get started, we’ll keep our services file pretty lightweight by only building one image. It is important to note here that Codeship supports a ‘cached’ directive that attempts to reuse previous builds in order to speed up the build process.
app:
  build:
    image: app
    dockerfile_path: Dockerfile
  cached: true
Next, the codeship-steps.yml file is a configuration file that defines the steps of the build, test, and deploy process. Again, to get started, we’re going to keep this file lightweight. For now, we’ll run our entire test suite all at once. Also, while we are only running one step at first, I have directed Codeship and Jet to run my steps in parallel. This will come in handy in a little bit.
- type: parallel
  steps:
  - service: app
    command: vendor/bin/phpunit
Putting It All Together
Now that we have our three configuration settings (and hopefully have Jet and Docker configured locally), we’re ready to put it all together! To run our test process, simply call the jet steps command from within the project directory. Here’s a quick screenshot of the results of the first run process:
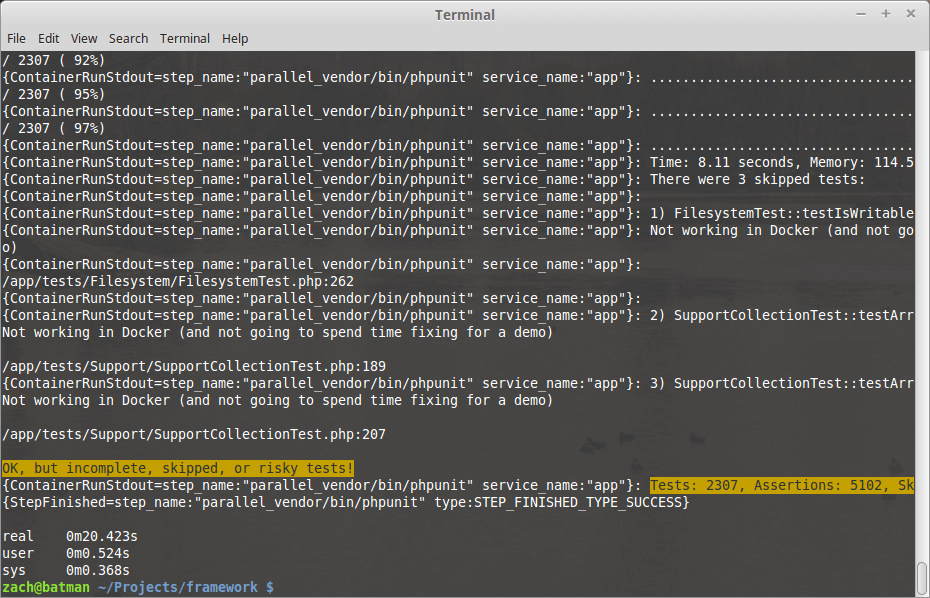
As you can see, excluding the build time (which I precached to speed subsequent tests up), the entire test suite of this project takes about 20 seconds. Not a bad base benchmark, but we can do better.
Parallelization
So, how do we fix the long build time? This is where the ‘parallel’ directive from the codeship-steps.yml file comes into play.
What this directive does is allow us to run steps in parallel, which in this case means running each subdirectory in our tests directory independently of the others. We can therefore run multiple tests at once, which will in turn let us drastically reduce the length of our test time. This is achieved by spinning up separate containers, in order to allow us to retain control over performance and resource use.
- type: parallel
steps:
- service: app
command: vendor/bin/phpunit tests/Auth/
- service: app
command: vendor/bin/phpunit tests/Broadcasting/
- service: app
command: vendor/bin/phpunit tests/Bus/
- service: app
command: vendor/bin/phpunit tests/Cache/
- service: app
command: vendor/bin/phpunit tests/Console/
- service: app
command: vendor/bin/phpunit tests/Container/
- service: app
command: vendor/bin/phpunit tests/Cookie/
- service: app
command: vendor/bin/phpunit tests/Database/
- service: app
command: vendor/bin/phpunit tests/Encryption/
- service: app
command: vendor/bin/phpunit tests/Events/
- service: app
command: vendor/bin/phpunit tests/Filesystem/
- service: app
command: vendor/bin/phpunit tests/Foundation/
- service: app
command: vendor/bin/phpunit tests/Hashing/
- service: app
command: vendor/bin/phpunit tests/Http/
- service: app
command: vendor/bin/phpunit tests/Log/
- service: app
command: vendor/bin/phpunit tests/Mail/
- service: app
command: vendor/bin/phpunit tests/Pagination/
- service: app
command: vendor/bin/phpunit tests/Pipeline/
- service: app
command: vendor/bin/phpunit tests/Queue/
- service: app
command: vendor/bin/phpunit tests/Redis/
- service: app
command: vendor/bin/phpunit tests/Routing/
- service: app
command: vendor/bin/phpunit tests/Session/
- service: app
command: vendor/bin/phpunit tests/Support/
- service: app
command: vendor/bin/phpunit tests/Translation/
- service: app
command: vendor/bin/phpunit tests/Validation/
- service: app
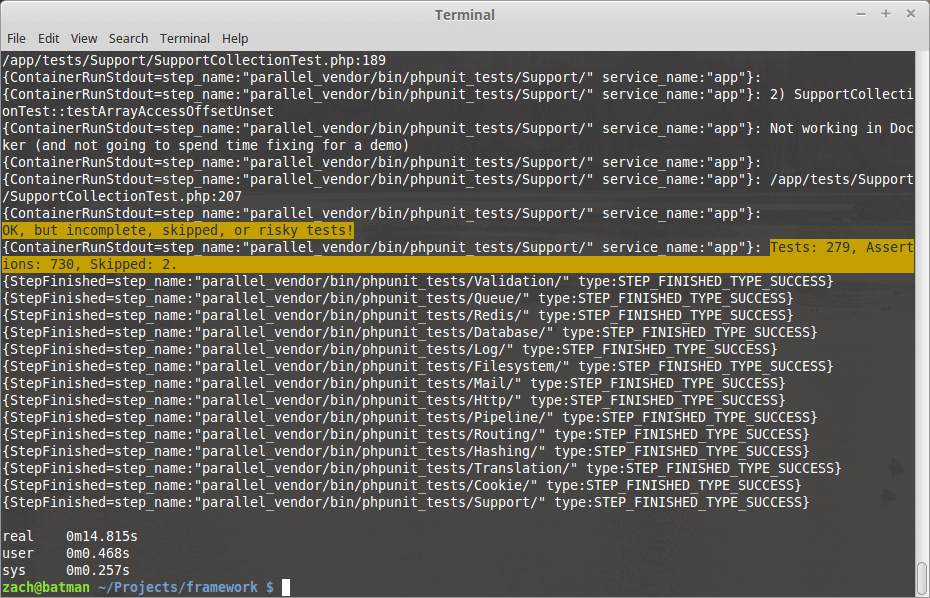
command: vendor/bin/phpunit tests/View/With just a little tweak to our codeship-steps.yml file, we can split up our test suite into multiple parallel processes, which reduces our total test time to 14 seconds. In a test suite that takes less than a minute, the speedup might feel negligible, but in a large suite with 10 minutes’ worth of tests, this can save us a ton of time in the long run.
Multiple Services
Up to this point, we’ve been focusing on speeding up our test suite through parallelization, but what about the rest of the process? How can we optimize everything from building to deploying? This is where the codeshipservices.yml file comes into play.
The syntax of this file is based on Docker Compose (meaning most syntax supported by Docker Compose is supported by Codeship Services), which is used to define multiple Docker containers for use in our build process. With a few small changes to this file, we can persist data across our containers, which will allow us to reduce unnecessary overhead and streamline each step.
Build and Test
To accomplish this, the first thing we need to do is split our build and test steps into two separate services. To keep this example straightforward, we will be using the same Dockerfile; however in the event that different processes require different packages, using multiple Dockerfiles would be appropriate.
build:
  build:
    image: app
    dockerfile_path: Dockerfile
  cached: true
  volumes_from:
    - data
test:
  build:
    image: app
    dockerfile_path: Dockerfile
  cached: true
  volumes_from:
    - data
data:
  image: busybox
  volumes:
    - ./vendor:/app/vendor
Let’s break this file down a bit.
As you can see, the original app service has been duplicated into two separate services: build and test. What’s different about these two services — the volumes and volumes_from directives. Because each service will require a fully built application, the test service inherits mounted volumes from the build service. What this means is that when the build process is run (via Composer), the resulting packages are persisted across each container.
I should note that because this is a backend PHP framework we are working with, the build process is a fairly simple installation of third-party PHP packages. In more complicated codebases, however, the build step could include anything from binary compilation to asset uglification and minification (the sky’s really the limit here). This flexibility is advantageous from a DevOps perspective because it assures that you are free to use whichever frameworks and development tools are the best fit — which is one of the key reasons for using Docker and a microservices architecture in the first place.
Deploy
Up until now, we have been doing all of our work locally via the Jet CLI tool, but at some point we need to actually start pushing data somewhere. Thankfully, Codeship supports deploying containers to remote registries, which allows us to deploy a built container wherever we want. While deployments are pretty par for the course when it comes to CI/CD services, what makes this unique is our ability to control exactly what gets deployed, and when.
For example, we might want to push our container to the remote registry before updating a code coverage report, or run database migrations in a parallel process. Or maybe we don’t want to deploy to a container image at all. Deployments could also be artifacts, APIs, or even to SFTP. This is a major advantage, since it means you can deploy to whatever infrastructure you already have. You don’t have to change your infrastructure to match your new development workflow.
Here, though, I’ll cover the basics of deploying to a container registry. I won’t go over the remote registry pushing configuration process because Codeship explains it much more effectively than I would, but in the context of this demo, it’s as simple as adding an additional step to our codeship-steps.yml file.
- type: serial
  steps:
    - type: serial
      steps:
        - service: build
          command: composer install --prefer-source --no-interaction
    - type: parallel
      steps:
        - service: test
          command: vendor/bin/phpunit tests/Auth/
        - service: test
          command: vendor/bin/phpunit tests/Broadcasting/
        - service: test
          command: vendor/bin/phpunit tests/Bus/
        - service: test
          command: vendor/bin/phpunit tests/Cache/
        - service: test
          command: vendor/bin/phpunit tests/Console/
        - service: test
          command: vendor/bin/phpunit tests/Container/
        - service: test
          command: vendor/bin/phpunit tests/Cookie/
        - service: test
          command: vendor/bin/phpunit tests/Database/
        - service: test
          command: vendor/bin/phpunit tests/Encryption/
        - service: test
          command: vendor/bin/phpunit tests/Events/
        - service: test
          command: vendor/bin/phpunit tests/Filesystem/
        - service: test
          command: vendor/bin/phpunit tests/Foundation/
        - service: test
          command: vendor/bin/phpunit tests/Hashing/
        - service: test
          command: vendor/bin/phpunit tests/Http/
        - service: test
          command: vendor/bin/phpunit tests/Log/
        - service: test
          command: vendor/bin/phpunit tests/Mail/
        - service: test
          command: vendor/bin/phpunit tests/Pagination/
        - service: test
          command: vendor/bin/phpunit tests/Pipeline/
        - service: test
          command: vendor/bin/phpunit tests/Queue/
        - service: test
          command: vendor/bin/phpunit tests/Redis/
        - service: test
          command: vendor/bin/phpunit tests/Routing/
        - service: test
          command: vendor/bin/phpunit tests/Session/
        - service: test
          command: vendor/bin/phpunit tests/Support/
        - service: test
          command: vendor/bin/phpunit tests/Translation/
        - service: test
          command: vendor/bin/phpunit tests/Validation/
        - service: test
          command: vendor/bin/phpunit tests/View/
    - type: serial
      steps:
        - service: build
          type: push
          image_name: zachflower/codeship-jet-parallel-ci
          registry: https://index.docker.io/v1/
          encrypted_dockercfg_path: dockercfg.encrypted
If you followed the Codeship documentation for enabling repository pushes, then you can see that getting it hooked into this demo was surprisingly easy. One quick push to GitHub later, and we now have an end-to-end build, test, and deploy process split across multiple containers and steps!
Conclusion
While this is a very limited demo, the potential here should be self-evident. The power of Codeship’s Docker support is incredible, and with the addition of their Jet CLI tool, you can incorporate it into your development process right from the start.
| Reference: | Turning Your App into Separate Containers for Better CI/CD from our WCG partner Zachary Flower at the Codeship Blog blog. |
