The Angular 2 change detection mechanism is much more transparent and easier to reason about than its equivalent in Angular 1. But there are still situations (like when doing performance optimizations) when we really need to know whats going on under hood. So let’s dig deeper into change detection by going over the following topics: (sample code is here):
- How is change detection implemented?
- What does an Angular 2 change detector look like, can i see it ?
- How does the default change detection mechanism work
- turning on/off change detection, and triggering it manually
- Avoiding change detection loops: Production vs Development mode
- What does the
OnPushchange detection mode actually do? - Using Immutable.js to simplify the building of Angular 2 apps
- Conclusions
How is change detection implemented?
Angular 2 can detect when component data changes, and then automatically re-render the view to reflect that change. But how can it do so after such a low-level event like the click of a button, that can happen anywhere on the page?
To understand how this works, we need to start by realizing that in Javascript the whole runtime is overridable by design. We can override functions in String or Number if we so want.
Overriding browser default mechanisms
What happens is that Angular 2 at startup time will patch several low-level browser APIs, such as for example addEventListener, which is the browser function used to register all browser events, including click handlers. Angular will replace addEventListener with a new version that does the equivalent of this:
// this is the new version of addEventListener
function addEventListener(eventName, callback) {
     // call the real addEventListener
     callRealAddEventListener(eventName, function() {
        // first call the original callback
        callback(...);
        // and then run Angular-specific functionality
        var changed = angular2.runChangeDetection();
         if (changed) {
             angular2.reRenderUIPart();
         }
     });
}
The new version of addEventListener adds more functionality to any event handler: not only the registered callback is called, but Angular 2 is given a chance to run change detection and update the UI.
How does this low-level runtime patching work?
This low level patching of browser APIs is done by a library shipped with Angular called Zone.js. Its important to have an idea of what a zone is.
A zone is nothing more than an execution context that survives multiple Javascript VM execution turns. Its a generic mechanism which we can use to add extra functionality to the browser. Angular uses Zones internally to trigger change detection, but another possible use would be to do application profiling, or keeping track of long stack traces that run across multiple VM turns.
Browser Async APIs supported
The following frequently used browser mechanisms are patched to support change detection:
- all browser events (click, mouseover, keyup, etc.)
setTimeout()andsetInterval()- Ajax requests
In fact many other browser APIs are patched by Zone.js to transparently trigger Angular 2 change detection, such as for example Websockets. Have a look at the Zone.js test specifications to see what is currently supported.
One limitation of this mechanism is that if by some reason an asynchronous browser API is not supported by Zone.js, then change detection will not be triggered. This is for example the case of IndexedDB callbacks.
This explains how change detection gets triggered, but once triggered how does it actually work?
The change detection tree
Each Angular 2 component has an associated change detector, which is created at application startup time. For example take the following TodoItem component:
@Component({
    selector: 'todo-item',
    template: '<span class="todo noselect" (click)="onToggle()">{{todo.owner.firstname}} - {{todo.description}} - completed: {{todo.completed}}</span>'
})
export class TodoItem {
    @Input()
    todo:Todo;

    @Output()
    toggle = new EventEmitter<Object>();

    onToggle() {
        this.toggle.emit(this.todo);
    }
}
This component will receive a Todo object as input and emit an event if the todo status is toggled. To make the example more interesting, the Todo class contains a nested object:
export class Todo {
    constructor(public id: number,
        public description: string,
        public completed: boolean,
        public owner: Owner) {
    }
}
We can see that Todo has a property owner which is itself an object with two properties: first name and last name.
What does the Todo Item change detector look like ?
We can actually see at runtime what the change detector looks like ! To see it lets just add some code in the Todo class to trigger a breakpoint when a certain property is accessed.
When the breakpoint hits, we can walk through the stack trace and see change detection in action:
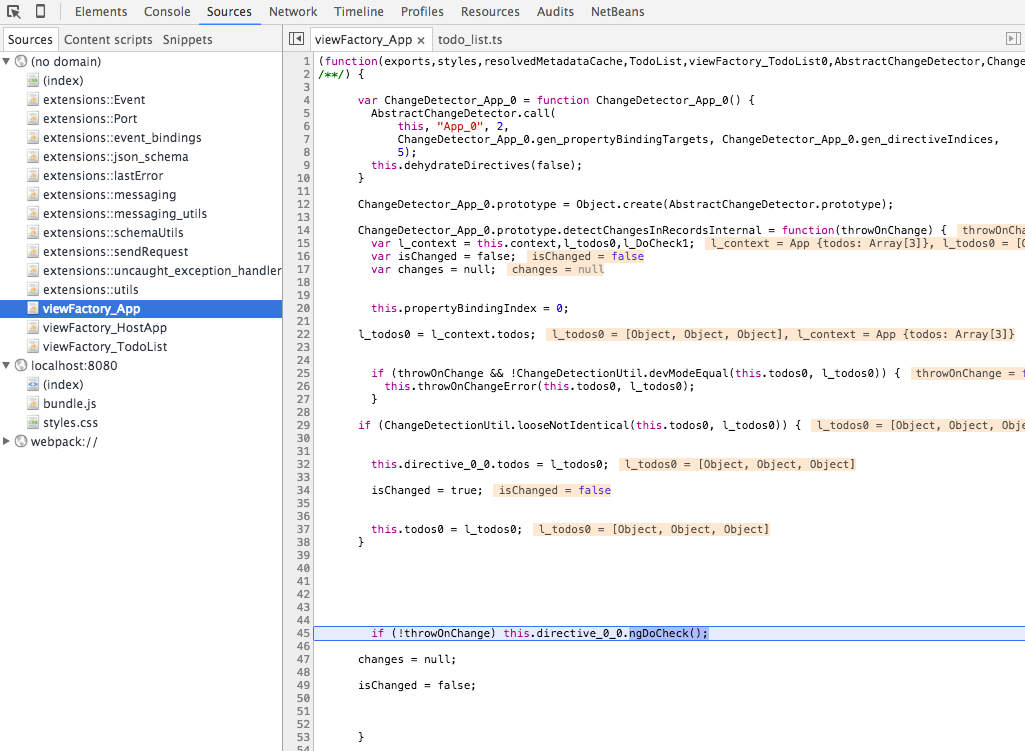
Don’t worry, you will never have to debug this code ! There is no magic involved either, its just a plain Javascript method built at application startup time. But what does it do?
How does the default change detection mechanism work?
This method might look strange at first, with all the strangely named variables. But by digging deeper into it, we notice that its doing something very simple: for each expression used in the template, its comparing the current value of the property used in the expression with the previous value of that property.
If the property value before and after is different, it will set isChanged to true, and thats it ! Well almost, its comparing values by using a method called looseNotIdentical(), which is really just a === comparison with special logic for the NaN case (see here).
And what about the nested object owner?
We can see in the change detector code that also the properties of the owner nested object are being checked for differences. But only the firstname property is being compared, not the lastname property.
This is because lastname is not used in the component template ! Also the top-level id property of Todo is not compared by the same reason.
With this, we can safely say that:
By default, Angular 2 Change Detection works by checking if the value of template expressions have changed. This is done for all components.
We can also conclude that:
By default, Angular 2 does not do deep object comparison to detect changes, it only takes into account properties used by the template
Why does change detection work like this by default?
One of the main goals of Angular 2 is to be more transparent and easy to use, so that framework users don’t have to go through great lengths to debug the framework and be aware of internal mechanisms in order to be able to use it effectively.
If you are familiar with Angular 1, think about $digest() and $apply() and all the pitfalls of when to use them / not to use them. One of the main goals of Angular 2 is to avoid that.
What about comparison by reference?
The fact of the matter is that Javascript objects are mutable, and Angular wants to give full support out of the box for those.
Imagine what it would be if the Angular 2 default change detection mechanism would be based on reference comparison of component inputs instead of the default mechanism? Even something as simple as the sample Todo application would be tricky to build: developers would have to be very careful to create a new Todo instead of simply updating properties.
But as we will see, its still possible to customize Angular change detection if we really need to.
What about performance?
Notice how the change detector for the todo list component makes explicit reference to the todos property.
Another way to do this would be to loop dynamically through the properties of the component, making the code generic instead of specific to the component. This way we wouldn’t have to build a change detector per component at startup time in the first place ! So what’s the story here?
A quick look inside the virtual machine
This all has to do with the way the Javascript virtual machine works. The code for dynamically comparing properties, although generic cannot easily be optimized away into native code by the VM just-in-time compiler.
This is unlike the specific code of the change detector, which does explicitly access each of the component input properties. This code is very much like the code we would write ourselves by hand, and is very easy to be transformed into native code by the virtual machine.
The end result of using generated but explicit detectors is a change detection mechanism that is very fast (more so than Angular 1), predicable and simple to reason about.
But if we run into a performance corner case, is there a way to optimize change detection?
The OnPush change detection mode
If our Todo list got really big, we could configure the TodoList component to update itself only when the Todo list changes. This can be done by updating the component change detection strategy to OnPush:
@Component({
    selector: 'todo-list',
    changeDetection: ChangeDetectionStrategy.OnPush,
    directives: [TodoItem],
    template: ...
})
export class TodoList {
    ...
}
Let’s now add to out application a couple of buttons: one to toggle the first item of the list by mutating it directly, and another that adds a Todo to the whole list. The code looks like this:
@Component({
    selector: 'app',
    directives: [TodoList],
    template: `<div>
                    <todo-list [todos]="todos"></todo-list>
               </div>
               <button (click)="toggleFirst()">Toggle First Item</button>
               <button (click)="addTodo()">Add Todo to List</button>`
})
export class App {
    todos:Array = initialData;

    constructor() {
    }

    toggleFirst() {
        this.todos[0].completed = ! this.todos[0].completed;
    }

    addTodo() {
        let newTodos = this.todos.slice(0);
        newTodos.push( new Todo(1, "TODO 4",
            false, new Owner("John", "Doe")));
        this.todos = newTodos;
    }
}
Lets now see how the two new buttons behave:
- the first button “Toggle First Item” does not work ! This is because the
toggleFirst()method directly mutates an element of the list.TodoListcannot detect this, as its input referencetodosdid not change - the second button does work ! notice that the method
addTodo()creates a copy of the todo list, and then adds an item to the copy and finally replaces the todos member variable with the copied list. This triggers change detection because the component detects a reference change in its input: it received a new list ! - In the second button, mutating directly the todos list will not work! we really need a new list.
Is OnPush really just comparing inputs by reference?
This is not the case, if you try to toggle a todo by clicking on it, it still works ! Even if you switch TodoItem to OnPush as well. This is because OnPush does not check only for changes in the component inputs: if a component emits an event that will also trigger change detection.
According to this quote from Victor Savkin in his blog:
When using OnPush detectors, then the framework will check an OnPush component when any of its input properties changes, when it fires an event, or when an observable fires an event
Although allowing for better performance, the use of OnPush comes at a high complexity cost if used with mutable objects. It might introduce bugs that are hard to reason about and reproduce. But there is a way to make the use of OnPush viable.
Using Immutable.js to simplify the building of Angular 2 apps
If we build our application using immutable objects and immutable lists only, its possible to use OnPush everywhere transparently, without the risk of stumbling into change detection bugs. This is because with immutable objects the only way to modify data is to create a new immutable object and replace the previous object. With immutable object we have the guarantee that:
- a new immutable object will always trigger
OnPushchange detection - we cannot accidentally create a bug by forgetting to create a new copy of an object, because the only way to modify data is to create new objects
A good choice for going immutable is to use the Immutable.js library. This library provides immutable primitives for building applications, like for example immutable objects (Maps) and immutable lists.
This library can be also be used in a type-safe way, check this previous post for an example on how to do it.
Avoiding change detection loops: Production vs Development mode
One of the important properties of Angular 2 change detection is that unlike Angular 1 it enforces a uni-directional data flow: when the data on our controller classes gets updated, change detection runs and updates the view.
But that updating of the view does not itself trigger further changes which on their turn trigger further updates to the view, creating what in Angular 1 was called a digest cycle.
How to trigger a change detection loop in Angular?
One way is if we are using lifecycle callbacks. For example in the TodoList component we can trigger a callback to another component that changes one of the bindings:
ngAfterViewChecked() {
    if (this.callback && this.clicked) {
        console.log("changing status ...");
        this.callback(Math.random());
    }
}
You can try the sample application, simply click the “Trigger Change Detection loop” button. An error message will show up in the console:
EXCEPTION: Expression '{{message}} in App@3:20' has changed after it was checkedThis error message is only throw if we are running Angular in development mode. What happens if we enable production mode?
enableProdMode();
bootstrap(App);
In production mode the error would not be thrown and the issue would remain undetected.
Are change detection issues frequent?
We really have to go out of our way to trigger a change detection loop, but just in case its better to always use development mode during the development phase, as that will avoid the problem.
This guarantee comes at the expense of Angular always running change detection twice, the second time for detecting this type of cases. In production mode change detection is only run once.
turning on/off change detection, and triggering it manually
There could be special ocasions where we do want to turn off change detection. Imagine a situation where a lot of data arrives from the backend via a websocket. We might want to update a certain part of the UI only once every 5 seconds. To do so, we start by injecting the change detector into the component:
constructor(private ref: ChangeDetectorRef) {
    ref.detach();
    setInterval(() => {
      this.ref.detectChanges();
    }, 5000);
  }
As we can see, we just detach the change detector, which effectively turns off change detection. Then we simply trigger it manually every 5 seconds by calling detectChanges().
Conclusions
The Angular 2 default change detection mechanism is actually quite similar to Angular 1: it compares the values of templates expressions before and after a browser event to see if something changed. It does so for all components. But there are also some important differences:
For one there are no change detection loops, or a digest cycle as it was named in Angular 1. This allows to reason about each component just by looking at its template and its controller.
Another difference is that the mechanism of detecting changes in a component is much faster due to the way change detectors are built.
Finally and unlike in Angular 1, the change detection mechanism is customizable.
Do we need really need to know that much about change detection?
Probably for 95% of applications and use cases its safe to say that Angular 2 Change Detection just works and there is not much that we need to know about it. Still its useful to have an idea on how it works, for several reasons:
- for one it helps us understand some development error messages that we might come across like the one concerning change detection loops
- it helps us to read error stack traces, all those
zone.afterTurnDone()all of a sudden look a lot more clear - in cases where performance is a a premium (and are we sure we shouldn’t just add pagination to that huge data table?), knowing about change detection helps us do performance optimizations.
Have a look at the references bellow for further reading on Angular 2 change detection.
References
Change Detection in Angular 2 by Victor Savkin (@victorsavkin)
Zones Ng-Conf-2014 talk by Brian Ford (@briantford)
Ng-Nl Change Detection Explained talk by Pascal Precht (@PascalPrecht)
| Reference: | How does Angular 2 Change Detection Really Work ? from our WCG partner Aleksey Novik at the The JHades Blog blog. |
