Introduction
In this article, I will demonstrate how to deploy a simple static Angular application on AWS cloud using S3 service. The article assumes that you have the necessary AWS account and able to access the S3 service. The application we are about to deploy will be simple and static in nature and there will be no server side code. For more complex application you could explore different deployment options. The S3 service of Amazon AWS is primarily used to host static website. We will deploy our Angular application that will be served as a static website using S3.
A brief about Simple Storage Service (S3)
S3 is a object storage facility provided by Amazon AWS. One can persist to or retrieve files from S3 using standard web UI or supported API. The object storage means you can place or store any flat files like images, videos or documents (Doc, Pdf etc). In S3, files are stored in a specialized folders called buckets. One can create as many buckets and store files in it. S3 is used to store static content i.e the content that does not change dynamically and therefore a popular choice to host static websites.
Creating a Simple Application
Before we deep dive into deployment process, we would need a simple application. You can quickly create the simple app using Angular CLI. For more information on setting up Angular CLI follow the Build Your Own Component article. Open the Node.js prompt and run the following command:
ng new my-simple-app
The above command will quickly create a new application called my-simple-app. The application files will be created under my-simple-app folder. Once the application is created we will quickly build the same. Navigate to my-simple-app folder and run the following command:
ng build
The above command will build the application i.e all the Typescript related code will be compiled into native JavaScript and stored in the dist folder. The dist folder is a folder of importance to us. We will deploy this dist folder in AWS S3.
Creating S3 Bucket
Let’s get practical. Make sure you have an Amazon account and if not then you can sign up for free. For the first year Amazon AWS provides you with free access to try out different services with specific usage limit. How much usage is free is very well documented on the AWS portal. So make sure you understand the usage limit and not end up paying for overuse of any services. For our simple Angular application, it should not cost you anything but if you indeed want to avail AWS services to deploy a full blown application then make sure you are aware of their cost patterns. Log in to AWS Console. Click on All Services and you should see plethora of AWS services.
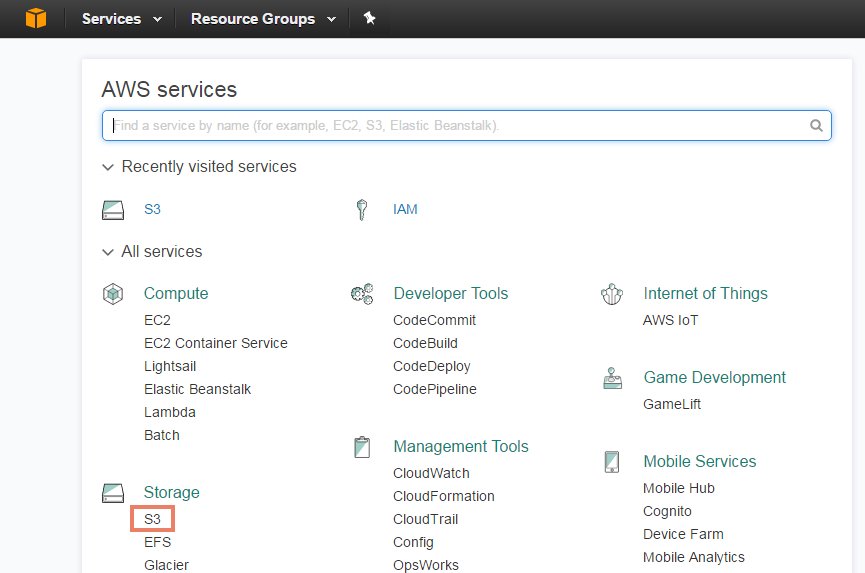
Click on S3 and click Create Bucket button.
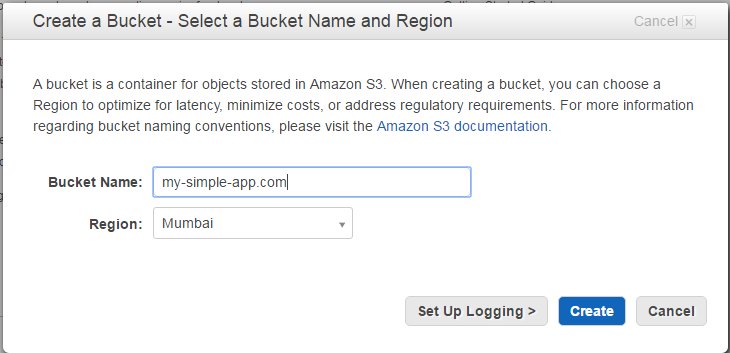
Provide the name of the bucket. Since we are deploying a very simple app, let’s name it my-simple-app.com. (The name typically should indicate the kind of website you intend to host and preferably in a DNS like naming convention like my-site.com). Bucket names are unique globally across regions and therefore it is advisable to choose a unique name that does not clash with other names. As websites have their domains registered, it is a good practice to keep your website name as a bucket name. Select the region which is the closest to where you are. Click Create to create the bucket. This is the bucket where we will store our Angular application.
Configuring the bucket
Bucket configuration will involve the following steps:
- Setting up permissions
- Configuring hosting details
Setting up permissions
We will setup permission for the newly created bucket that will host our application.
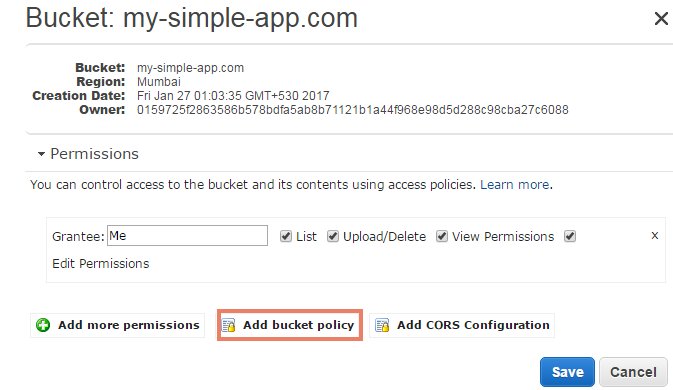
Select the my-simple-app.com bucket and navigate to Permissions->Add bucket policy and copy the following permission policy:
{
  "Version":"2012-10-17",
  "Statement":[{
	"Sid":"PublicReadGetObject",
        "Effect":"Allow",
	  "Principal": "*",
      "Action":["s3:GetObject"],
      "Resource":["arn:aws:s3:::my-simple-app.com/*"
      ]
    }
  ]
}
The above policy states that anyone is allowed to access my simple app. By default if you do not setup any permission then no one can access your bucket. Since we want our site to be served to public, the above permission grants that access. Click Save.
Configuring hosting details
Next we will configure the hosting details.
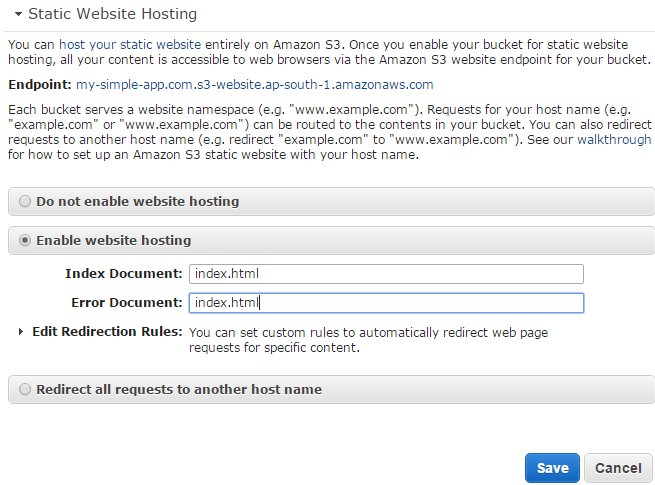
Navigate to Static Website Hosting->Enable website hosting and provide the Index Document as index.html. This is the root html that will be served by our Angular application. The Error Document can also contain index.html for now. (If you are routing your errors to a separate HTML file then you can specify that file name). Typically, for a simple static application it is best to leave it to Angular to handle error conditions for any invalid routes. Click Save.
Deploying the Application
The next step will be to deploy our simple application, it means we will upload our Angular compiled files to our bucket.
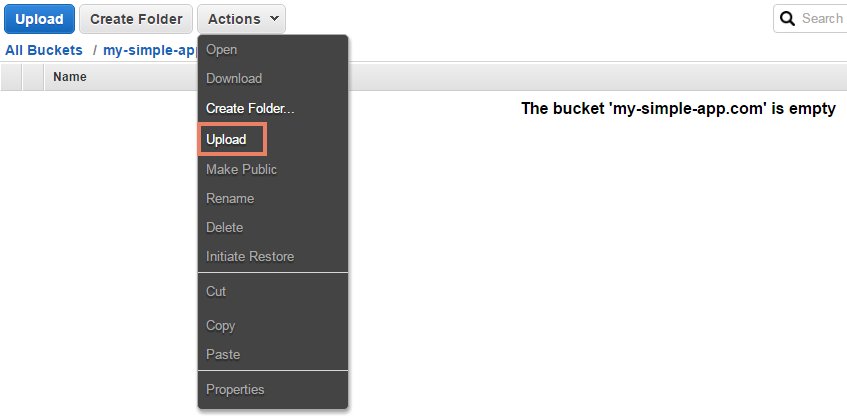
Click on our newly configured bucket – my-simple-app.com. Select Action->Upload. Here you will be able to add files either using drag and drop feature or by selecting Add Files option. You can click Add Files option and navigate to the dist folder of your my-simple-app Angular application. Under dist, select everything and drag it to your bucket. Click Start Upload. This will upload all the files and folder under the dist folder to our my-simple-app.com bucket. Now our simple application is deployed on S3.
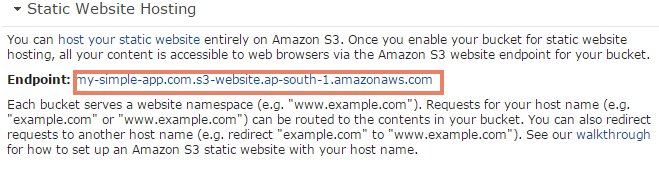
To test our deployment, select Properties and navigate to Static Website Hosting and you will see the endpoint URL (which is a long Amazon provided URN). Just click that URL and you will see your Angular app running on AWS S3.
In a more real world situation, you may want to register a domain name and setup DNS servers and map it to your S3 bucket. So that you can directly use that domain to view your site instead of using the default endpoint address provided by Amazon AWS. You can explore various other options within S3 to suit your deployment needs.
| Reference: | AngularJs 2 Series: Deploy Your Application on AWS S3 from our WCG partner Rajeev Hathi at the TECH ORGAN blog. |
