In this article, we will take a look at developing a custom AngularJS Component. Then, we will learn to package it as a library so that we can reuse it across different projects. Firstly, we will start by getting familiar with the underlying concepts and their implementation leading up to writing our own Component library. Finally, we will consume the same in a sample component based application. So, let’s get started.
As part of this effort to explore components we will build a simple user registration component. We will then package the same as a library so that we can reuse this component across applications. The component will show a simple UI prompting for a username and password on a registration page. The component includes a password strength checker which will show compliance with a set of rules for a secure password.
Table of Contents
1. Tools & Technologies
We will build a component and package it as a library as we learn about the topic. I have chosen the below set of tools and will use the following technologies as we work in this post. Although, feel free to use a different toolset as per your preference.
2. Project Structure
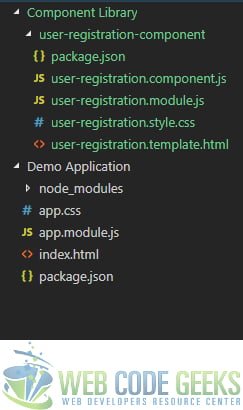
There are two separate folders as you can see in the below screen grab. One will host our custom component library and the other will host a sample application which will consume the component.
3. Introduction to AngularJS Components
Components were introduced with version 1.5 of AngularJS. They can be thought of as directives with templates. Apart from this they allow us to structure our app as a Component based one. Unlike directives which are applied to existing DOM elements to impart additional behavior. A component has its own HTML called its template. Let us take a look at how we define a Component.
A component resides in a js file with code that looks like below:
angular.
  module('moduleName').
  component('componentName', {
    template: 'Hello, {{$ctrl.user}}!',
    controller: function GreetUserController() {
      this.user = 'world';
    }
  });
We call the component method of an AngularJS Module and pass the name of the component as the first argument and an object called CDO or Component Description Object, which describes the component as the second argument. With templates for a Component we can either specify it inline by setting the value of template to a HTML snippet. Or we can also pass the URL of the HTML file containing the template by setting the templateUrl property.
4. Creating a Component
We will create a component which encapsulates functionality to render a user registration view. This component will also check for password strength and provide feedback to the user. We will wrap this piece into a library of its own so that we can easily share it among different applications with just a few steps.
Add the following files in a folder named similar after the component, i.e. user-registration-component.
- package.json
- user-registration.component.js
- user-registration.template.html
- user-registration.module.js
- user-registration.style.css
The package.json file is needed to list the dependencies of our component library, version and name among other things. The content of the file are as below:
package.json
{
    "name": "user-registration-component",
    "version": "1.0.0",
    "description": "WCG -- AngularJS Component Library",
    "scripts": {
        "test": "echo \"Error: no test specified\" && exit 1",
        "start": "http-server ./ -a localhost -p 8090 -c-1"
    },
    "keywords": [
        "AngularJS",
        "Component",
        "Library",
        "User",
        "Registration"
    ],
    "author": "Siddharth@WCG",
    "license": "ISC",
    "dependencies": {
        "angular": "^1.7.4",
        "bootstrap": "3.3.x"
    }
}
Now we create a file where we declare our module. This module will host our component as we will see later. The contents of this file user-registration.module.js is as below:
user-registration.module.js
'use strict';

angular.module('userRegistrationModule', []);
Moving on now we create our Component itself. The file, user-registration.component.js, has our component and it looks as below:
user-registration.component.js
'use strict';

angular.module('userRegistrationModule').
component('userRegistration',
{
    templateUrl: '/node_modules/user-registration-component/user-registration.template.html',
    controller: function () {
        var self = this;
        self.pwd = "";
        self.strength = '100%';
        self.score = 0;
        self.checkUpperCase = function () {
            for (var c = 0; c < self.pwd.length; c++) {
                if (self.pwd.charCodeAt() >= 65 && self.pwd.charCodeAt() <= 91) {
                    return 1;
                }
            }
            return 0;
        };

        self.checkEmpty = function () {
            var p = self.pwd || "";
            if (p.length > 0) {
                return 1;
            }
            return 0;
        };
        self.checkDigit = function () {
            var p = self.pwd || "";
            var digits = ['1', '2', '3', '4', '5', '6', '7', '8', '9', '0'];
            var result = 0;
            digits.forEach(function(item) {
                if (p.includes(item)) {
                    result = 1;
                    return;
                }
            });
            return (result === 0 ? 0: 1);
        };
        self.checkLength = function () {
            var p = self.pwd || "";
            if (p.length >= 8) {
               return 1;
            }
            return 0;
        };
        self.checkSpecialChar = function () {
            var specChars = ['*', '@', '_', '.'];
            var p = self.pwd || "";
            var result = 0;
            specChars.forEach(function(item) {
                if (p.includes(item)) {
                    result = 1;
                    return;
                }
            });
            return (result === 0 ? 0: 1);
        };
        self.rules = [{
            ruleFn: self.checkEmpty,
            score: 0
        }, {
            ruleFn: self.checkDigit,
            score: 0
        }, {
            ruleFn: self.checkUpperCase,
            score: 0
        }, {
            ruleFn: self.checkSpecialChar,
            score: 0
        }, {
            ruleFn: self.checkLength,
            score: 0
        }];

        self.checkStrength = function () {
            self.score = 0;
            var runningTotal = 0;
            self.rules.forEach(function (item) {
                item.score = item.ruleFn();
                runningTotal += item.score;
                self.strength = (100 - ((runningTotal / self.rules.length) * 100)) + '%';
             }, self);
        };
    }
});
What we are doing here is declaring a component with template residing in a file called user-registration.template.html and a controller for this component. The template is described below and as for the controller it has code to check the strength of the password based on a set of rules. The rules are stored in an array of objects with each object having a function which evaluates the password and returns a score. The score is zero if the password fails the check otherwise it has a value of 1. We use the score from each function to evaluate the strength of the password and show it using a color scheme, with Red representing Weak password and Green representing a Strong password.
The process is triggered on the change event of the password field in the template.
The template of our component looks as below:
user-registration.template.html
<form>
    <div class="form-group">
        <label class="sr-only" for="inputUsername">Username</label>
        <input class="form-control" type="text" placeholder="Username" />
    </div>
    <div class="row">
        <div class="col-xs-12 col-sm-6 col-md-6">
            <div class="form-group">
                <input class="form-control" new-password type="password"
 ng-model="$ctrl.pwd" ng-change="$ctrl.checkStrength()" id="inputPassword"
 placeholder="Password" />
            </div>
        </div>
        <div class="col-xs-12 col-sm-6 col-md-6">
            <div class="form-group">
                <input class="form-control" new-password type="password"
 id="inputConfirmPassword" placeholder="Confirm Password" />
            </div>
        </div>
    </div>
    <div class="row">
        <div class="col-xs-12 col-sm-6 col-md-6">
            <label>Password Strength</label>
            <div class="gradient">
                <div ng-style="{ 'width': $ctrl.strength }"></div>
            </div>
        </div>
    </div>
    <div>
        <ul>
            <li>Password cannot be empty</li>
            <li>Must contain atleast one Uppercase character</li>
            <li>Must contain atleast one number</li>
            <li>Must contain one of these characters * @ _ .</li>
            <li>Must be of 8 characters in length </li>
        </ul>
    </div>
    <div class="row">
        <div class="col-xs-12 col-sm-6 col-md-6">
            <div class="form-group">
                <button type="button" class="form-control btn btn-success">
                    Register
                </button>
            </div>
        </div>
    </div>
</form>
5. Publishing the Library
To reuse our component in other applications we need to publish it. We will use npm to achieve the same. We have a couple of options, either we publish our component as public or as a scoped package. The difference in the two being who is able to access the component. If we publish our component as public then everyone can access it. Otherwise we can go for scoped packages which limits the access to our component to our own organization. Let us look at the steps required to publish using both options. Before we begin using either option, we need to have an account with npmjs.org albeit one requires a paid account to publish scoped packages.
5.1 Publish with Public Access
To publish our component as a library with public access we need to follow the below steps
First, navigate to the directory containing the component and related artifacts that we want to publish.
>cd Component Library/user-registration-component
Then we need to login with npmjs.org credentials by using the following command.
>npm adduser
Afterwards we run the following command
>npm publish
This will publish our component library to npm and you can verify the same by visiting http://npmjs.org and searching by the name you gave your library.
To publish an updated version we need to update the version of our component in the package.json file in the directory of the component and follow the above steps again.
5.2 Publish with Restricted Access
To publish our component with private access we need to perform the below steps
Navigate to our component library directory
>cd Component Library/user-registration-component
Login with the npmjs.org account:
>npm adduser
Then run the below command:
>npm publish --access restricted
This should publish our component library with private access. We will take a look in the next section how to consume the same in another project.
6. Consuming our Library
Now that we are done publishing our component library let us take a look at how we can consume the same in an application. All the action would now be in the folder Demo Application. The Demo Application is setup as a simple AngularJS template with just a root app module and an index.html page. Now to pull down our published library and add it to this project we need to run the following command at the root of the project.
>npm install user-registration-module --save
This should pull down the latest version of our library and save it as a dependency in the package.json file of the project. The package.json file of our Demo Application should look like below:

Next we need to add the following script tags to our index.html page.
<script src="node_modules/user-registration-component/user-registration.module.js"></script>
<scriptsrc="node_modules/user-registration-component/user-registration.component.js"></script>
This will pull down our library for use. We need to add the userRegistrationModule as a dependency of the root module of our demo application in the app.module.js file as below:
'use strict';

angular.module('userRegistrationDemo', ['userRegistrationModule']);
All that we need to do now is add the following tag to our HTML file index.html.
<user-registration></user-registration>
The contents of the index.html file should look like below:
index.html
<!doctype html>
<html lang="en" ng-app="userRegistrationDemo">

    <head>
        <meta name="viewport"
        content="width=device-width, initial-scale=1, maximum-scale=1, user-scalable=no">
        <meta charset="utf-8">
        <title>WCG -- Angularjs Component Library Demonstration</title>
        <link rel="stylesheet" href="node_modules/bootstrap/dist/css/bootstrap.css" />
        <link rel="stylesheet" href="app.css" />
        <script src="node_modules/angular/angular.js"></script>
        <script src="app.module.js"></script>
        <script src="node_modules/user-registration-component/user-registration.module.js">
        </script>
        <script src="node_modules/user-registration-component/user-registration.component.js">
        </script>
    </head>

    <body>
        <div class="container">
            <h3>WCG -- Angularjs Component Library Demonstration</h3>
        </div>
        <div class="container">
            <div class="row">
                <div class="col-md-12">
                    <user-registration></user-registration>
                </div>
            </div>
        </div>
    </body>
</html>
To look at the results we will run the application using the following command
>npm start
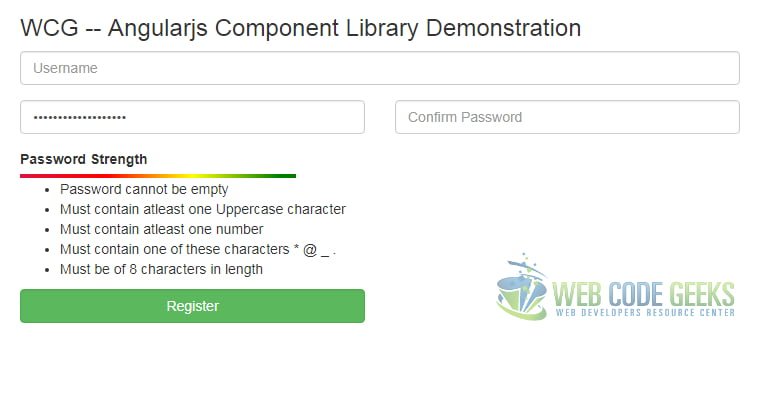
Then we should navigate to the following URL in the browser http://localhost:8090. The browser would display the index page as below

As soon as you start typing in the password field you would see the strength checker provide feedback on the password. You should see something like below:
7. Download the Source Code
This wraps up how to create and publish an AngularJS Component Library.
You can download the full source code of this example here: AngularJS Component Library
