So, you’ve learned JavaScript and now you’re wanting to get into Angular. But where do you start?
There are quite a few examples out there. One of the best ideas I have personally found useful for a new developer to learn is how to do Create, Read, Update and Delete operations.
So let’s start learning how to do C.R.U.D. with Angular. In this blog we’ll go through the process of building a simple, working Angular address book application with C.R.U.D. operations. By the end, and by studying the full, working code, you should have a better grasp on Angular.
Let’s Get Started
We’re going to build a simple AngularJS 1.x address book application that looks like this:
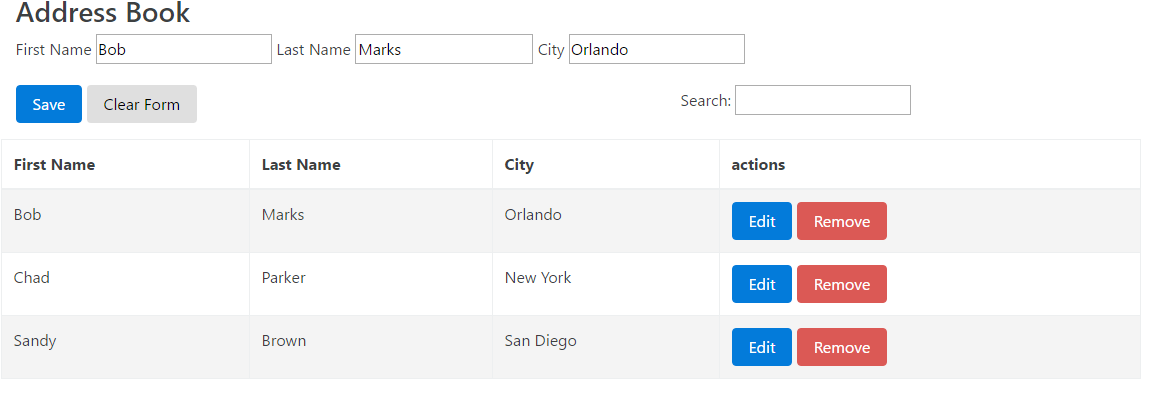
First what we will need is our HTML template. Remember, we’re going simple here, so in the end we are only going to have two files.
Look through the following markup and I will explain as we go.
The Markup
<!DOCTYPE html>
<html ng-app="example">

<head>
  <meta charset="utf-8" />
  <title>AngularJS CRUD Example</title>
  <link rel="stylesheet" href="https://maxcdn.bootstrapcdn.com/bootstrap/4.0.0-alpha.4/css/bootstrap.min.css" />
  <script>
    document.write('<base href="' + document.location + '" />');
  </script>
  <script src="https://code.angularjs.org/1.5.8/angular.js"></script>
  <script src="app.js"></script>
</head>

<body ng-controller="MainCtrl as main">
  <div class="container">
    <h3>Address Book</h3>

    <p>
      <label>First Name</label>
      <input type="text" ng-model="main.person.firstname " />
      <label>Last Name</label>
      <input type="text " ng-model="main.person.lastname" />
      <label>City</label>
      <input type="text" ng-model="main.person.city " />
    </p>

    <div class="row">
      <div class="col-md-7">
        <button class="btn btn-primary" ng-click="main.addClickHandler()">Save</button>
        <button class="btn btn-default" ng-click="main.resetClickHandler()">Clear Form</button>
      </div>
      <div class="col-md-5">
        <label>Search:</label>
        <input type="text" ng-model="main.search" />
      </div>
    </div>

    <p></p>

    <div class="row" ng-show="main.addresses">
      <table class="table table-bordered table-striped table-condensed">
        <thead>
          <tr>
            <th>First Name</th>
            <th>Last Name</th>
            <th>City</th>
            <th>actions</th>
          </tr>
        </thead>
        <tbody>
          <tr ng-repeat="item in main.addresses |filter:main.search ">
            <td ng-bind="item.firstname "></td>
            <td ng-bind="item.lastname "></td>
            <td ng-bind="item.city "></td>
            <td>
              <button class="btn btn-primary" ng-click="main.editClickHandler(item)">Edit</button>
              <button class="btn btn-danger" ng-click="main.removeClickHandler(item)">Remove</button>
            </td>
          </tr>
        </tbody>
      </table>
    </div>
  </div>
</body>

</html>
To begin with, we’re adding the bootstrap CSS to make the application look pretty.
Second we’re adding AngularJS 1.5.x to the application from a Content Delivery Network or CDN.
Third we’re making a reference to the JavaScript file which we will be creating and adding our logic to.
On the HTML tag we added ng-app="example". This is making the entire page scoped to our application. On the body tag we add ng-controller="MainCtrl as main". By using the controller as syntax we will be avoiding the use of $scope throughout the JavaScript.
Now we can get inside the actual meat of the template. For the form where you’ll be adding a name and city we have the following:

Notice the usage of main. By doing this, we have named the scope of the backing controller. This gives a developer a little more idea of where and what the context of the variable they’re working with.
A second best practice that we’re doing here is using the object person to capture the variable of first name, last name, and city. When used with ng-model, this is allowing us to set a property on a model rather setting a property on a $scope. It’s a much cleaner way of identifying properties when you’re working with them in the JavaScript side of an Angular application.
You will notice that we have written our buttons in this fashion:
<button class="btn btn-primary" ng-click="main.addClickHandler()">Save</button>
<button class="btn btn-default" ng-click="main.resetClickHandler()">Clear Form</button>
Once again, we’re making sure that our alias main is attached to the function which we are going to call from the JavaScript side of the application.
With this application we’re also going to take advantage of Angular’s filtering so that we will be able to search through our list of people.
<label>Search:</label>
<input type="text" ng-model="main.search" />
Now we don’t want an empty table to show before we have people added, so with the following code:
<div class="row" ng-show="main.addresses">
We are going to hide the display until we have at least one address. ng-show works on a boolean toggle. So until we have addresses, the toggle will see false; once we have an address, collection the toggle will see true.
Onto the table which will display the people we are adding:
<tr ng-repeat="item in main.addresses |filter:main.search ">
Simply doing a repeat on the main.address collection. We are going to pipe in an Angular filter using the variable we defined earlier: main.search.
What’s going to happen here is that anything we type in the input will be used as a filter against the main.address collection. We will see an immediate effect on the display when the application is running.
The bindings for the columns are done in this fashion:
<td ng-bind="item.firstname "></td>
<td ng-bind="item.lastname "></td>
<td ng-bind="item.city "></td>
item is a single item from the collection and by using the dot notation again, we are able to access the properties of that row item.
Last thing in the markup, we are going to have a couple of buttons for each row where we can edit or delete the item.
<button class="btn btn-primary" ng-click="main.editClickHandler(item)">Edit</button>
 <button class="btn btn-danger" ng-click="main.removeClickHandler(item)">Remove</button>
These buttons will be pretty much like the first two, except here we are passing the item which is associated with that row. This is how we will access that item in the JavaScript.
Okay, we’re done with the markup. Now let’s move on to writing some JavaScript.
The JavaScript
The first thing we’re going to do is make an Angular module.
(function () {
  'use strict'
  angular.module('example', []);
})();
We’ve introduced an Immediately Invoked Function Expression to modularize this application and to keep our code from living on the global namespace.
Once again, it’s best practice syntax. Inside we have created our Angular module and we’ve given it a name. We won’t be using any third-party modules, so nothing else will be done here.
For the rest of the application we’re again going to create an IIFE-wrapped Angular module:
(function(){
    'use strict';

    angular
        .module('example')
        .controller(‘MainCtrl’, CoreFunction)


}());
Notice we named the module the same as opening module. We named the controller same as we named it on the HTML template side, and we have passed in a variable named CoreFunction.
This variable is as it’s called, the core of the controller and all of our logic from this point on will go inside of this function. By doing this we’re giving ourselves the idea of a standalone “class” which will be passed into the Angular module system. When you see it all together, it feels much more like JavaScript than Angular syntax.
function CoreFunction() {
var vm = this,
      		addressCollection = [],
      		isEditing = false;
 }
We create the function and inside of it we instantiate a couple of local variables. The most important one is that we’re going to alias this to the abbreviation of vm. Functionally there is no reason do this, but by doing this, you have a really good idea of what will be attached to the view via the magic of Angular.
Think of vm as view model and think that anything attached to vm will be accessible in the template. It makes the mental model of the application a little easier to understand.
After setting vm, we’re creating an empty array to hold the addresses locally, and we set an editing flag to be used later in the code.
Again, inside the CoreFunction, we’re going to create the actual logic for our Create, Read, Update, and Delete operations.
Create Operation
var add = function () {
        var newPerson = {};

        if (!angular.equals({}, vm.person)) {
          if (isEditing !== false) {
            addressCollection[isEditing] = vm.person;
            isEditing = false;
          } else {
            newPerson = vm.person
            addressCollection.push(newPerson);
          }

          vm.addresses = addressCollection;
          vm.person = {};
        }
      },
The add function does two things. One, if it’s a new person we will take the properties from vm.person which came from the template and push that object in the local address collection. The address collection is assigned to the view model’s collection.
Second, if the add function is doing an update, isEditing will not be false, and will be used as the index of that person we’re editing. We will replace that existing index with our edited person. Whereupon we reset the editing flag and exit the function.
Update Operation
edit = function (editPerson) {
        isEditing = addressCollection.indexOf(editPerson);
        vm.person = angular.copy(editPerson);
      },
As we saw in the add, we’re needing to set the isEditing flag to something other than false.
Here we’re accepting the person from the template via a function parameter. We’re using JavaScript’s indexOf function and we’re going to set isEditing to that index number.
Second, we’re setting the view model’s person object to a copy of the row’s person object using a built-in Angular copy function. By doing this you will not see the row properties change as you edit them in the input boxes on the template.
Delete Operation
remove = function (removePerson) {
        var index = addressCollection.indexOf(removePerson);
        addressCollection.splice(index, 1);
        if (addressCollection.length === 0) {
          vm.person = {};
          vm.addresses = undefined;
        }
      },
Deleting a row from our address collection is pretty straightforward. Again, we’re taking the person we want to remove and we’re going to again find its array index. This is just like we did for edit.
Now this time we are going to use another JavaScript function called splice to cut out and remove that index from our collection.
Now if we removed the last person from the address collection, we want to clean up the view model so wm.person is initialized as an empty object and wm.address is set as undefined.
Why undefined you may ask? Instead of setting the collection to an empty array, which will still have a length, we want to set the variable to something that will be a JavaScript-falsey value. Remember the boolean toggle on the template. Yes, that’s where this value is set to hide the table.
But Where Is The Read Operation?
You may be wondering why there’s no function to “read” the data. Well if you look again at the add function, you’ll notice that when you do “add” a person you’re pushing an item in the address collection which is bound to the vm.addresses.
Remember when I said that anything attached to the view model will be accessible in the template, well we have a ng-repeat which will actually “read” that collection and generate the rows for us.
So in essence, “read” is the only operation where we don’t have to actually do much to make it work.
The Rest Of The Code
The rest of the JavaScript is actually pretty simple:
reset = function () {
        vm.person = {};
        vm.search = '';
        isEditing = false;
      }

    // view model attached click handlers
    vm.addClickHandler = function () {
      add();
    }

    vm.editClickHandler = function (editPerson) {
      edit(editPerson);
    }

    vm.removeClickHandler = function (removePerson) {
      remove(removePerson);
    }

    vm.resetClickHandler = function () {
      reset();
    }
Again, all of this code resides in the CoreFunction. The reset function is a cleanup function where all of our working creating and editing items are set back to a default state. This does not clear the address collection, just the form found in the HTML template.
Now the last four functions are attached to the view model vm and are used as our click handlers for the buttons found in the HTML template. Notice that inside of each click handler, we are just going to call the local function and pass on any parameters are necessary.
Summary
So after all that hard work you should now have a working Angular 1.x application which allows you to Create, Read, Update and Delete operations from a locally-created collection.
You can see working example on Plnkr.co.
I hope that you found this helpful in getting to know Angular!
| Reference: | Learning Angular C.R.U.D. from our WCG partner Chris Berry at the Keyhole Software blog. |
