In this example, we’re having a look at a very popular jQuery plugin called Lightbox. Lightbox is originally a small javascript library used to overlay images on top of the current page. It’s a snap to setup and works on all modern browsers.
It is one of the easiest solutions when it comes to individual image viewers or even galleries of images (images set). All modern websites nowadays support image viewers and use them for various reasons like portfolio, user photos etc.
Below, we’ll have a look at how to set up the library and get going with the different options it offers.

1. Getting Started
First, download the latest version of the plugin as a .zip file here. You can use either Bower or NPM to install the plugin like so:
- Bower:
bower install lightbox2 --save - NPM:
npm install lightbox2 --save
Next, open up the zip file and take a peek at the barebones, working example that is included in the /examples folder.
Now that you have the very basics, create a new HTML document and add the basic syntax alongside with the right links to the plugin sources. Don’t forget to load the jQuery library, before lightbox. Your markup should look like so:
<!DOCTYPE html>
<html>
<head>
	<title>jQuery Lightbox Example</title>
    <link href="css/lightbox.css" rel="stylesheet">
</head>
<body>

<!-- HTML SECTION  -->


<!-- JAVASCRIPT SECTION  -->
<script src="js/jquery-1.11.3.min.js"></script>
<script src="js/lightbox.js"></script>
<script type="text/javascript">

</script>

</body>
</html>
2. Initialize HTML
The HTML of a simple image that can be opened with lightbox is:
<a href="images/img1.jpg" data-lightbox="img1"><img src="images/img1-thumb.jpg"></a>
If you want to set a caption, optionally, you can add the data-title attribute.
2.1 Individual Images Example
In this example, we’ll be adding three individual images in order to use the lightbox library.
<h2>Individual Images</h2>
<a href="images/img1.jpg" data-lightbox="img1" data-title="Modern Medicine"><img src="images/img1-thumb.jpg"></a>
<a href="images/img2.jpg" data-lightbox="img2" data-title="Running Exercise"><img src="images/img2-thumb.jpg"></a>
<a href="images/img3.jpg" data-lightbox="img3" data-title="Heart Drawing"><img src="images/img3-thumb.jpg"></a>
Remember to set different values (text) in the data-lightbox attribute, so they aren’t considered as a gallery.
2.2 Gallery Images Example
In this example, we’ll be adding three images with the same data-lightbox text to mean this is a gallery.
<h2>Image Gallery</h2>
<a href="images/img1.jpg" data-lightbox="img" data-title="Modern Medicine"><img src="images/img1-thumb.jpg"></a>
<a href="images/img2.jpg" data-lightbox="img" data-title="Running Exercise"><img src="images/img2-thumb.jpg"></a>
<a href="images/img3.jpg" data-lightbox="img" data-title="Heart Drawing"><img src="images/img3-thumb.jpg"></a>
Remember to set different values (text) in the data-lightbox attribute, so they aren’t considered as a gallery.
3. Options
If you want to change any of the default options, call the option method.
- alwaysShowNavOnTouchDevices [Default: false] – If true, the left and right navigation arrows which appear on mouse hover when viewing image sets will always be visible on devices which support touch.
- albumLabel [Default: “Image %1 of %2”] – The text displayed below the caption when viewing an image set. The default text shows the current image number and the total number of images in the set.
- disableScrolling [Default: false] – If true, prevent the page from scrolling while Lightbox is open. This works by settings overflow hidden on the body.
- fadeDuration [Default: 500] – The time it takes for the Lightbox container and overlay to fade in and out, in milliseconds.
- fitImagesInViewport [Default: true] – If true, resize images that would extend outside of the viewport so they fit neatly inside of it. This saves the user from having to scroll to see the entire image.
- maxWidth – If set, the image height will be limited to this number, in pixels. Aspect ratio will not be maintained.
- maxHeight – If set, the image width will be limited to this number, in pixels. Aspect ratio will not be maintained.
- positionFromTop [Default: 50] – The distance from top of viewport that the Lightbox container will appear, in pixels.
- showImageNumberLabel [Default: true] – If false, the text indicating the current image number and the total number of images in set (Ex. “image 2 of 4”) will be hidden.
- wrapAround [Default: false] – If true, when a user reaches the last image in a set, the right navigation arrow will appear and they will be to continue moving forward which will take them back to the first image in the set.
An example where we change some of the default values using the option method is:
<script type="text/javascript">
lightbox.option({
    'fadeDuration': 800,
    'resizeDuration': 800,
    'showImageNumberLabel': false
});
</script>
Now the examples would behave a bit different based on the above options.
Another example where we use options to manipulate the default plugin settings would be:
<script type="text/javascript">
lightbox.option({
    'fitImagesInViewport': false,
    'positionFromTop': 100,
    'wrapAround': true
});
</script>
The result would be: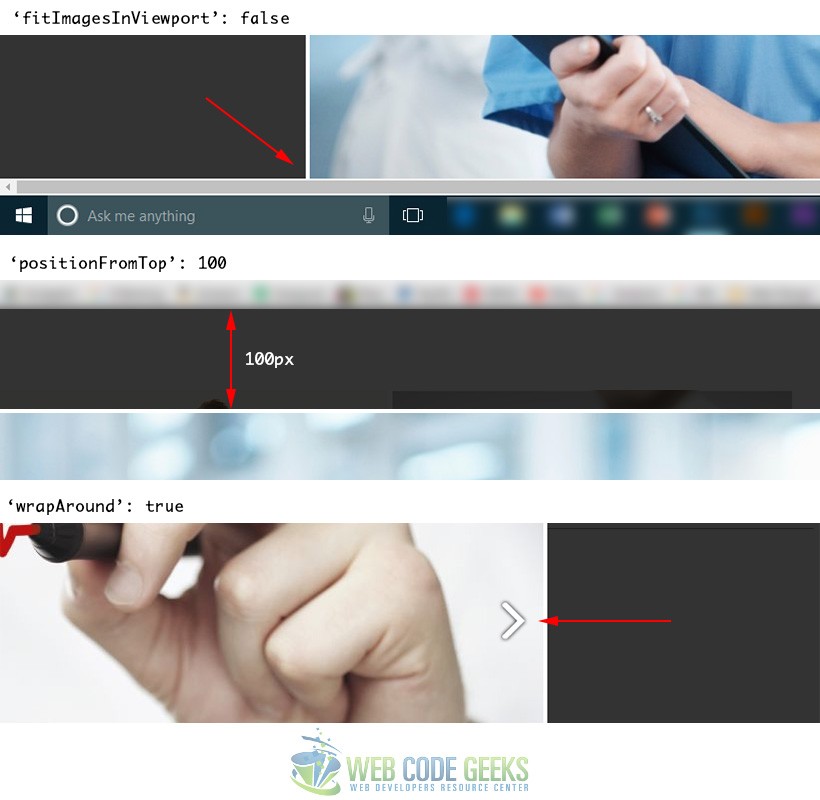
4. Conclusion
To conclude, we can say that the lightbox plugin is not only a great overlay image/gallery viewer, but is also supported on all modern browsers like Internet Explorer, Chrome, Safari, Firefox and mobile browsers are no exception here: iOS Safari, iOS, Chrome, Android Browser, Android Chrome etc. Feel free to use this light library in your web projects and customize more using the option method.
5. Download the Source Code
This was an example about jQuery Lightbox.
You can download the full source code of this example here: jQuery LightBox
