The aim of this article is to explain the usage of .mouseover() method of jQuery. The mouseover event occurs when the mouse pointer is over the selected element, and that makes it very useful when considering changing content on hover. It will basically allow you to have whatever kind of behaviour you want as soon as the cursor reaches the element given this method.
This event is often used together with the mouseout or mouseleave event. This is because, obviously, when you leave the element you may want to reset it to its initial view. Later in this article, we’ll see what is the difference between .hover() and .mouseover() method, as they are often confused with each-other.
1. Basic Setup
The following two section contain the most basic setup you should have to keep going futher.
1.1 HTML Document
To begin, create a new HTML document and add the following basic syntax:
<!DOCTYPE html>
<html>
<head>
	<title>jQuery Mouseover Example</title>
</head>
<body>

<!-- STYLE SECTION  -->

<!-- HTML SECTION  -->


<!-- JAVASCRIPT SECTION  -->
<script src="jquery-1.11.3.min.js"></script>

<script type="text/javascript">

</script>

</body>
</html>
1.2 Basic Application of .mouseover()
To apply the .mouseover() method, add some element in HTML first:
<!-- HTML SECTION  -->
<div>I am just a line</div>
We’d like, for example, to add a class (which will change styling) when the mouse is over the only div we have. So let’s set up a class in CSS and set the text color to white, the background to blue and add a padding.
<!-- STYLE SECTION  -->
<style type="text/css">
    .blue-bg {
        color: white;
        background-color: #2980b9;
        padding:1em;
        width: 8em;
    }
</style>
To trigger .addClass() method on hover, select the div and add the .mouseover() method in it, specifying that you want to add a class to this div. It would look something like this:
<!-- JAVASCRIPT SECTION  -->
<script type="text/javascript">
$('div').mouseover(function(){
    $(this).addClass('blue-bg');
});
</script>
The result would be a slightly different style on the div when the cursor gets over it.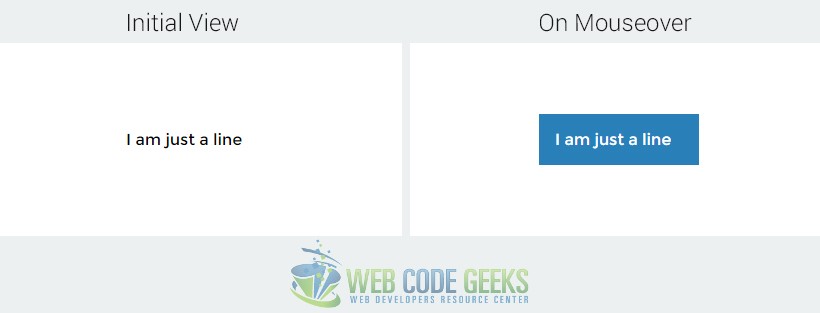
2. A Comprehensive Example
Now let’s begin creating a real-case content which will be added styles, content and animation on mouseover. This is just a real example to give you an idea how important and useful the .mouseover() method is. Here, I am using Bootstrap framework and animate.css to spped up coding, but these have nothing to do with our actual jQuery code, we’re still using .mouseover() later. This code will be provided together with all supporting files, so there is no need to copy and try it now because you’ll need extra links like bootstrap and animate.css libraries.
First, I created some elements, most of which were hidden at first using "display:none":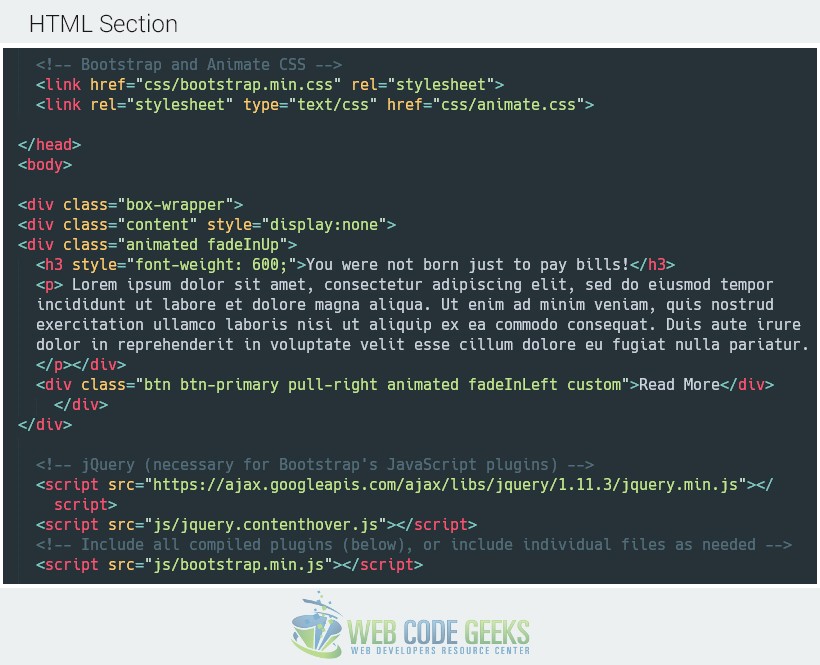
Then, added some styling to have a better designed content.
Finally, just be adding and removing classes using .mouseover() and .mouseleave() (the opposite of mouseover) I came to this great animated photo hover.
<!-- JAVASCRIPT SECTION  -->
<script type="text/javascript">
    $('.box-wrapper').mouseover(function(){
      $(this).find('.content').addClass('animated zoomIn').show();
    }).mouseleave(function(){
      $(this).find('.content').fadeOut();
    });
</script>
3. Alternative Syntaxes
3.1 Using .on(‘mouseover’, handler)
You can achieve the exact same results using .on( "mouseover", handler ) instead of .mouseover( handler ). For the first example, we’d just have:
<!-- JAVASCRIPT SECTION  -->
<script type="text/javascript">
$('div').on('mouseover', function(){
    $(this).addClass('blue-bg');
});
</script>
3.2 Using .hover()
We use .hover() to bind one or two handlers to the matched elements, to be executed when the mouse pointer enters and leaves the elements. For our simple example, we’d have:
<!-- JAVASCRIPT SECTION  -->
<script type="text/javascript">
$('div').hover(
    function(){
    $(this).addClass('blue-bg');
},
    function(){
    $(this).removeClass('blue-bg');
});
</script>
What’s the difference between .hover() and .mouseover()?
The hover() function is more high level – it’s built to call functions to handle both a mouseenter event and a mouseleave event. It’s very convenient for a UI element that has a hover and normal state (e.g. a button.)
The mouseover() function specifically binds to the mouseover event. It’s best for situations where you only care when the mouse has crossed the border into an element and you don’t really care what happens if it leaves. It’s also the function to call when you want to trigger the event on some element.
3.3 Using .mouseenter()
In short, you’ll notice that a mouse over event occurs on an element when you are over it – coming from either its child OR parent element, but a mouse enter event only occurs when the mouse moves from the parent element to the element. However, in most cases, you won’t notice a difference. The updated code using .mouseenter() and .mouseout (the equivalent for mouseleave) would be:
<!-- JAVASCRIPT SECTION  -->
<script type="text/javascript">
$('div').mouseenter(function(){
    $(this).addClass('blue-bg');
}).mouseout ( function(){
    $(this).removeClass('blue-bg');
});cript>
The result would look just the same as above.
4. Conclusion
To conclude, it is important to state that .mouseover() is jQuery’s way of stating :hover (from CSS), but it comes with a lot more advantages here. You can manipulate stuff a lot easier, adding or removing classes, animating content or even adding extra HTML elements, all of which happen at the moment when the cursor gets over a specific content you choose.
5. Download
You can download the full source code of this example here: jQuery Mouseover

Great! Simple and clean.