In this post we will look at how to upload files using Node.js and show the user a progress bar with the status of the operation. Node.js, as you know, is a Server side JavaScript framework which has shot to prominence recently. A lot of people with existing skills in JavaScript are now able to use the same for server side logic. We now have the option to build the server side and client side artifacts using the same language, JavaScript.
1. Tools & Technologies
I have used the following toolset to build the example in this post.
You can navigate to the tools page to get them by clicking on the hyperlinks above. Although I have used Visual Studio Code IDE you can switch to other tools that you are comfortable with. Node.js is the server side JavaScript development framework. The formidable module is an additional dependency required for this demo since the native Node.js modules lack certain capabilities we will need to implement this example, notably processing HTML forms posted from the client side.

2. Project Layout
We follow the below folder structure in the example we will build. This is what the final application layout would look like:
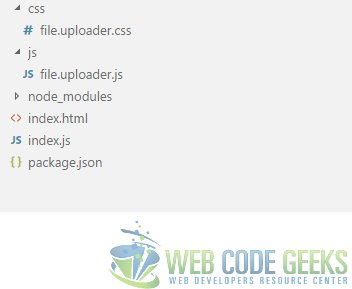
| index.js | This file hosts all of our server side logic and exposes the API we use for Uploading. |
| file.uploader.js | This file contains the client side logic and is referenced in our index.html landing page. |
| index.html | It is our landing page with all our HTML markup to build a file uploader. |
| file.uploader.css | Our styles reside in this css file. |
3. Server side Implementation
The server side implementation resides in the file index.js. In this file we create a web server using the http module that comes with Node itself. But there is no way to handle or process incoming HTML forms which are POSTed to the server. So we leverage a module called formidable. This module allows us to parse the incoming form and access the form data from the request object. The http module provides us both the request and response object. Files uploaded using POST requests get saved to a temporary location on the server. We then access these files and move them to a folder on our server. Let us see what our code looks like followed by explanation of the same.
index.js
var http = require("http");
var url = require("url");
var fs = require("fs");
var formidable = require("formidable");
var port = 8090;
var host = "localhost";

http.createServer(function (req, res) {
    var path = url.parse(req.url, true);
    if(path.pathname.endsWith("html")){
        fs.readFile("." + path.pathname, function(err, data){
            res.writeHead(200, "ok", { "Content-Type": "text/html"});
            res.write(data);
            res.end();
        });
    } else if(path.pathname.endsWith("js")){
        fs.readFile("." + path.pathname, function(err, data){
            res.writeHead(200, "ok", { "Content-Type": "text/javascript"});
            res.write(data);
            res.end();
        });
    } else if(path.pathname.endsWith("css")){
        fs.readFile("." + path.pathname, function(err, data){
            res.writeHead(200, "ok", {"Content-Type": "text/css"});
            res.write(data);
            res.end();
        });
    } else if(path.pathname.endsWith("uploadFile")){
        var form = new formidable.IncomingForm();
        form.parse(req, function(err, fields, files){
            var oldpath = files.file.path;
            var newpath = 'C:/Users/siddharth/' + files.file.name;
            fs.rename(oldpath, newpath, function (err) {
              if (err) throw err;
              res.write('File uploaded and moved!');
              res.end();
            });

        });

    }

}).listen(port, host);
As you can see in the code above we implement a web server using http module. Firstly we parse the URL using the url module. We check if the incoming request is for a resource file. In case the request is for a html, js, css file we return the same to the browser. But if the request is for uploadFile URL then we proceed to process the posted files. We hand over the request object provided by http module to the formidable module’s IncomingForm object using its parse method. It returns us, among other things, a list of files uploaded to our callback function. We then move the files from their temporary location to a folder in the Users directory. Afterwards we return an OK response to the browser.
4. Client side Implementation
On the client end we will use an input tag with type attribute as file and decorat it with multiple attribute. This tag will be hidden though and we will trigger it’s click when we need to show the Open File Dialog. Later we will listen to its change to get the list of selected files to upload. We will use a button on the UI for the user to use the feature. Once we have the list of files to upload we will initialize our progress bar and update it on the progress event of the XMLHttpRequest object’s upload property. We will use AJAX to post the files to the server side. The progress event handler is called with data like the total number of bytes and number of bytes uploaded. The progress bar is actually two divs one inside the other. The inner div has a background color of green and a width of 0%. As the upload progresses we increase the width of the inner div to show progress of the upload. The code for all this resides in the file.uploader.js file and looks like below:
file.uploader.js
var browse = document.getElementsByClassName('selectFiles')[0];
var fileDialog = document.createElement("INPUT");
fileDialog.setAttribute("type", "file");
fileDialog.setAttribute("multiple", "true");
fileDialog.style.display = "none";
var uploadProgress = document.getElementsByClassName("uploadProgressDetails")[0];
var progress;
setupProgressBar();
browse.addEventListener("click", function(){
    fileDialog.click();

});

fileDialog.addEventListener("change", function(){

    processFiles(fileDialog.files);

});

function processFiles(files){

    resetProgressBar();
    var request = new XMLHttpRequest();
    request.upload.addEventListener("progress", showProgress);
    request.open("POST", "/uploadFile");
    var formData = new FormData();
    for(var file = 0; file < files.length; file++){

        formData.append("file" + file, files[file], files[file].name);

    }
    request.send(formData);
}
function showProgress(evt){

    progress.style.width = (((evt.loaded/evt.total)*100))+ "%";

}
function resetProgressBar(){
    progress.style.width = "0%";
}
function setupProgressBar(){
    var progressBar = document.createElement("DIV");
    progressBar.className = "progressBar";
    uploadProgress.appendChild(progressBar);
    var innerDIV = document.createElement("DIV");
    innerDIV.className = "progress";
    progressBar.appendChild(innerDIV);
    progress = document.getElementsByClassName("progress")[0];
}
5. Running the Application
To run the example application we have built you need to run the following commands in order at the root of the application.
First execute
> npm install
then
> node index.js
Now, we can navigate to the URL http://localhost:8090/index.html to test out the File upload functionality we just implemented. The landing page should look like below:
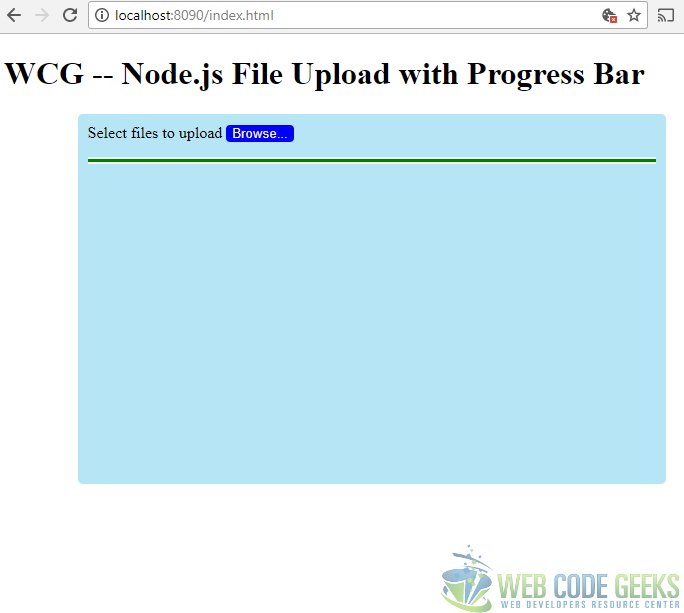
On clicking the “Browse” button a File Open Dialog should open. We can select a single file or multiple files using Shift or CTRL keys while making selections. As we click the Open button the upload would begin and we can see the progress bar updating to reflect the progress.
6. Download the Source Code
This wraps up our effort to write an application for Node.js File Uploading with Progress Bar.
You can download the full source code of this example here : WCG — Node.js File Upload with Progress Bar

hello sir,
i got following error
Hi,
Apologies for the delay in response. I investigated the issue but unfortunately I could not replicate it at my end. I tried to run this code using different versions of Node (5.0.0, 6.3.0, 8.11.3, 10.7.0) as well as the formidable module(1.1.1 & 1.2.1). It will help if you could share some more details, like the point in the application flow when you receive the error and the Node, npm and formidable versions.
Thanks & Regards,
Siddharth Seth
var storage = multer.diskStorage({
^
TypeError: multer.diskStorage is not a function
at Object. (D:\New folder (2)\File-upload-in-Node-master\Server.js:4:22)
at Module._compile (internal/modules/cjs/loader.js:654:30)
at Object.Module._extensions..js (internal/modules/cjs/loader.js:665:10)
at Module.load (internal/modules/cjs/loader.js:566:32)
at tryModuleLoad (internal/modules/cjs/loader.js:506:12)
at Function.Module._load (internal/modules/cjs/loader.js:498:3)
at Function.Module.runMain (internal/modules/cjs/loader.js:695:10)
at startup (internal/bootstrap/node.js:201:19)
at bootstrapNodeJSCore (internal/bootstrap/node.js:516:3)