In Part I of this two-part series, you learned how to write, test a JavaScript module, and publish it as an NPM package. This post will focus on updating your module using continuous integration.
Continuous Integration and Deployment with Codeship
Continuous integration (CI) is one of those topics that might sound scary and complicated, and of course there are a gazillion aspects of it that could occupy you for years, but getting started doesn’t have to be a major undertaking.
The idea of CI is very coupled to using a code repository (usually git) as well as the idea that testing and building on every committed change and releasing often will help you identify problems early.
Quick introduction to git/CI-based workflows
A common setup with git and CI is to have a branch called develop, which will automatically test/build any changes and deploy to a develop/staging environment (which is only for internal preview/testing), and a branch called master, which will do the same for the production environment.
Each new feature is developed in its own branch. When that’s done, you make a request to merge it to develop, writing a short description of what functionality your changes adds or what problems they solve. Someone will then read your description, check your code changes, and decide if this can safely be merged into the develop branch and that it is up to the project’s standards.
Of course, if you are the only person working on a project, you are going to have to fill both these roles. I still think doing pull requests (sometimes called merge requests) is worth doing anyway; they give a very nice high-level overview of the changes that are made to a codebase over time.
When starting a project on my own, I often commit directly to the
masterordevelopbranch until I have some kind of working proof of concept. Then, when it’s time to start making incremental improvements to the project, I switch to creating a new branch for every feature and making pull requests to myself.
To deploy to production, you then merge the develop branch into master. How often this should happen is up for (much) debate.
Some say that every change to develop should kick off a series of automated tests on the staging environment, which should be as identical to the production environment as possible, and automatically deploy to production if they succeed. This idea is called continuous deployment.
Some think that continuous deployment is not always practical and that it is enough to automatically verify that every change to the staging environment could be deployed to production. This idea is called continuous delivery.
How does CI/CD apply to an NPM package?
These are the goals I defined for the human-date-range module:
- Make sure that every commit is tested with Jest and built with Rollup to verify that everything works.
- Make sure that every commit to the project’s
masterbranch also publishes successful builds to NPM.
This matches the workflow described above, where “deploy” has simply been translated to “publish a new version to NPM.” There is no “develop environment” here since there is only one NPM. To keep things simple, only commits to master will result in a deploy
There are ways to have different release “channels.” You can publish a dev version with
npm publish --tag dev, and anyone who doesnpm install human-date-rangewill still get the old stable version. People who like to live dangerously can runnpm install human-date-range@devto get your develop version.
Publishing a New Version to NPM
Publishing new versions is done by changing the version in package.json and then running npm publish again. This can be done by running npm version, which has the advantage that it can “bump” your current version by one; either npm version patch to bump the last number (1.0.X), or npm version minor to bump the middle number (1.X.0), or npm version major to bump the first number (X.0.0).
When run in a project with git, it will also create a version-tagged commit for you with the version change. So if you fix a bug in your module, the correct way to make a new release would be to run:
npm version patch
npm publish
Your module is well prepared for CI since testing, building, and publishing are all configured already.
The idea here is to let you control when to publish which version by letting you manually bump the appropriate version number and push all changes from develop to master when you feel ready to publish a new version.
Because CI will also test and build every commit to develop when it’s time to release, you can feel confident about the tests passing in master as well. That’s the theory, so let’s go ahead and set this up.
Some prerequisites
You will need:
- a GitHub account (this could also be a Bitbucket or GitLab account, but GitHub will be used as an example)
- a Codeship account (Codeship is the service that will run your tests, build your code, and publish to NPM for you)
- Git installed on your machine
GitHub
Start by creating a new repository on GitHub here: https://github.com/new
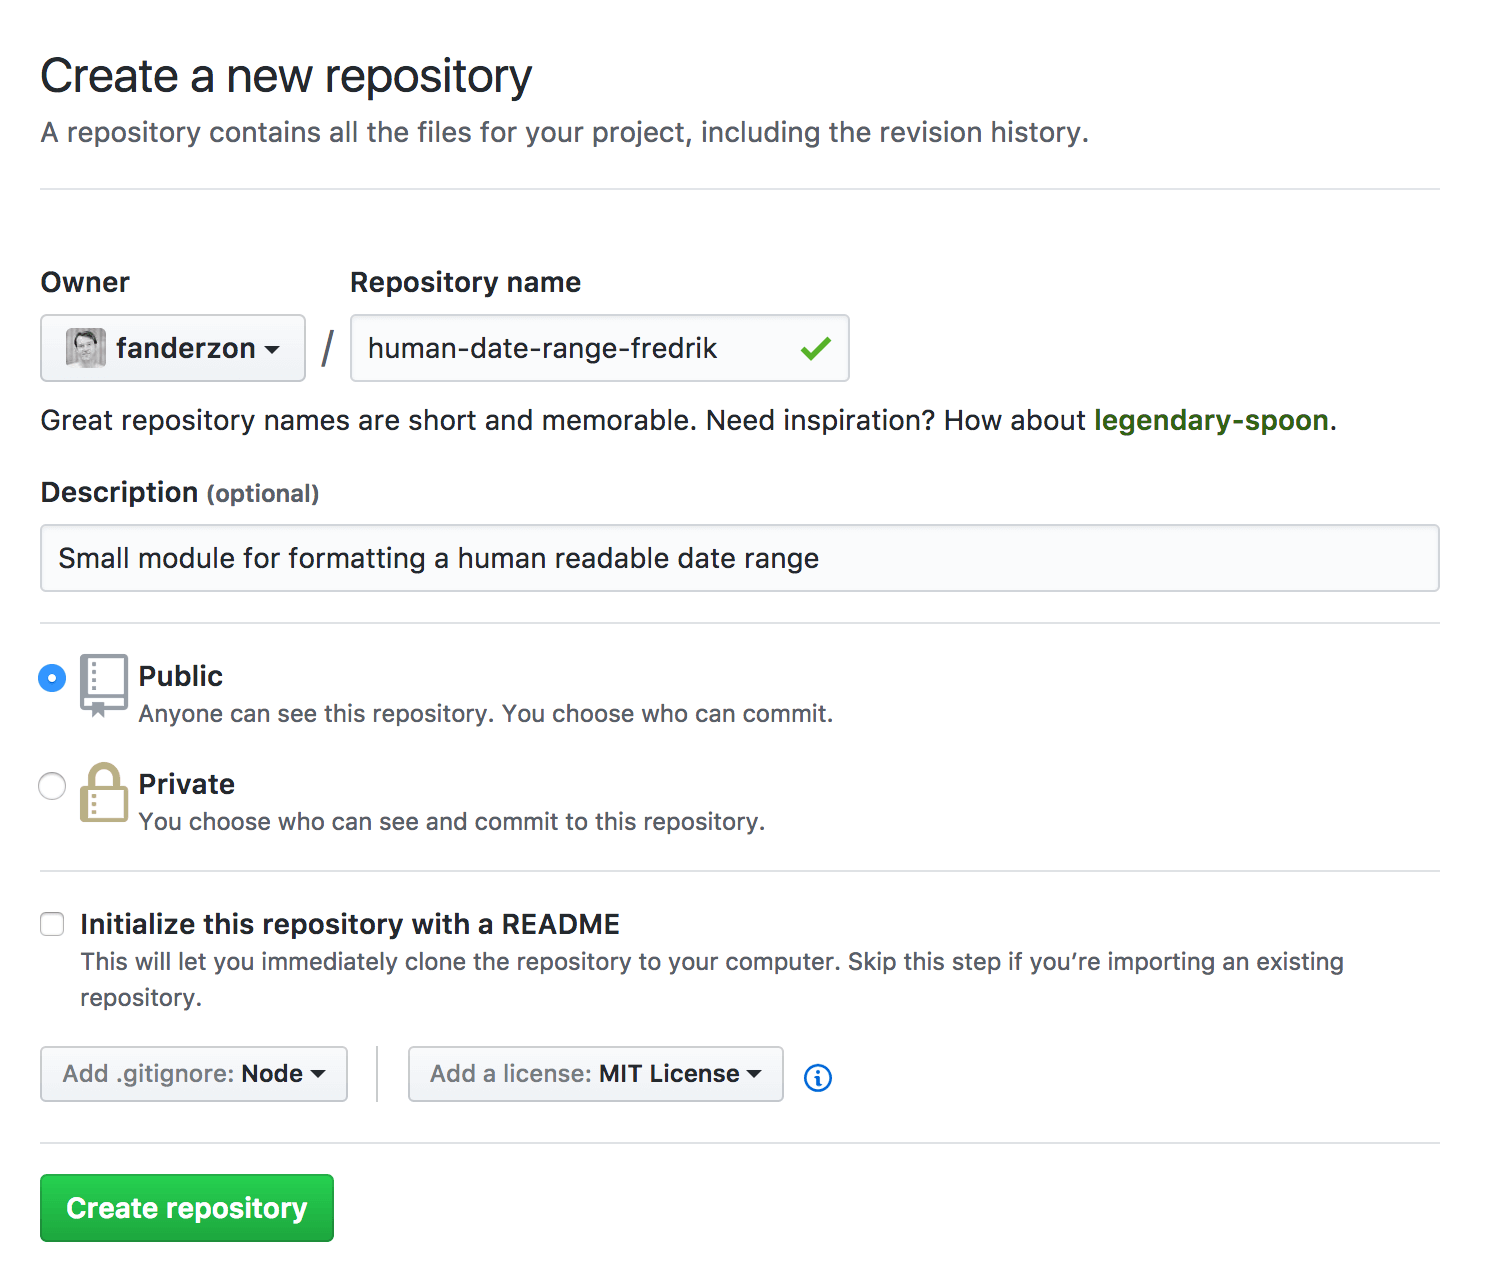
Once you have created your repository, GitHub will give you some helpful hints on how to get started. Nake note of your repository’s URL (it starts with git@ and should look something like git@github.com:youraccount/human-date-range-youraccount.git).
Initialize git and add your remote using the URL to your repository. Just to make sure everything works, create a stub of a README.md file and commit/push it to a new develop branch:
git init
git remote add origin git@github.com:fanderzon/human-date-range-fredrik.git
echo "# human-date-range-fredrik" >> README.md
git add README.md
git checkout -b develop
git commit -m "Added readme stub"
git push -u origin develop
Codeship
With the GitHub repository in place, you can now add it to Codeship. Go to your dashboard and create a new project. Select Connect with GitHub repository:
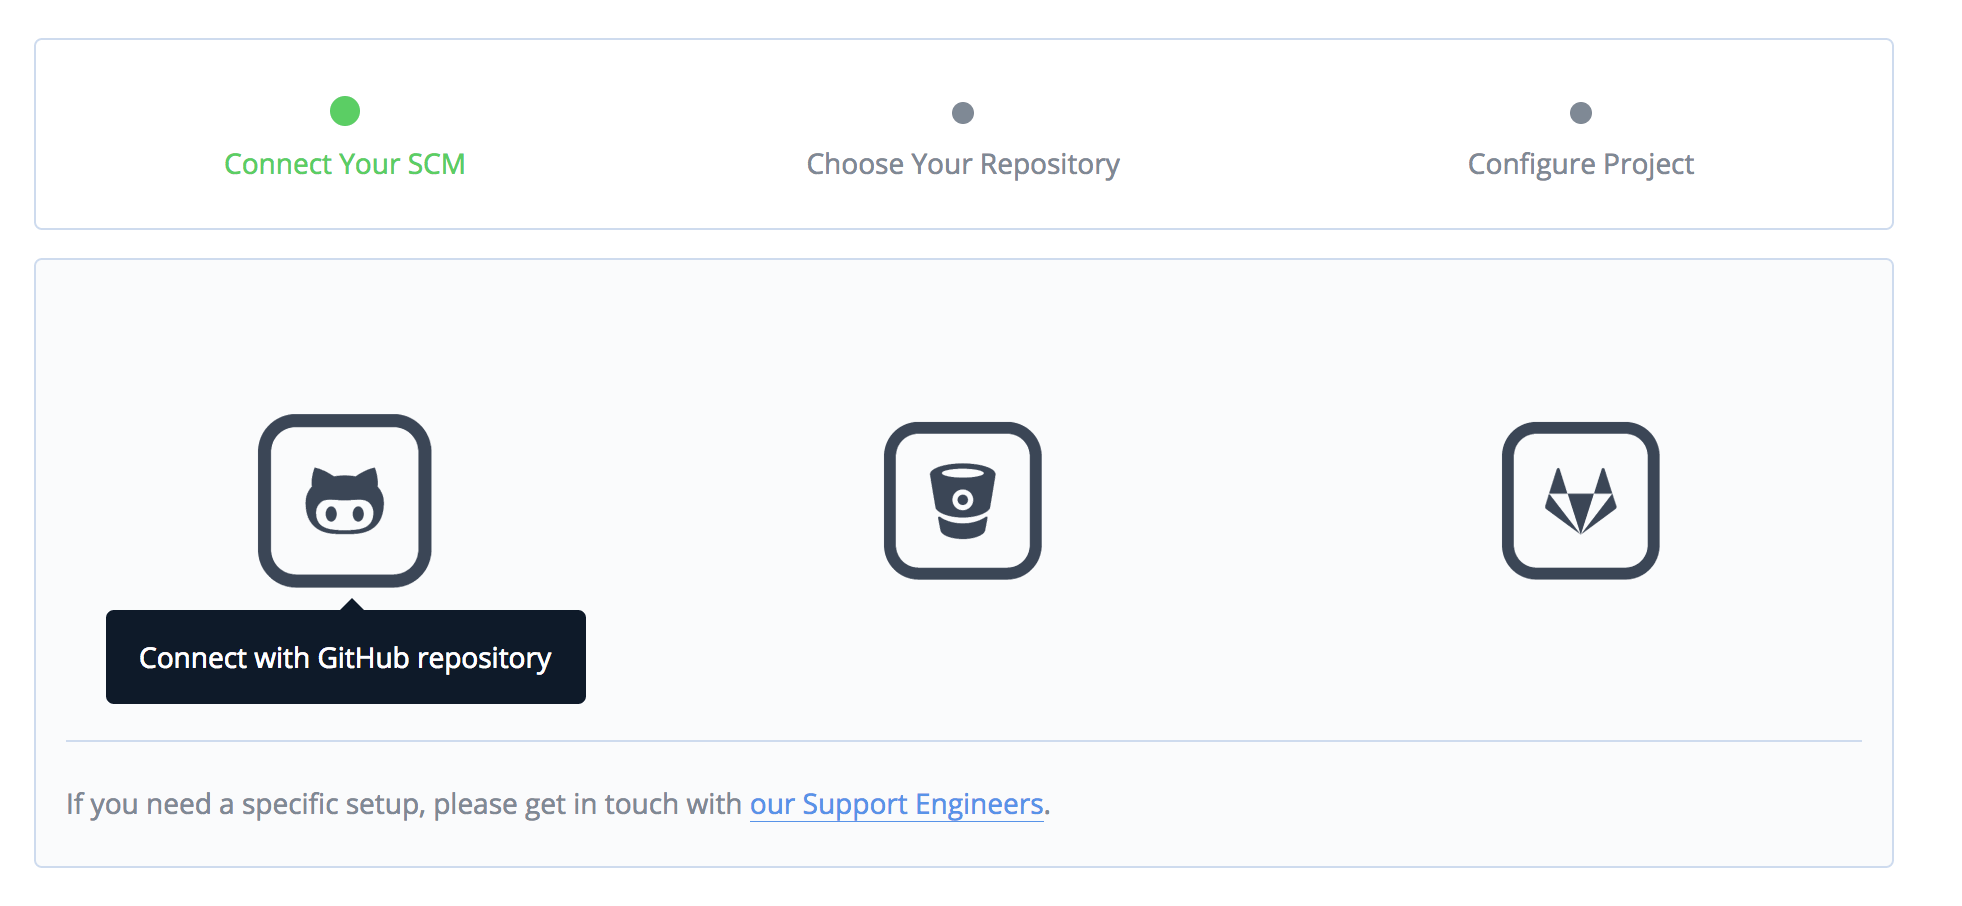
Use the same URL to your repository that you used earlier to connect your repository:

Run tests on commits
In the next step, pick Codeship Basic, and you should be taken to this view:
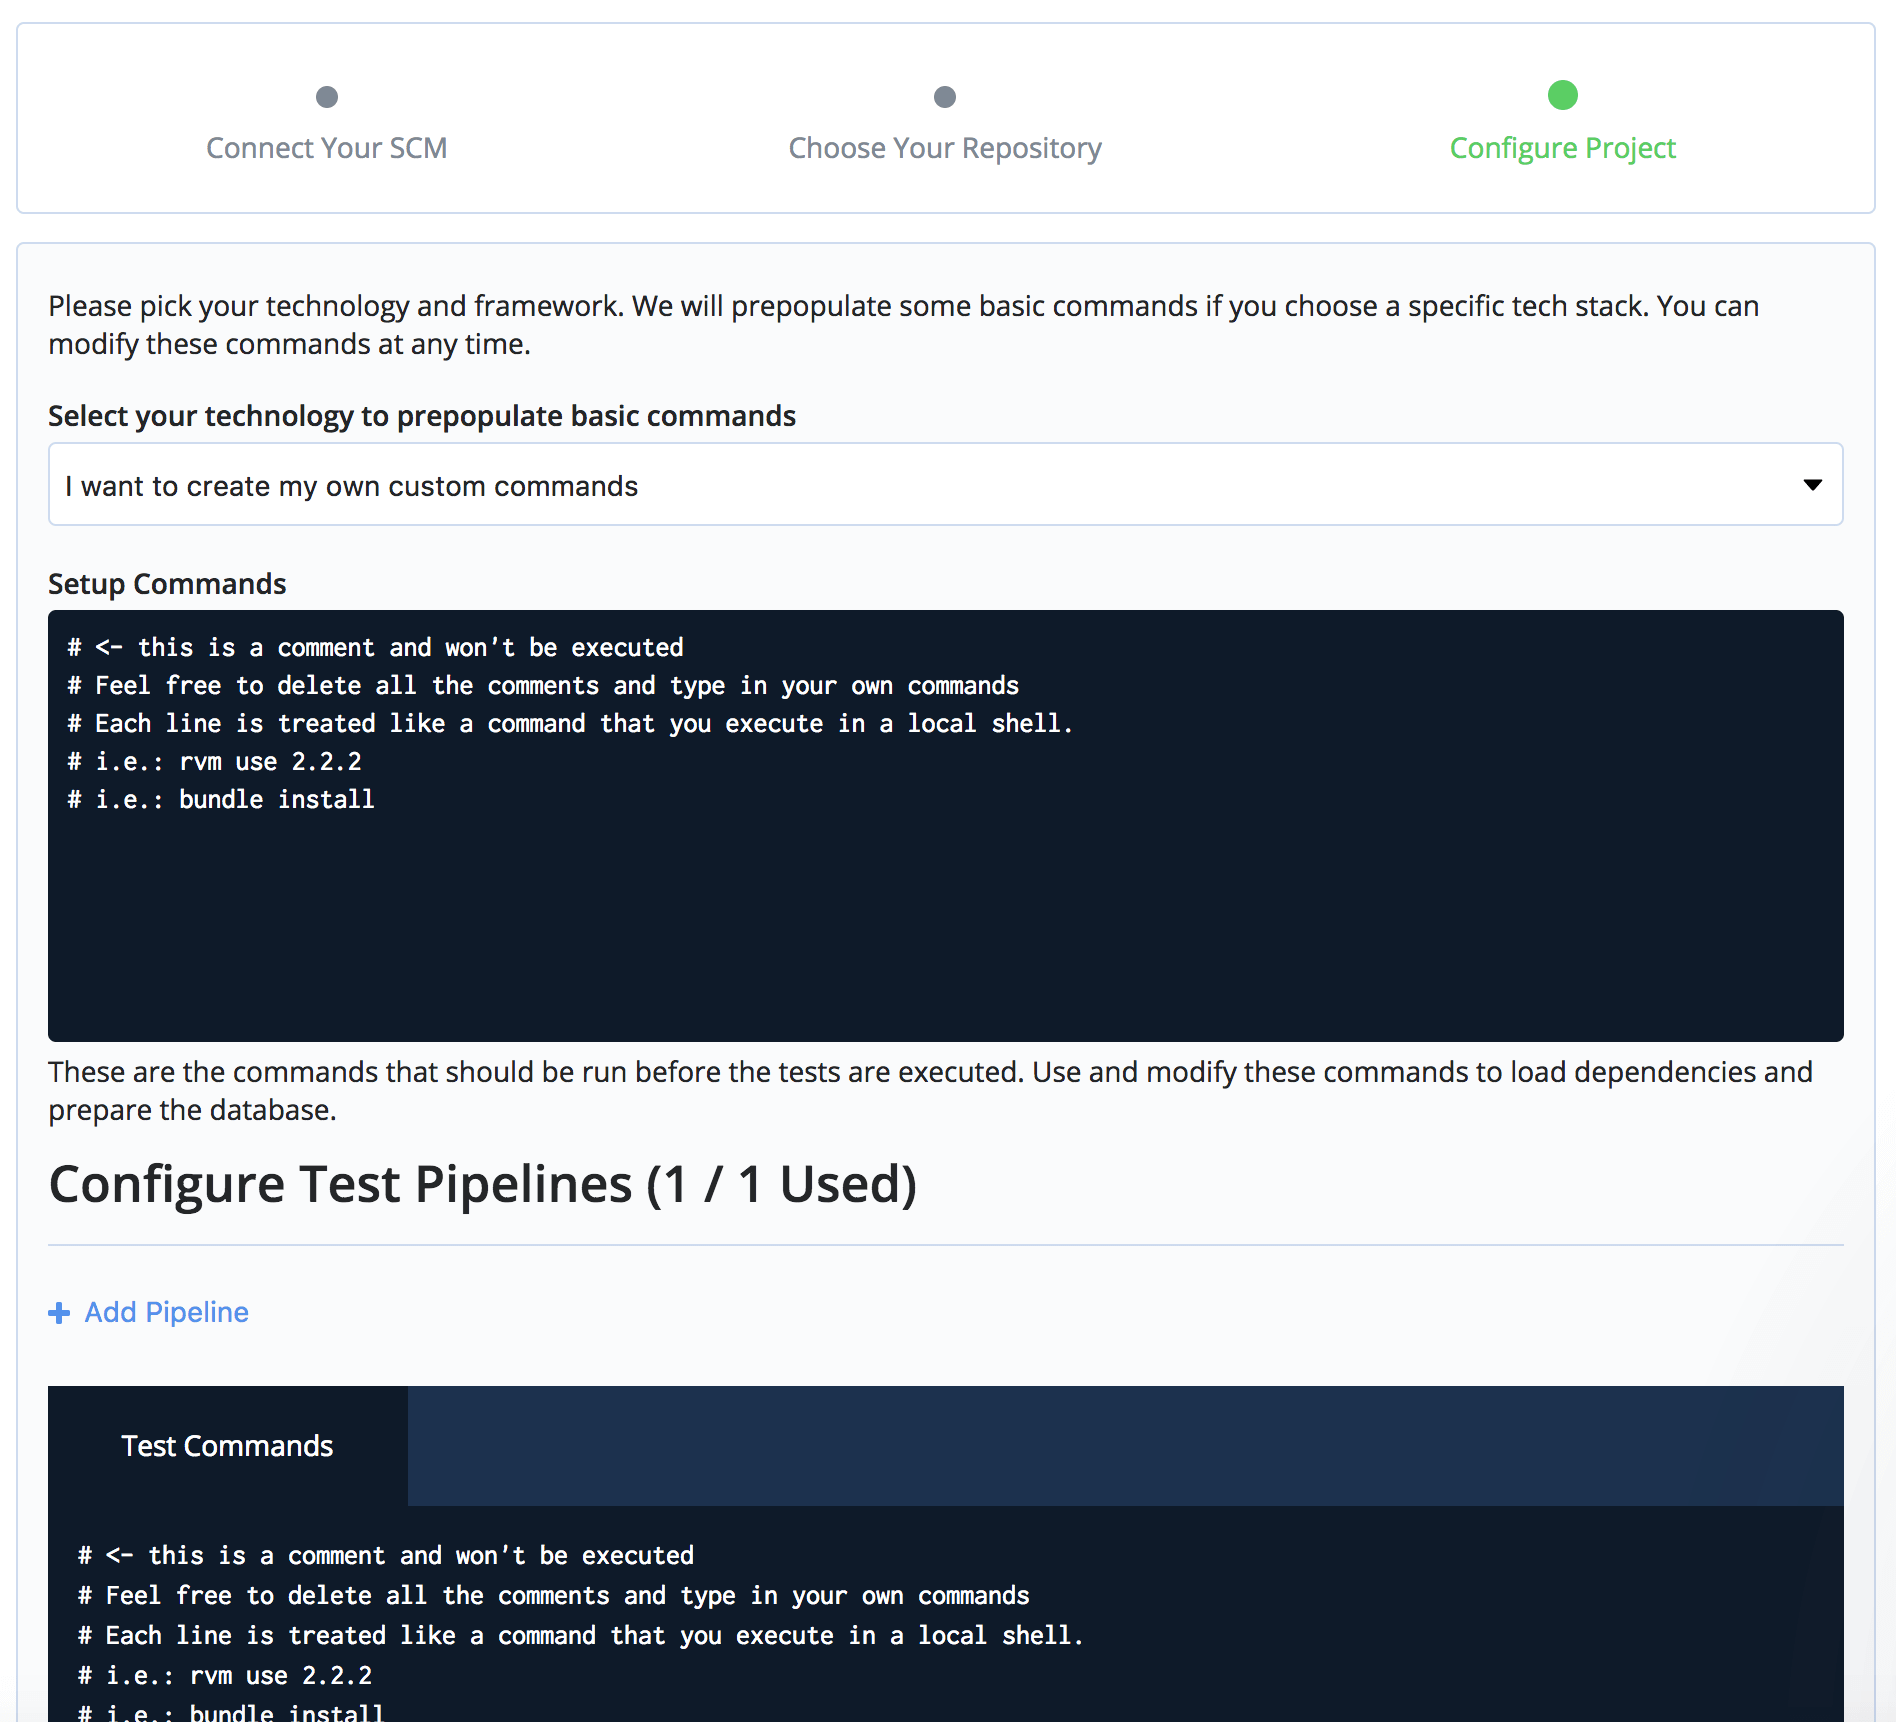
For Setup Commands, you need to pick the Node version to run (or Codeship will default to a super-old version) and then install all dependencies (6.10.1 is the current long-term support version of Node):
nvm install 6.10.1
npm install
For Test Commands, you want to put:
npm test
npm run build
Told you that you were well prepared for this!
Publishing on commits to master
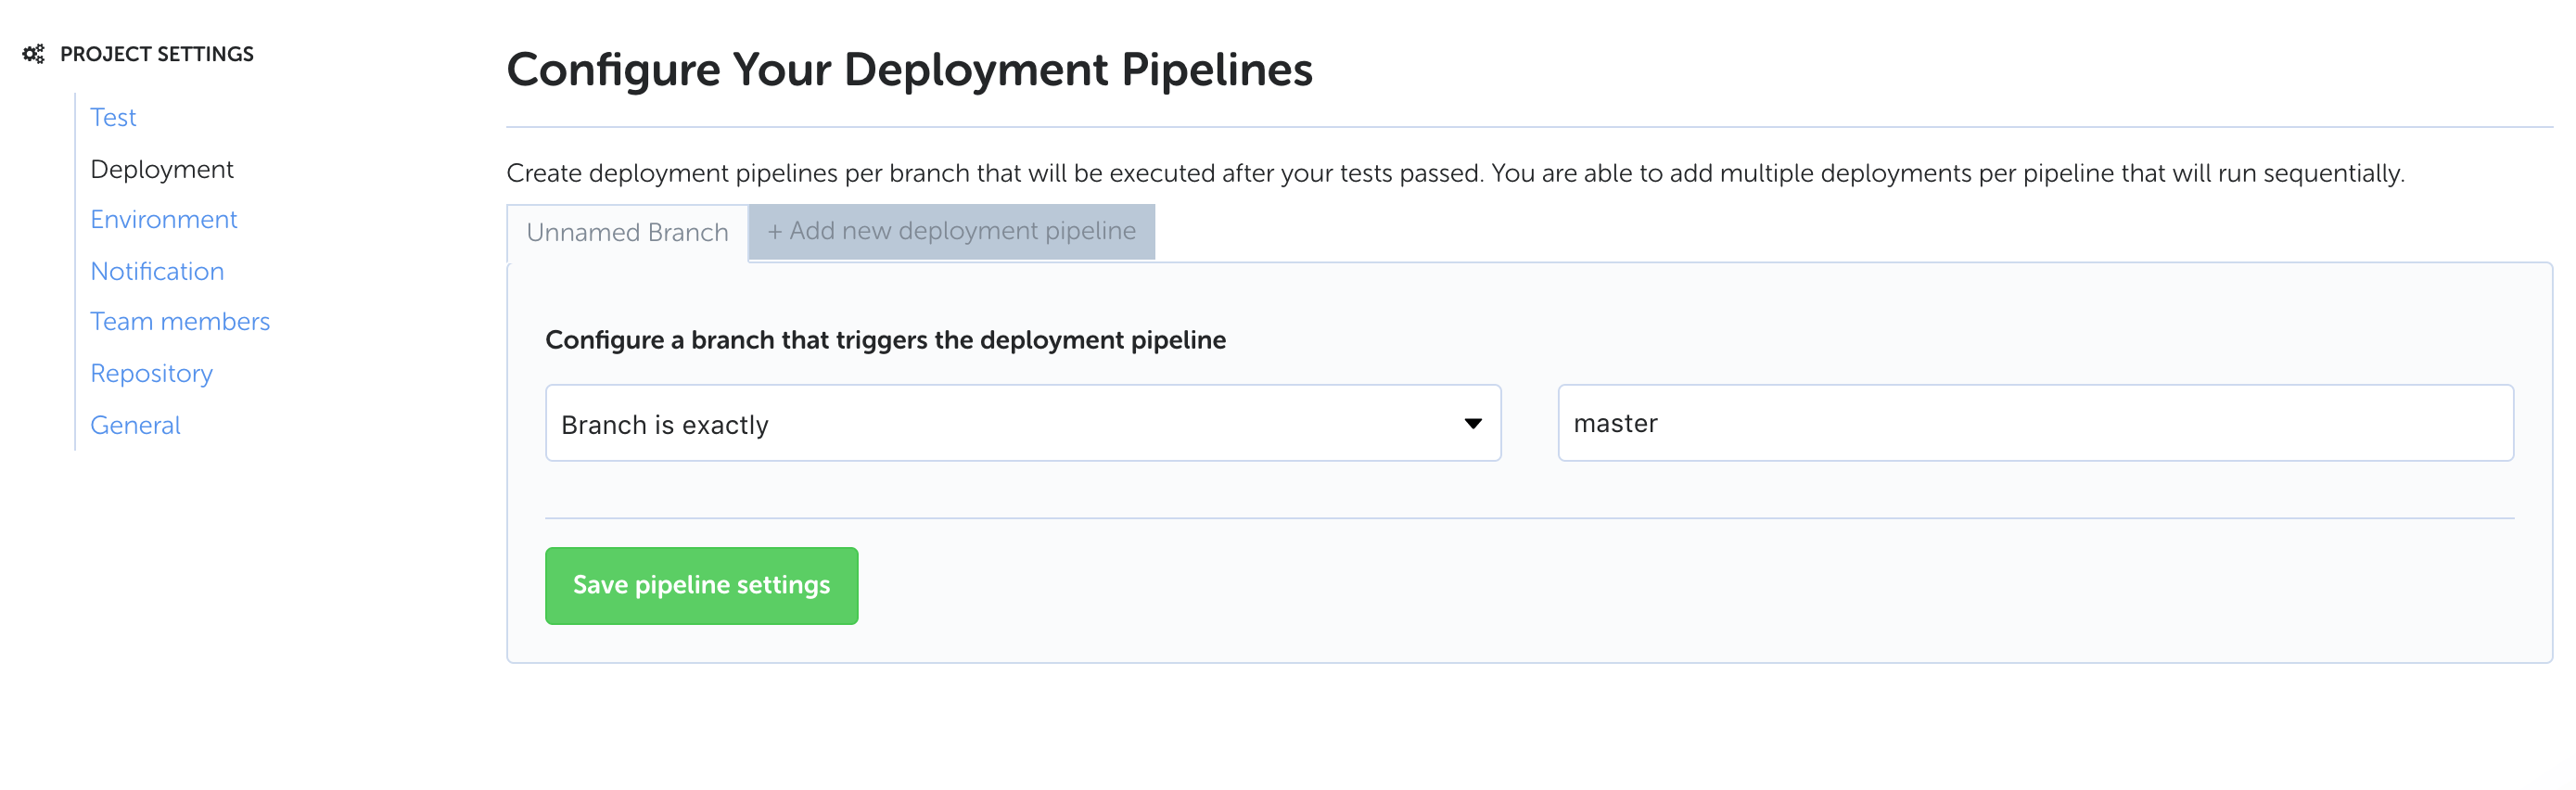
Now that the testing part is done, click Settings in the navigation menu and then Deployment.
![]()
Add a new deployment pipeline and set it to Branch is exactly master.
On the next screen, click Custom Script at the bottom. You will need to configure NPM a bit before running publish.
When you ran npm adduser (or npm login) earlier, NPM will have created a meta data file at ~/.npmrc.
Open that file (with nano ~/.npmrc or whatever text editor you prefer) and copy the line that starts with //registry.npmjs.org/:.
Use the code below as your custom deploy script at Codeship. Substitute your own name and email and replace the content between the double quotes in echo "" with the line you copied from ~/.npmrc.
npm set init.author.name "Your Name"
npm set init.author.email "your@email.com"
echo "//registry.npmjs.org/:_authToken=your-token-here" > ~/.npmrc
npm publish
Now all that’s left is to test this.
Publishing Through Codeship
Check out the master branch and merge the changes from develop into it. Then up the NPM version and push to GitHub.
git checkout -b master
git merge develop
npm versi
This will start the test/build process like any commit, but if that succeeds, it will now also run your deploy script. You should have a new version out on NPM in no time (or actually about a minute).
That’s a good start for moving into CI. Not only does this way of publishing prevent you from sharing a broken build, Codeship will also notify you by email if your tests fail on any commit during development; same if your build fails.
If you want to be notified in some other way (like a message on Slack), that can be configured on the Settings page.
However, you still have to manually merge develop into master and manually bump the NPM version when you want to make a release. Some will like that level of control, and some will seek to completely automate releases and NPM version handling as well, using something like semantic-release, where the NPM version can be updated automatically because every commit message has to follow a certain template.
| Reference: | Updating a Maintainable NPM Module with Continuous Integration from our WCG partner Fredrik Andersson at the Codeship Blog blog. |
