Discover faster, more efficient performance monitoring with an enterprise APM product learning from your apps. Take the AppDynamics APM Guided Tour!
It’s easy to get started with AppDynamics’ new .NET Microservices Agent. Featuring advanced portability, refinement and ease of use, this agent delivers great value to our customers who monitor .NET Core applications. Its flexibility in deployment is a boon to AppDynamics users hosting .NET apps in the cloud.

There are numerous ways to develop .NET applications, and several ways to run them. As the landscape expands for .NET development—including advances in .NET Core with its cross-platform capabilities, self-contained deployments, and even the ability to run an ASP.NET Core app on a Raspberry PI with the upcoming .NET Core 2.1 ARM32 support—it’s only fitting that AppDynamics should advance its abilities to monitor this new landscape.
One of these advancements is our new .NET Microservices Agent. Like .NET Core, this agent has evolved to become more portable and easier to use, providing more value to our customers who monitor .NET Core applications. Its portability and refinement enable a couple of installation options, both of which align closely with the movement to host .NET applications in the cloud, the development of microservices, and the growing use of containers. This flexibility in deployment was a requirement of our customers, as they had concerns over the one-size fits all deployment options of some of our competitors. These deployment methods include:
- Installing via the AppDynamics Site Extension in Azure
- Installing via the NuGet package bundled with the application
Each method has its advantages and disadvantages:
- AppDynamics Site Extension
- Advantage: Azure Site Extension is an easy deployment method that decouples the AppDynamics agent from the code. A couple of clicks and some basic configuration settings and—voila!—an Azure App Service has an AppDynamics monitoring solution.
- Disadvantage: It is an Azure App Service-only option. Should the application need to be moved to another service such as Azure Service Fabric, a different installation method would be needed.
- AppDynamics NuGet Package
- Advantage: the NuGet package installation method is super versatile. Since it’s bundled with the application, wherever it goes, the agent and monitoring go too. An excellent option for microservices and containers.
- Disadvantage: It’s biggest advantage is also a drawback, as coupling the agent with the application increases operational requirements. Agent updates, for instance, would require small configuration changes and redeployments.
The Easy Option: AppDynamics Site Extension
Azure provides the ability to add Site Extensions, a simple way to add functionality and tooling to an Azure App Service.
In the case of AppDynamics’ .NET Microservices Agent, Site Extensions is a wonderful deployment method that allows you to set up monitoring on an Azure App Service without having to modify your application. This method is great for an operations team that either wants to monitor an existing Azure App Service without deploying new bits, or decouple the monitoring solution from the application.
The installation and configuration of the AppDynamics Site Extension is simple:
- Add the Site Extension to the App Service from the Site Extension Gallery.
- Launch the Controller Configuration Form and set up the Agent.
As always, Azure provides multiple ways to do things. Let’s break down these simple steps and show installation from two perspectives: from the Azure Portal, and from the Kudu service running on the Azure App Service Control Manager site.
Installing the Site Extension via the Azure Portal
The Azure Portal provides a very easy method to install the AppDynamics Site Extension. As the Portal is the most common interface when working with Azure resources, this method will feel the most comfortable.
Step 1: Add the Site Extension
- Log into the Azure Portal at https://portal.azure.com and navigate to the Azure App Service to install the AppDynamics Site Extension.
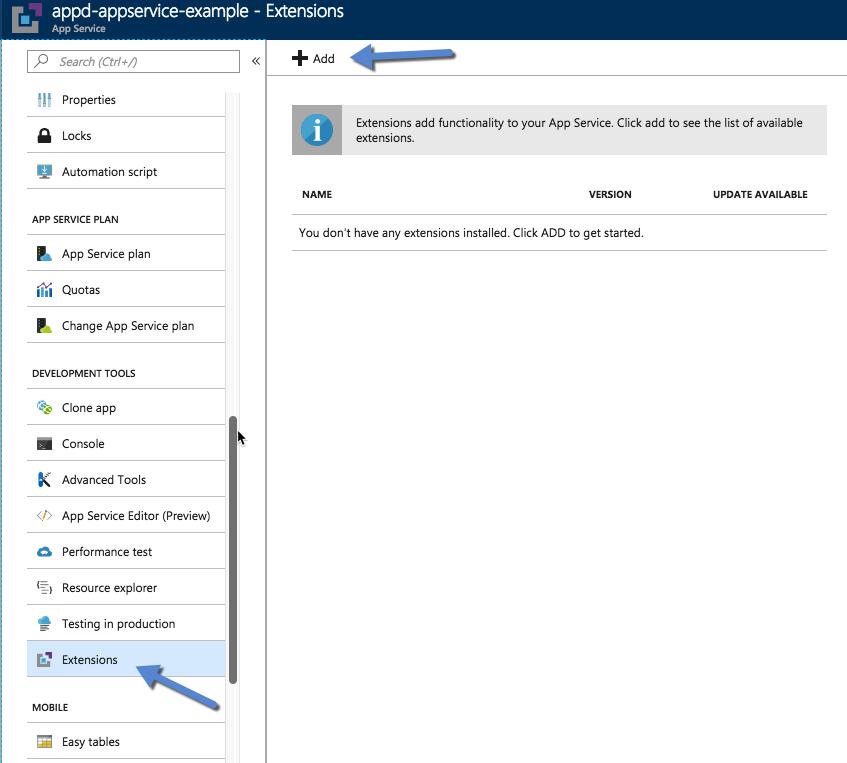
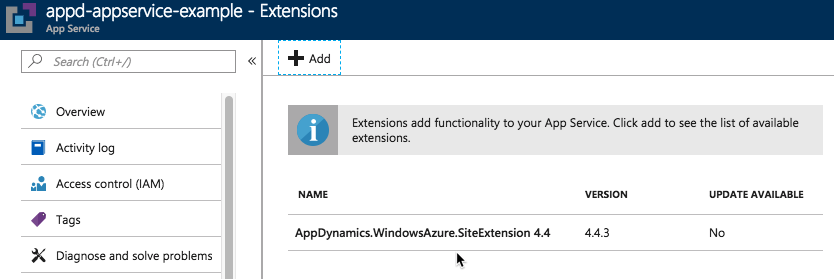
- In the menu sidebar, click the Extensions option to load the list of currently installed Site Extensions for the Azure App Service. Click the Add button near the top of the page (see below) to load the Site Extension Gallery, where you can search for the latest AppDynamics Site Extension.
- In the “Add extension” blade, select the AppDynamics Site Extension to install.
(The Portal UI is not always the most friendly. If you hover over the names, a tooltip should appear showing the full extension name.)
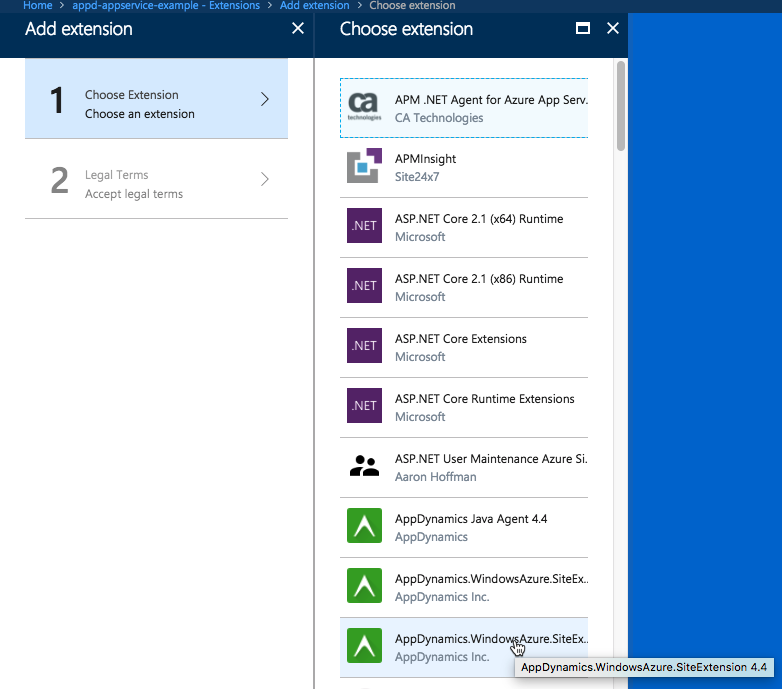
- After choosing the extension, click OK to accept the legal terms, and OK again to finish the selection. Installation will start, and after a moment the AppDynamics Site Extension will be ready to configure.
Step 2: Launch and Configure
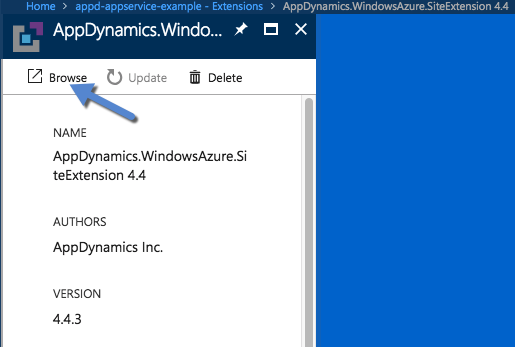
- To configure the AppDynamics Agent, click the AppDynamics Site Extension to bring up the details blade, and then click the Browse button at the top. This will launch the AppDynamics Controller Configuration form for the agent.
- Fill in the configuration settings from your AppDynamics Controller, and click the Validate button. Once the agent setup is complete, monitoring will start.
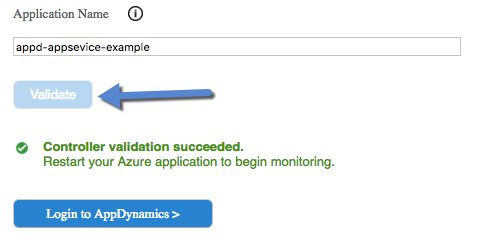
- Now add some load to the application. In a few moments, the app will show up in the AppDynamics Controller.
Installing the Site Extension via Kudu
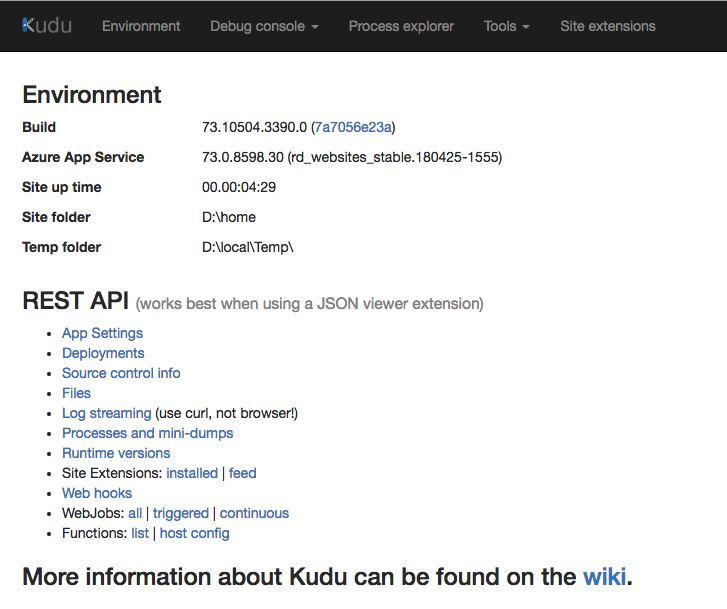
Every Azure App Service is created with a secondary site running the Kudu service, which you can learn more about at the projectkudu on GitHub. The Kudu service is a powerful tool that gives you a behind-the-scenes look at your Azure App Service. It’s also the place where Site Extensions are run. Installing the AppD Site Extension from the Kudu service is just as simple as from the Azure Portal.
Step 1: Add Site Extension
- Login to the Azure Portal at https://portal.azure.com and navigate to the Azure App Service to install the AppDynamics Site Extension.
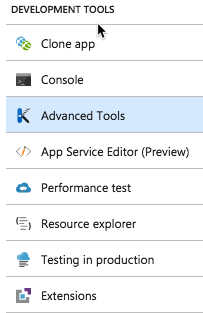
- The Kudu service is easy to access via the Advanced Tools selection on the App Service sidebar.
- Another option is to login directly to the secondary site’s URL by including a “.scm” as a prefix to the “.azurewebsite.net” domain. For example: http://appd-appservice-example.azurewebsites.net becomes http://appd-appservice-example.scm.azurewebsites.net. (You can read more about accessing the Kudu service in the projectkudu wiki.)
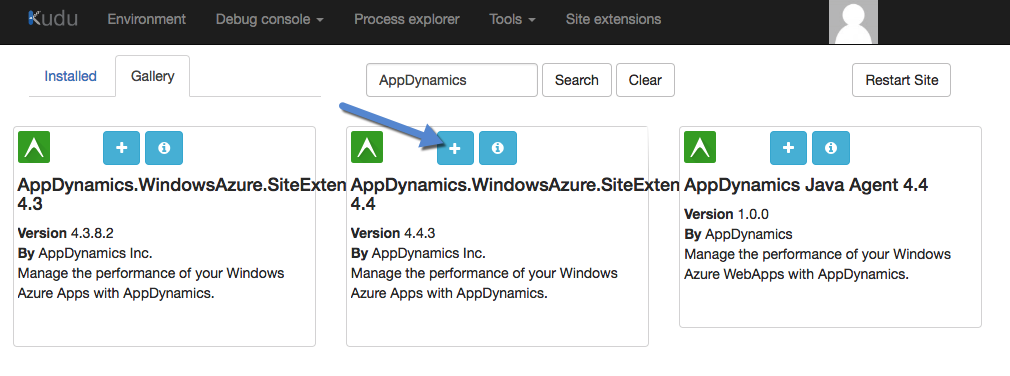
- On the Kudu top menu bar, click the Site Extensions link to view the currently installed Site Extensions. To access the Site Extension Gallery, click the Gallery tab.

- A simple search for “AppDynamics” will bring up all the available AppDynamics Site Extensions. Simply click the add “+” icon on the Site Extension tile to install.
- On the “terms acknowledgement” dialog pop-up, click the Install button.
- Finish the setup by clicking the “Restart Site” button on the upper right. This will restart the SCM site and prepare the AppDynamics Controller Configuration form.
Step 2: Launch and Configure
- Once the restart completes, click the “Launch” icon (play button) on the Site Extension tile. This will launch the AppDynamics Controller Configuration form.
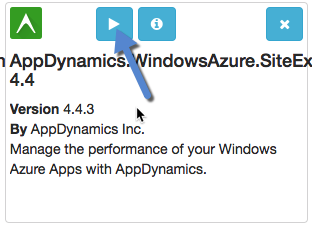
- Follow the same process as before by filling in the details and clicking the Verify button.
- The agent is now set up, and AppDynamics is monitoring the application.
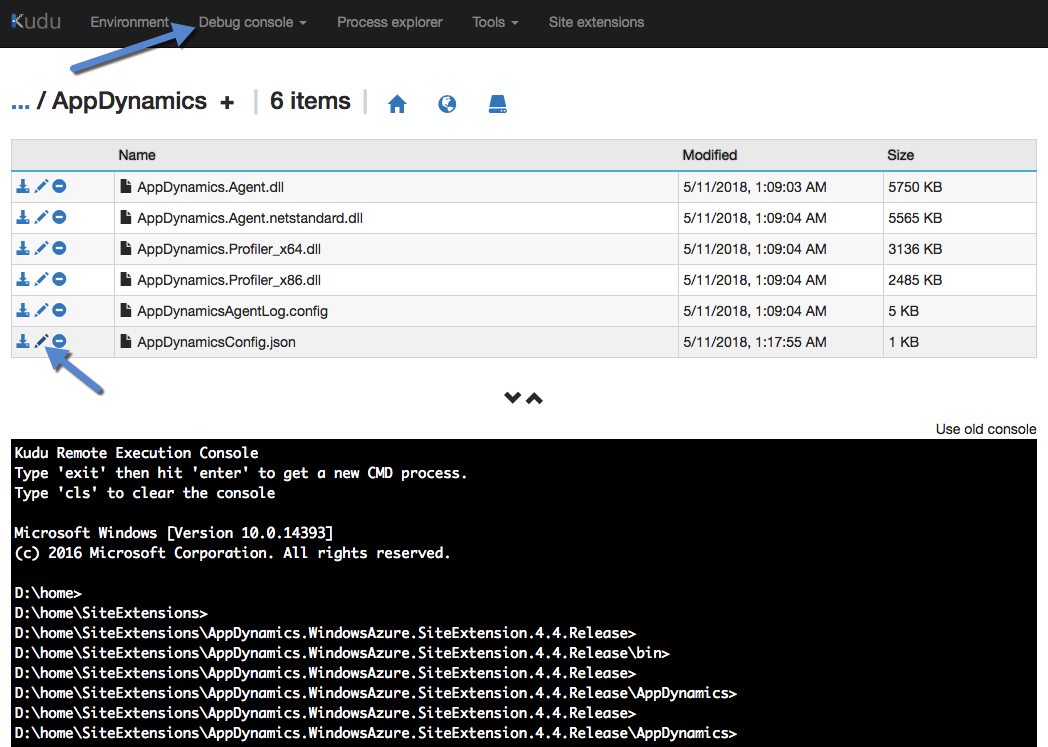
AppDynamics Site Extension in Kudu Debug Console
One of the advantages of the Kudo service is the ability to use the Kudu Debug Console to locate App Service files, including the AppDynamics Site Extension installation and AppDynamics Agent log files. Should the Agent need configuration changes, such as adding a “tier” name, you can use the Kudu Debug Console to locate the AppDynamicsConfig.json file and make the necessary modifications.
The Versatile Option: AppDynamics NuGet Packages
The NuGet package installation option is the most versatile deployment method, as the agent is bundled with the application. Wherever the application goes, the agent and monitoring solutions go too. This method is great for monitoring .NET applications running in Azure Service Fabric and Docker containers.
AppDynamics currently has four separate NuGet packages for the .NET Microservices Agent, and each is explained in greater detail in the AppDynamics documentation. Your choice of package should be based on where your application will be hosted, and which .NET framework you will use.
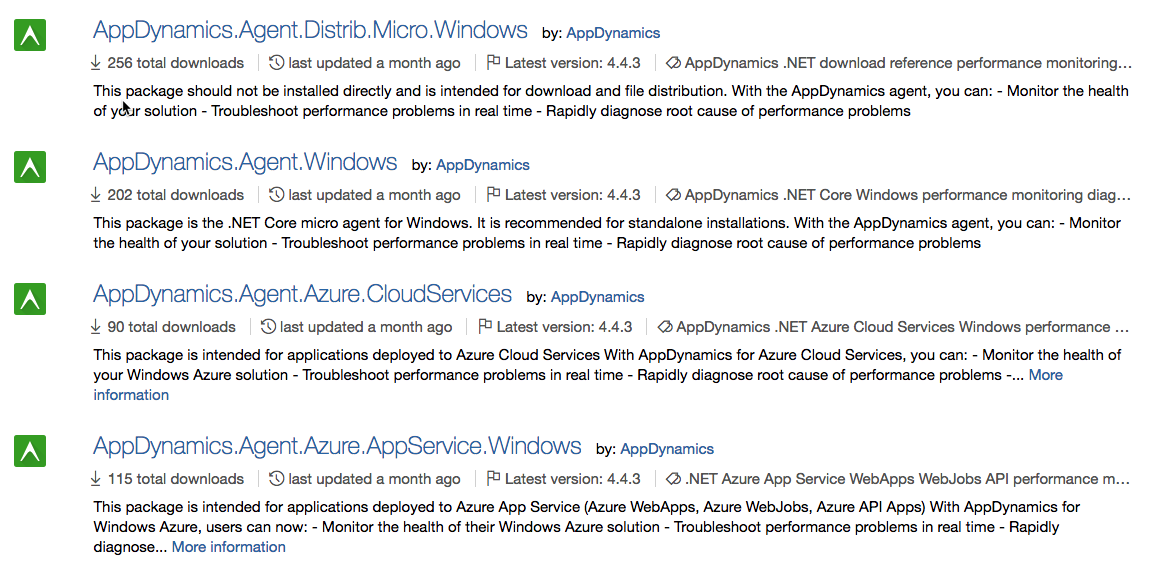
In the example below, we will use the package best suited for an Azure App Service, for a comparison to the Site Extension.
Installing the AppDynamics App Service NuGet Package
The method for installing a NuGet package will vary by tooling, but for simplicity we will assume a simple web application is open in Visual Studio, and that we’re using Visual Studio to manage NuGet packages. If you’re working with a more complex solution with multiple applications bundled together, NuGet package installation will vary by project deployment.
Step 1: Getting the Correct Package
- On the web app project, right-click and bring up the context menu. Locate and click “Manage NuGet Packages…”. This should bring up the NuGet Package Manager, where you can search for “AppDynamics” under the Browse tab.

- Locate the correct package—in this case, the “AppService” option—select the appropriate version and click Install.
- Do a build of your project to add the AppDynamics directory to your project.
- The agent is now installed and ready to configure.
Step 2: Configure the Agent
- Locate the AppDynamicsConfig.json in the AppDynamics directory and fill in the Controller configuration information.

- Publish the application to Azure and add some load to the application to test if monitoring was set up properly.
I hope these steps give you an overview of how easy it is to get started with our .NET Microservices Agent. Make sure to review our official .NET Microservices Agent and Deploy AppDynamics for Azure documentation for more information.
Discover faster, more efficient performance monitoring with an enterprise APM product learning from your apps. Take the AppDynamics APM Guided Tour!
