The demand for mobile application developers is extremely high. However, learning each platform’s native programming language and toolsets can be a significant, time-consuming challenge.
Fortunately, there’s a better way! Cross-platform application development.
The goal of cross-platform development is to create software that seamlessly runs on multiple platforms using one set of tools and programming languages. The benefits of this approach include lower costs, rapid prototyping, and skill reuse.
To begin creating an application with this approach, most developers select a framework as their starting point. Fortunately, there are lots to pick from. Some, including React Native, NativeScript, Vue, Angular, and Ionic, are built using web technologies. Others, like Xamarin and Flutter, leverage a diverse set of programming languages including C# and Dart.
Most of these are stellar; however, it can be overwhelming at first to decide which approach to take, which framework to pick, and then to get up to speed on its unique nuances.
Therefore, we’re going to skip the complexity and focus on the core concepts. Using our existing HTML, CSS, and JavaScript skills, we’ll create a mobile app that runs in a web browser as well as on Android and iOS. I prefer the web-based approach since it provides the most options for deployment: web, mobile, and desktop.
After following this two-part guide, you’ll be prepared to jump into a more serious framework should you wish to explore this approach further. In part one, we’ll create the mobile app, and in part two, deploy it to a device using Adobe’s PhoneGap Build tool.
Mobile App Building Blocks
Before jumping into creating the app, let’s define the technologies we’ll be using:
- Apache Cordova: An open-source mobile development framework that provides the tools to turn a web-based application into a native one.
- Adobe PhoneGap: Adobe’s distribution of Cordova. It’s essentially the same as Cordova, but with some extensions and additional tooling (such as PhoneGap Build). PhoneGap and Cordova are used interchangeably here.
- PhoneGap Build: Adobe’s free cloud service that converts your HTML5, CSS, and JavaScript assets into a variety of native apps. The key benefit is avoiding having to maintain native SDKs.
- Kendo UI: While we could create an app using barebones HTML5, CSS, and JavaScript, there would be a lot of work involved to create something that looks and feels like a mobile app. Therefore, we’ll use Kendo UI’s mobile widgets, which provide reusable components such as navigation and buttons, as well as common mobile UI designs.
- jQuery: Everyone’s favorite JavaScript framework.
Cordova App Architecture
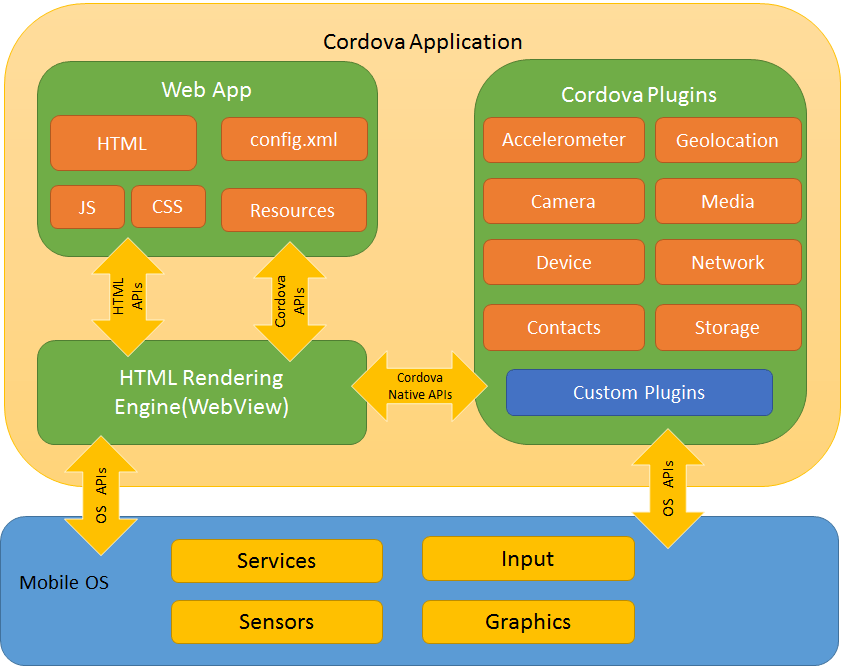
Cordova App Architecture via Cordova
A Cordova app is made up of a few different components: a web application, the HTML rendering engine (WebView), and native plugins.
The web application is the most recognizable, consisting of HTML, JavaScript, CSS, and resources, which include any other files needed by the app. This typically means media such as images or video. The config xml file, to be covered in part two, represents metadata about the app and specifies parameters affecting how it works.
The WebView is the secret sauce of a Cordova application. It is essentially an embedded web browser that the web application runs in. The WebView is then placed into a native app shell, allowing an app created with web tech to be deployed as a native app.
Plugins, the last component of a Cordova app, provide standardized access to device capabilities. The result? Native code can be invoked from JavaScript, giving the web app functionality that has never before been possible. Core plugins allow app experiences to be crafted that utilize the device’s camera, accelerator, storage, contacts, and more.
If a core plugin doesn’t fit one’s needs, third-party plugins are an option. They are open-source and created by the Cordova community. Virtually every use case is already available as a plugin, and if not, developers are free to create their own.
Plugins are implemented using each targeted platform’s native code (Objective-C or Swift for iOS, Java for Android, etc.), and exposes a JavaScript application programming interface (API). This interface provides an abstraction layer over the underlying native code, so the Cordova developer does not need to understand the native programming languages.
Altogether, this makes for a compelling solution to cross-platform development. The one piece of the puzzle that Cordova doesn’t provide, though, is user interface (UI) widgets. It’s up to the developer to implement the UI layer.
Fortunately, there’s no need to start from scratch, as many open-source frameworks are available. This includes Kendo UI, which we’ll look at as part of our application’s design.
Creating the App
The mobile app we’ll be creating is located here. For the rest of this article, all code referenced can be found in the “app – part one” folder.
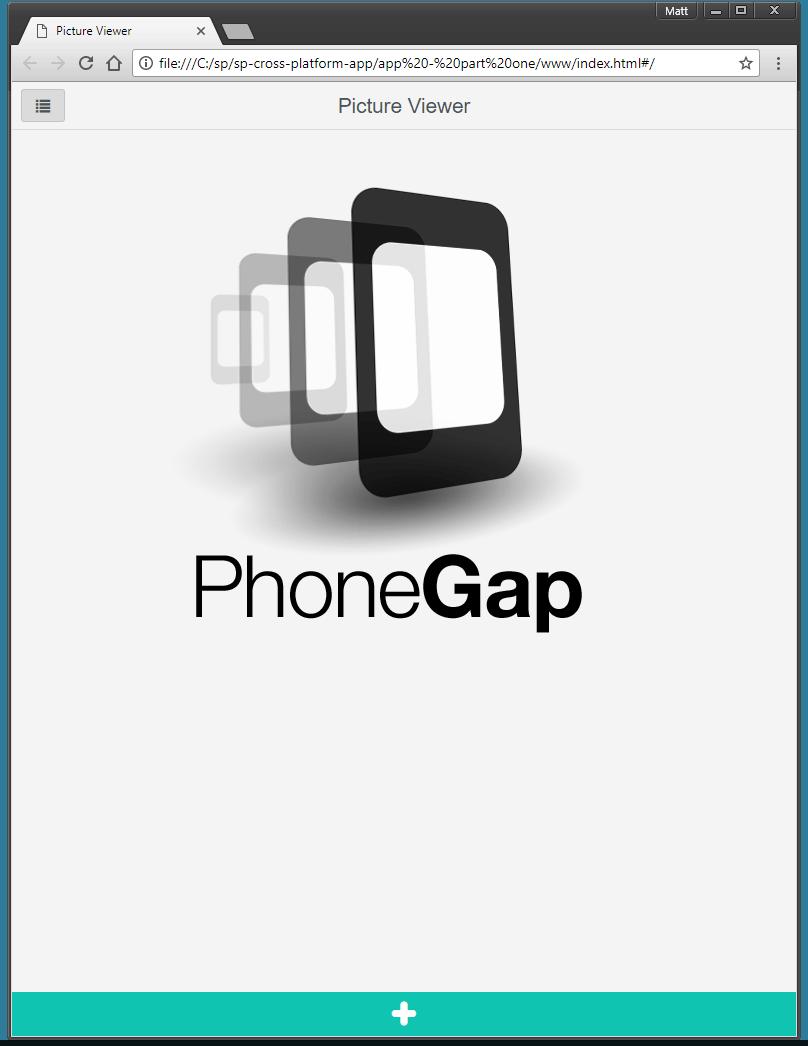
The complete app below, running in Google Chrome, displays an image of the PhoneGap logo when first opened. When the user taps the button at the bottom of the screen, the device’s camera opens, allowing the user to take a picture. Additionally, the captured photo is saved on the device so that when the user closes the app and comes back to it later, it is displayed immediately.
App Structure
Taking a peek into the “app – part one” folder, we see the “www” folder, which serves as a container for the entire web application. All HTML, CSS, JavaScript, and media (images, etc.) files are placed here.
Also in this folder is the config.xml file, a configuration metadata file for Cordova. PhoneGap Build uses this file to determine how to create iOS and Android apps from the web app. We’ll implement this in part two.
Within the “www” folder, we see the “img” folder, a container for any static images used within the app. The “scripts” folder contains all JavaScript files, including jQuery and Kendo UI. The “styles” folder contains all CSS files. Index.html, the entire application itself, is implemented as a single page application (SPA). With this approach, a single HTML page is loaded and is dynamically updated using asynchronous JavaScript (AJAX). This is a perfect approach given the goal of creating a responsive mobile app.
Additionally, other folders include “icons,” all icon image files to be used when creating the iOS and Android app, and “splash,” all splash screen images that display when the mobile app is opened.
These images will be created in part two.
App Code: index.html
With an overview of the structure of the Cordova app, we’re ready to dive into the implementation of our app. Let’s begin with index.html, the main container of the app.
 <!DOCTYPE html>
<html>
<head>
  <meta charset="utf-8" />

  <meta http-equiv="Content-Security-Policy"
    content="default-src
    'self'
    gap:
    'unsafe-eval'
    'unsafe-inline';">

  <!-- Kendo UI Mobile styles for all supported platforms -->
  <link href="styles/kendo.mobile.all.min.css" rel="stylesheet">
  <!-- This app's styles -->
  <link href="styles/main.css" rel="stylesheet" />
</head>
At its core, this is an HTML5 web app, declared via this simple DOCTYPE tag at the top of the file: <!DOCTYPE html>.
Next, a meta tag defines a Content Security Policy (CSP). CSPs are an added layer of security for web pages and apps that mitigate certain types of attacks, such as cross-site scripting. In cross-platform mobile apps, they are a security mechanism used to ensure only the third-party content specified (via APIs or images, etc.) is loaded. More information can be found on the Mozilla Developer Network (MDN) web docs.
Last, there are two link tags that bring in the app’s CSS, both for Kendo UI and any custom styles we wish to define.
 <body onload="initialize();">
  <div data-role="view" id="drawer-home" data-title="Photo Viewer">
    <div id="mainContent" class="mainContent">
      <img id="curImage" class="currentImage"  />
    </div>

    <div data-role="footer">
      <div data-role="tabstrip">
        <a id="btnAddPic" data-role="button" data-icon="add" onclick="controller.takePicture();"></a>
      </div>
    </div>
  </div>

  <div data-role="view" id="drawer-about" data-title="About">
    <ul data-role="listview" data-style="inset" data-type="group">
      <li>Cross-platform mobile app sample
    <ul>
      <li>This is the sample application for Simple Programmer. </li>
      <li>This app allows the user to take a picture using the device's camera and caches it for later retrieval.
      </li>
    </ul>
      </li>
    </ul>
   </div>
</body>
Next up is a portion of the document’s body. To demonstrate how to create multiple pages in an app, there are two here. The main page displays the picture taken from the device’s camera and an “About” page displays some text that describes the app’s capabilities.
Notice the two div tags with a data-role=”view” attribute. This is specific to the Kendo UI framework and represents each screen (or “view”) of the app. The first view, with title “Picture Viewer,” displays the last image taken by the device camera via a simple <img> tag. Immediately below, there are two other data-role attributes, footer and tabstrip. These tell Kendo UI to create a footer that contains clickable buttons like we’d see in a typical mobile app.
Continuing on, the next data-role represents the “About” page. Only one new custom attribute is used here, the listview, a common mobile UI pattern. As the name implies, it styles and groups together a list of items. In this case, we give it an unordered list (<ul>) and it takes care of the rest.
How does this really work? When this HTML file is opened in a browser, Kendo UI reads all of their custom attributes and performs some magic in order to create the resulting UI widgets that the user sees. Yes, the HTML is changed in the browser, but writing an app with it is very straightforward.
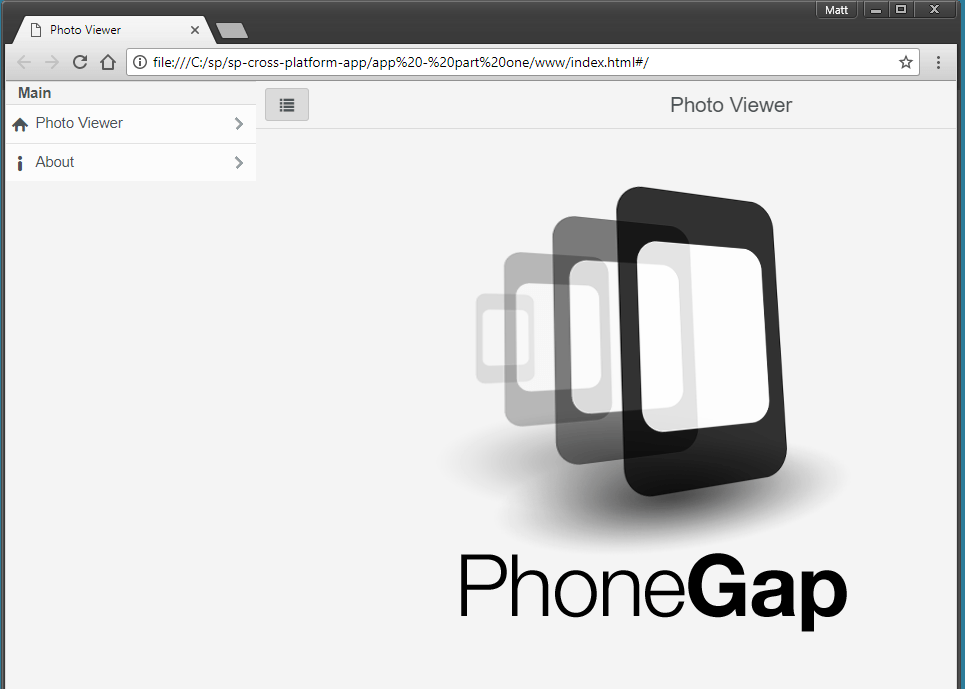
The last portion of the HTML document body defines a feature that really makes this web app feel like a mobile app: a drawer widget, which opens via a left or right swipe, or by tapping on the hamburger menu icon:
<!-- Define the drawer -->
<div data-role="drawer" id="my-drawer" data-views="['drawer-home', 'drawer-about', 'index.html']">
  <ul data-role="listview" data-type="group">
    <li>Main
  <ul>
    <li data-icon="home"><a href="#drawer-home" data-transition="none">Photo Viewer</a></li>
    <li data-icon="info"><a href="#drawer-about" data-transition="none">About</a></li>
  </ul>
    </li>
  </ul>
</div>

<!-- Define the app layout -->
<div data-role="layout" data-id="drawer-layout">
  <header data-role="header">
    <div data-role="navbar">
      <a data-role="button" data-rel="drawer" href="#my-drawer" data-icon="hamburger" data-align="left"></a>
      <span data-role="view-title"></span>
    </div>
  </header>
</div>
The two outer divs define the drawer menu and its arrangement within the app. The data-views attribute of the drawer tells it what pages to link to (“Photo Viewer,” “About,” and the parent HTML file itself), defined again using an unordered list for each. Kendo UI ships with a variety of common web/mobile icons. Changing them is as simple as reviewing this list, choosing one, and updating the reserved word (such as “info” to “search”).
The next div with data-role layout declares that the drawer menu should be displayed on every page in the app. The hamburger button points to the drawer via the href tag and the “my-drawer” id.
<!-- PG Build service injects this (do not include yourself!), but still need a reference here -->
<script src="cordova.js"></script>

<!-- Kendo UI-related JavaScript -->
<script src="scripts/jquery.min.js"></script>
<script src="scripts/kendo.all.min.js"></script>

<!-- Main app logic -->
<script src="scripts/controller.js"></script>
The last section of the HTML file contains all JavaScript inclusions. Cordova.js is the first one. We do not include this file within the app’s folder. Instead, the PhoneGap Build service injects this file for us. Yes, it’s a bit odd to have to include a reference to it, especially because running the app locally will display a console error about the “missing” file, but it must be done.
Next up, there is Kendo UI, jQuery, and Controller.js, which contains all of the app’s setup and main logic code unique to this app.
App Code: Controller.js
Within Controller.js, we write the code that will provide the interactive functionality of the app, such as using the mobile device’s camera to take a photo.
 ctrl.init = function() {
  // initialize kendo mobile app - only line needed to get started
  new kendo.mobile.Application(document.body, { skin: "flat", layout: "drawer-layout" });

  // load previous photo if available, otherwise load a stock image
  document.getElementById('curImage').src = localStorage.soloImageSrc || "img/phonegap.png";
}
We begin with an initialization function, which executes immediately when the app loads. First, we need Kendo UI to stylize the app by creating a new instance of “kendo.mobile.Application”.
The first parameter given, document.body, is always used because we want Kendo UI to have access to the entire web app. The second parameter represents various configuration options. I’ve set the skin property to “flat,” referencing the popular “flat design” user interface style. If we left out this property entirely, Kendo UI automatically detects which type of device the app is running on (iOS or Android in this case), stylizing it according to that platform’s design preferences.
The layout property tells Kendo UI which general layout to apply to the app. As you’ll recall from the above HTML, we created a layout that attaches a drawer menu to every page within the app. We defined the layout in HTML by using the data-role=”layout” and data-id=”drawer-layout” attributes.
The final line of code in the initialization function involves the usage of the logical OR operator (“||”) as a neat JavaScript trick to determine which image to display. If the “soloImageSrc” object doesn’t exist in localStorage, then use the default Phonegap.png image included in the “img” folder. localStorage allows developers to store data in a web browser. We’ll use it as an easy way to store and retrieve the user’s last photo captured with the camera.
Next up is the most important JavaScript function, the one that lets the user take a photo with their device’s camera.
ctrl.takePicture = function() {
  if (navigator.camera) {
    // Use the "cordova-plugin-camera" plugin to access the device's camera
    navigator.camera.getPicture( cameraSuccessCallback, cameraFailCallback, {
      quality: 100,
      destinationType: Camera.DestinationType.FILE_URI,
      sourceType : Camera.PictureSourceType.CAMERA,
      allowEdit : false,
      encodingType: Camera.EncodingType.JPEG,
      correctOrientation: true,
      saveToPhotoAlbum: true
    } );
  } else {
    // load local image
    cameraSuccessCallback("img/no-camera.png");
  }
}
<a id="btnAddPic" data-role="button" data-icon="add" onclick="controller.takePicture();"></a>
When the camera plugin is added to the app using PhoneGap Build in part two of this article, a “navigator.camera” object becomes available. The plugin’s creator defines an API for us to use, which abstracts away the underlying native code. The magic of this is that we don’t need to change the code for iOS and Android; it works the same regardless of platform.
In this app, we’ll use the “getPicture” API. When this is called, the camera app is opened and ready to take a picture.
If the user is successful in taking a photo, then the cameraSuccessCallback function is executed. If something goes wrong or the user closes the camera without taking a picture, then the cameraFailCallback function is executed. Additionally, there are a variety of configuration options we can set, including the quality of the captured image and file type. For more options and APIs, see the documentation.
The last part of this code is the conditional check around the existence of the “navigator.camera” object. This is just a good coding practice I like to implement. If we don’t include it then test the app in a web browser, the app will break and nothing will happen in the UI. Therefore, it makes the app more robust by displaying the no-camera.png file to signify the lack of availability of the camera plugin.
Upon successfully taking a photo, the camera plugin will execute the function provided as the “successCallback” parameter.
function cameraSuccessCallback(imageDataPath) {
  // Display newly taken photo and cache on device for later retrieval
  document.getElementById('curImage').src = imageDataPath;
  localStorage.soloImageSrc = imageDataPath;
}
The image data is passed into the function, allowing us, in this case, to display it immediately and cache it via localStorage.
If something goes wrong or the user closes the camera without taking a picture, the “errorCallback” function is executed.
function cameraFailCallback(message) {
  // Show the user why the camera failed
  alert('Camera failed because: ' + message);
}
A more enhanced user experience could definitely be crafted, but for now it’s enough to show the user an alert message detailing the issue.
App Code: Cordova Plugin Initialization
There is one last concept to cover that is unique to Cordova apps. Before we can access and use a plugin and its device APIs in our code, we must wait for Cordova to fully load first. Otherwise, the code will fail upon execution.
// Cordova is ready - begin using plugins here
function onDeviceReady() {
  // Nothing to do for Camera plugin
}

function initialize() {
  // register device ready event - called when Cordova is fully loaded
  document.addEventListener("deviceready", onDeviceReady, false);
}
<body onload="initialize();"> <!-- App UI code --> </body>
This is not an issue in this example app because the user can’t interact with the camera plugin until the app fully loads anyway. However, it’s worth mentioning since it’s typically a source of confusion for developers.
To ensure that everything has loaded properly, attach a function to the HTML body “onload” event. Next, register a “deviceready” function that Cordova will execute when it has fully loaded. Once it has, we’re free to interact with any plugins.
What’s Next?
We now have a fully implemented, web-based, cross-platform app that allows users to access the device’s camera to take and display photos. In part two, we’ll cover the steps to transform it into a native Android and iOS app.
Interested in learning more about the cross-platform development approach? Check out my Pluralsight course, PhoneGap Build Fundamentals. It covers everything you need to go from zero to app store, including in-depth coverage of native plugins, testing and debugging on mobile devices, and app store submission.
| Published on Web Code Geeks with permission by Matt Netkow, partner at our WCG program. See the original article here: From Zero to App: The Cross-platform Development Approach Simplified Opinions expressed by Web Code Geeks contributors are their own. |
