Azure CLI provides you with one of the most convenient ways to work with Microsoft Azure resources. Here’s how to get up and running and how to use it most efficiently.
As the name CLI says (Command Line Interface), Azure CLI allows you to execute Azure commands from any command line. Because it’s written in Node.js, it’s not tied to a specific type of command line, like Bash or PowerShell — it should work with any system that’s capable of running Node.js.
Azure CLI Quick Start
What’s the easiest way to get started? Well, just a couple of weeks ago, I would have walked you through downloading and setting up Node.js, followed by how to authenticate your CLI instance to your Azure subscription. I can still to that, but before I do, I want to show you a much easier way.
Introduced recently, Azure Portal now comes with an online CLI right inside your browser. So to get started with Azure CLI, all you have to do is to log in to Azure Portal at portal.azure.com and click the Cloud Shell icon.
![]()
For those of you interested, Azure Cloud Shell is based on Xterm.js, which is open source. So you can check all the technical details on the GitHub repository.
When opening Cloud Shell for the first time, you need to confirm creation of a Storage Account. That will be used to persist any files in your Cloud Shell.
A new resource group will be created for that storage account, so everything is in its place. Please note that you’ll need to have the right privileges to be allowed to create a storage account.
Azure Cloud Shell is a frontend to a fully fledged Bash. You don’t get root access, but besides that you can do anything that can be done in a Bash session. Plus — as said earlier — all the files are persisted. So it’s really as good as any Putty or any other ways of “bashing.”
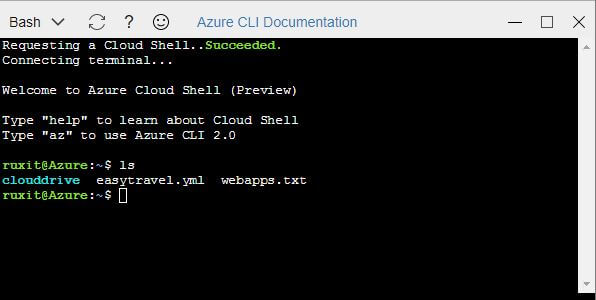
When you look at the screenshot, you’ll notice a directory called clouddrive. This directory is also accessible from Azure Portal, so you can upload any files to your Cloud Shell.
How to Upload Files to Azure Cloud Shell
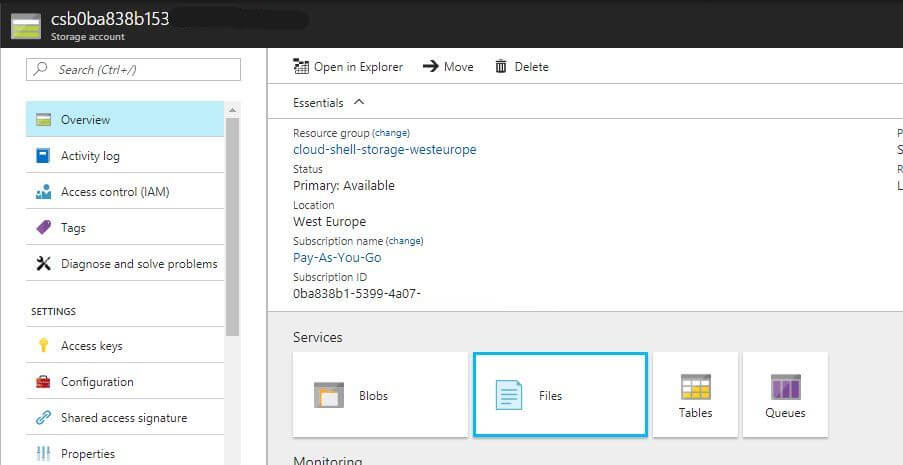
Select the resource group I showed earlier. There, you’ll find a Storage Account, which does not come with a particularly meaningful name. But because this is a resource group dedicated to Cloud Shell, you shouldn’t have much of a chance to make a wrong guess.
Inside the Storage Account, select Files.
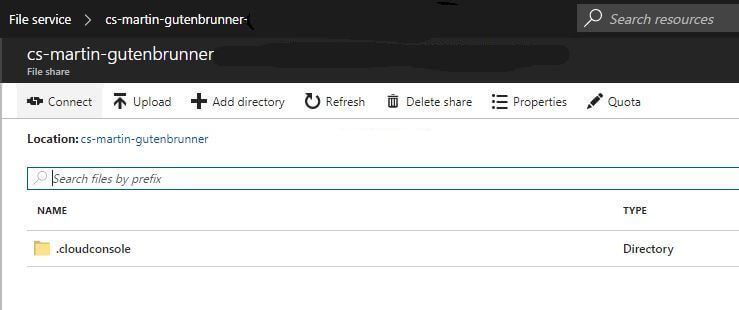
Inside the File service, select the one that resembles your cloud drive.
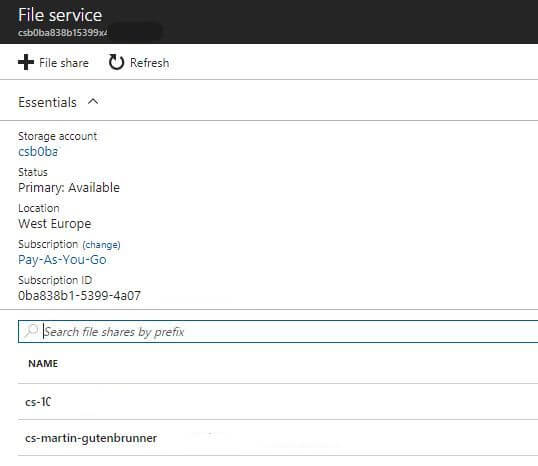
The file share you see on Azure Portal now exactly resembles the home location of your Cloud Shell instance. Do a ls -la to see that hidden .cloudconsole folder listed in your Bash.
Working with Azure CLI
Now that we have this working, I’d like to finally jump into working with Azure CLI. If you prefer to have your own local instance running instead of a browser-based interface, scroll to the bottom of this post. Don’t forget to come back here, once you’re set.
Quite frankly, there’s not too much to be said about how to work with Azure CLI. As with any good command-line tool, the built-in help is great. So to start, just type az. That gives you a pretty complete overview on all the resource types you can work with.
To work with VMs, you type `az vm´, followed by the actual command.
Azure CLI is very hierarchical. For every layer, just add -h, and you’ll get a comprehensive description of all available commands.
My favorite bits of Azure CLI
Let’s walk through a few of my favorite aspects of working in Azure CLI.
Azure CLI and Kubernetes
CLIs have come a long way, so Azure CLI is by far not the first of its kind. Especially platforms-as-a-service, like Kubernetes, which also heavily builds on CLIs for operations. Because Kubernetes is part of the Azure Container Services offering, it only makes sense for Azure CLI to integrate as seamlessly as possible. To install kubectl — Kubernetes’ CLI — just issue the following command:
sudo az acs kubernetes install-cli
That installs kubectl to your path, allowing you to directly start working with your Kubernetes installation.
Creating a service principal
A service principal is a special kind of Azure account. It’s designed to allow apps and services to get access to your Azure resources. For example, kubectl requires a service principal to be able to manage Azure resources inside a Kubernetes cluster.
Let me tell you, creating a service principal can be really hard when you try to do it manually from Azure Portal. Let’s just say I’ve spent hours and hours trying to get this done.
By using Azure CLI, it becomes a one-liner:
az ad sp create-for-rbac --name SP_NAME --password <password>
The output will be a JSON document like this:
{
  "appId": "a1b2c3d4-ad2a-4b31-ab64-7d5b714b7d8d",
  "displayName": "<your-app-name>",

  "tenant": "XXXXXXXX-XXXX-XXXX-XXXX-XXXXXXXXXXXX"
}
Usually, you’ll need to use the appId and tenant parameter values for authenticating your apps and services.
Adding extensions to VM scale-sets
A VM extension allows you to add functionality to your VMs on the fly. You can make this part of your ARM-templates at deployment time, or you can also add an extension at runtime of the VM.
Extensions become especially powerful when you’re not only working with single VMs, but with VM Scale Sets. While you can add extensions to scale sets, Azure Portal doesn’t (yet) come with the according option in the UI. So for now, you’ll have to use Azure CLI, PowerShell cmdlets, or the plain Azure Management REST API. Coincidence has it that this post is about Azure CLI, so guess what? I’ll cover that part next real quick.
To get a list of available extensions, I suggest you visit Azure Portal. Select an existing VM, scroll down to Extensions, and browse the catalog. To find out the necessary parameters for applying the extensions to your VM scale sets (or single VMs), execute:
az vmss extension image list
We’ll need the publisher and name properties.
Once you’ve identified the extension you want to add, issue the following command:
az vmss extension set -n oneAgentWindows --publisher dynatrace.ruxit -g <your-resgroup-name> --vmss-name <scaleset-name> --settings <settings in json-format>
```

Settings need to be in JSON-format, make sure you get the escaping done right. Example:
```
--settings "{\"key\":\"value\", \"key2\": \"value2\"}"
For getting information about an extension’s parameter names and values, please check the publisher’s documentation.
Lots of light-weight scripting
In my job, I often have to grant access to various resources to single persons. And every so often, it’s just repetituous, because I did the same thing for the same resource but for another person just the day before. For that purpose, I created small shell scripts that only require adding the username.
I also use this for batch creation of users or resources, eg, for training purposes.
!Sign up for a free Codeship Account
Azure CLI Installation and Setup
If you don’t want to use Azure CLI from inside Azure Portal, you can also run it on your local machine, of course. According to your environment, the procedure is different. While I could replicate the necessary steps here, it’s probably best to directly link to the official documentation (mainly because it saves me from keeping that part of this post up-to-date): How to install Azure CLI.
After you’re done, log in to your Azure subscription by issuing the following command:
az login
![]()
Azure CLI comes back to you, asking to open the specified URL in your browser and pasting the code shown. After that, your Azure CLI is connected to your Azure subscription. Pretty neat.
To see what you can do with Azure, let’s head back to where we came from.
What’s Behind Azure CLI?
The real fabric underneath all Azure resources is ARM, the Azure Resource Manager; not to be confused with the ARM CPU-architecture. As the name says, it’s the component that orchestrates and controls all Azure Resources.
There are several ways to interact with ARM, and Azure CLI is only one of them. The other options are PowerShell cmdlets, Azure CLI 1.0 (the Python-based predecessor of what we’re talking about here), Azure Management REST API, and Azure Portal itself. Right, Azure Portal itself doesn’t take any shortcuts or secret doors — it’s just another consumer of the Azure API.
Summary
As you’ve seen here, Azure CLI is just one of the many options for interacting with all of your Azure resources. In my opinion, it’s the most versatile, because its Node.js-based nature allows you to operate Azure exactly the same way on any platform (even inside your browser).
Interestingly, Azure Portal itself doesn’t even offer as many options as Azure CLI does. So I can only repeat myself: It’s probably the best way to work with your Azure resources.
| Reference: | Get Up and Running with Azure CLI from our WCG partner Martin Gutenbrunner at the Codeship Blog blog. |
