In this article we will understand RabbitMQ, a message broker middleware recommeded by OpenStack for cloud deployments. It complies to AMQP standards and developed in Erlang. The code examples are developed using Python and PIKA library.
1. Message Broker
A message broker is a software component that enables communication across applications in the enterprise application cluster. It also known as Message Oriented Middleware(MOM) in Service Oriented Architecture (SOA). The applications in the enterprise cluster use the message broker like a mail-exchange or a post-office to send messages to other applications.
RabbitMQ complies to AMQP standard, which is open standard for business messages between applications and organizations. It is a binary protocol rather than an interface specification. AMQP standard enables messaging as a cloud service, advanced publish-subscribe pattern, custom header based rourting and programming language independent.
2. RabbitMQ Model
The RabbitMQ model consits of various components. They are: Producer (sender), Consumer (receiver), Exchange , Bindings and Message queues. These components work together as explained below:
- The producer sends a message to an exchange
- Exchange forwards the message to the queues based on the bindings
- The bindings are set by queues to attach to an exchange
- Consumers (receiver) receives the messages from their respective message queues.
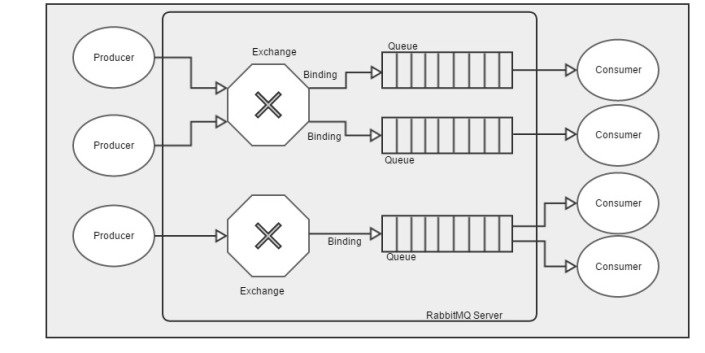
The producer and consumer of the messages are external entities. The Exchanges, Queues and Bindings are internal entities of the message broker.
2.1 Exchanges
Exchanges are core of RabbitMQ. The producer sends messages to exchanges to forward it to the right consumer. Exchanges make forwarding decision based on exchange type, routing_key in the message, custome header fields in the message, and the routing_key registered by the queue with the exchange.
Exchanges can be configured durable, so that they will survive restarts of the RabbitMQ server. Exchanges can be “internal” to server, so that it can be published by other exchanges inside the server. The exchanges can be configured to auto-delete, while no more queues are bound to it.
2.2 Queues
Queues are used to forward the messages to target consumers and ensures orderly message delivery. The consumer bind itself to a queue with a callback function, so that consumer will be notified on receiving a message.
Queues can be configured durable, so that they will survive restarts of the RabbitMQ server. It can also be configured “exclusive” to a connection, once the connection is closed the queue will be deleted. Auto-delete queues are deleted when no consumer is subscribed to the queue.
2.3 Bindings
Bindings are used by the exchanges to make the routing decision for a message. Basically bindings connects the exchanges with the queues and it uses exchange-type, routing-key set by the queue, custom message headers and routing-key present in the message sent by the producer. If there are not enough bindings to make a forwarding decision for a message, the message can be dropped or sent back to the producer, based on the properties set in the message.
3. Producer and Consumer
In a typical banking system, when a customer withdraws money from the ATM or swipes his credit card at a shop, the customer is notified with a SMS or an email to prevent frauds. In this use case, the core banking system will send a message to messaging sub-systems and continue process other customer requests. The messaging sub-systems listening on the queues will be notified and they take appropriate actions based on subscriber preferences. In this example, the core banking system is the producer of the messages and messaging sub-system are consumer of the messages.
3.1 Producer
As per RabbitMQ design, the producer sends the message to an exchange. The behaviour of the exchange defined by the exchange type, route_key & bindings by the message queues. Let us see how to create a producer using Python pika library. If you do not have RabbitMQ setup, please refer the Appendix-A section to install and configure RabbitMQ.
import pika

""" Establish connection and declare the exchange"""
connection = pika.BlockingConnection(pika.ConnectionParameters(host='localhost'))
channel = connection.channel()
channel.exchange_declare(exchange="SMS-Exchange",exchange_type="direct")

""" Publish a Message on the Channel """
Msg = "Balance as of today is 200.00$"
channel.basic_publish(exchange = "SMS-Exchange",routing_key="Sms-Alert",body=Msg)

"""Close the communication channel """
connection.close()
In the above code segment, first we establish connection to server, where RabbitMQ is hosted. RabbitMQ allows to establish multiple channel within the existing connection and all the communications are operations are tied with that channel. The 3rd line, we create an exchange and named it “SMS-Exchange” and its type is “direct”. In case if the exchange is already created, this statement will not create an error it simply returns it unless there is no conflict in the exchange type.
The function “channel.basic_publish” is used to send a message to the exchange. The producer has to mention that name of exchange and routing_key along with the actual message. In “direct” exchange the “routing_key” will be used to make message forwarding decision. Finally close the connection, if not needed any more.
3.2 Consumer
As per RabbitMQ design, the consumer is the target application where the messages are intended. The consumer must register itself to a queue and bind it with the exchange. If more than one consumers registers to a queue, then RabbitMQ sends the messages to consumers in round-robin fashion.
import pika

""" define a callback function to receive the message """
def callback(channel,method,properties,body):
    print "[X] Received Message ",body

""" Establish connection """
connection = pika.BlockingConnection(pika.ConnectionParameters(host='localhost')
channel = connection.channel()

""" Declare the queue & bind to the exchange with routing key """
channel.queue_declare(queue="SMS-Queue")
channel.queue_bind(exchange="SMS-Exchange",queue="SMS-Queue",routing_key="SMS-Alert")

""" register the call back function """
channel.basic_consume(callback,queue="SMS-Queue",no_ack=True)

""" listen to the queue """
channel.start_consuming()
The connection establishment is exactly same for both producer and consumer. But the consumer has to declare a queue and bind the queue with the exchange along with routing_key. In the above code, the “SMS-Queue” is created and bound with “SMS-Exchange” with routing_key “SMS-Alert”. This instructs the SMS-Exchange to forward the message with routing_key “SMS-Alert” to “SMS-Queue”.
The callback function registered with the queue will be called once message is received on the queue. The list statement “channel.start_consuming()” is a blocking call, where the consumer awaits for any messages on the registered queue.
3.3 Remote Connection
In the above examples we have connected to RabbitMQ server which is present in the localhost. Lets see the code snippet, how to connect to a remote RabbitMQ server:
import pika
credits = pika.PlainCredentials('scott','tiger')
params = pika.ConnectionParameters('10.0.0.1',5672,'/',credits)
connection = pika.BlockingConnection(parameters=params)
The above code, first creates a credits object by setting up the user credentials. Then we create a parameters object by setting up the IP address, port number, virtual host path and credential object. This parameter is simply passed to BlockingConnection method to establish connection with the given parameters. Once you establish a connection, the rest of code is exactly same for creating a producer and consumer.
In this exercise we have discussed developing producer and consumer using blocking connection. RabbitMQ also supports asynchronous connections. Please find the examples at http://pika.readthedocs.org/en/latest/examples/asynchronous_publisher_example.html .
4. Exchange Types
In this section we will learn how to develop various types of exchanges.
4.1 Direct Exchange
A direct exchange delivers messages to queues based on the message routing key. A queue binds to the exchange with a routing key. When a new message with that routing key arrives at the direct exchange, that message is routed to that queue. Direct exchanges are used to distribute tasks between multiple workers in a round robin manner. RabbitMQ load balances the consumers, when multiple consumers listens on the same queue. A direct exchange is ideal for the unicast routing of message.
Producer: The below code segment creates an exchange named “Direct-X” and set the exchange type to “direct”. The postMsg method sends the message to this exchange with routing_key set to “Key1”
import pika

connection = pika.BlockingConnection(pika.ConnectionParameters(host='localhost'))
channel = connection.channel()

""" Declare a exchange with type as direct """
channel.exchange_declare(exchange="Direct-X",exchange_type="direct")

""" Publish a Message on the Channel """
Msg = raw_input("Please enter the message :")
channel.basic_publish(exchange = "Direct-X",routing_key="Key1",body=Msg)

"""Close the communication channel """
connection.close()
Consumer:
The below code snippet creates Queue named “Direct-Q1” and registers it with the exchange “Direct-X” for the messages with the routing_key as “Key1”.
import pika

""" define a callback function to receive the message """
def callback(channel,method,properties,body):
    print "[X] Received Message ",body

""" Establish connection """
connection = pika.BlockingConnection(pika.ConnectionParameters(host='localhost')
channel = connection.channel()

""" Declare the queue & bind to the exchange with routing key """
channel.queue_declare(queue="Direct-Q")
channel.queue_bind(exchange="Direct-X",queue="Direct-Q",routing_key="Key1")
""" register the call back function """
channel.basic_consume(callback,queue="Direct-Q",no_ack=True)

""" listen to the queue """
channel.start_consuming()
Note: If more than one consumers listens to the same queue, RabbitMQ load balances the messages across the consumers in round-robin fashion.
4.2 Fanout Exchange
A fanout exchange routes messages to all the queues that are bounded irrespective of the routing key. It is most suitable for broadcast.
Producer:
Create a producer which sent message to the exchange “Fanout-X”.
import pika

connection = pika.BlockingConnection(pika.ConnectionParameters(host='localhost'))
channel = connection.channel()

""" Declare a exchange with type as direct """
channel.exchange_declare(exchange="Fanout-X",exchange_type="fanout")

""" Publish a Message on the Channel """
Msg = raw_input("Please enter the message :")
channel.basic_publish(exchange = "Fanout-X",routing_key="Key1",body=Msg)

"""Close the communication channel """
connection.close()
Consumer 1:
Creates a queue “Faount-Q1” and binds to exchange “Fanout-X”, which is of fanout exchange type. Even though the consumer registers a routing_key, it will not have any effect on exchange’s forwarding decision, because it is a fanout exchange.
import pika

""" define a callback function to receive the message """
def callback(channel,method,properties,body):
    print "[X] Received Message ",body

""" Establish connection """
connection = pika.BlockingConnection(pika.ConnectionParameters(host='localhost')
channel = connection.channel()

""" Declare the queue & bind to the exchange with routing key """
channel.queue_declare(queue="Fanout-Q1")
channel.queue_bind(exchange="Direct-X",queue="Fanout-Q1",routing_key="Key1")
""" register the call back function """
channel.basic_consume(callback,queue="Fanout-Q1",no_ack=True)

""" listen to the queue """
channel.start_consuming()
Consumer 2: Creates a another queue “Fanout-Q2” and binds it to the same exchange “Fanout-X”
import pika

""" define a callback function to receive the message """
def callback(channel,method,properties,body):
    print "[X] Received Message ",body

""" Establish connection """
connection = pika.BlockingConnection(pika.ConnectionParameters(host='localhost')
channel = connection.channel()

""" Declare the queue & bind to the exchange with routing key """
channel.queue_declare(queue="Fanout-Q2")
channel.queue_bind(exchange="Fanout-X",queue="Fanout-Q2",routing_key="Key1")
""" register the call back function """
channel.basic_consume(callback,queue="Fanout-Q2",no_ack=True)

""" listen to the queue """
channel.start_consuming()
Now you will see that the message sent by the publisher will be received by both consumers.
4.3 Topic Exchange
Topic exchange route messages to one or more queues based on the message routing key and key-pattern used to bind a queue to an exchange. This is exchange is used to implement publish/subscriber pattern. Topic exchange is suitable for multicast.
Producer creates an exchange named “Topic-X” of type “topic” and sends various messages with different key values.
import pika

connection = pika.BlockingConnection(pika.ConnectionParameters(host='localhost'))
channel = connection.channel()

""" Declare a exchange with type as direct """
channel.exchange_declare(exchange="Topic-X",exchange_type="topic")

""" Publish a Message on the Channel """
Msg = raw_input("Please enter the message :")
channel.basic_publish(exchange = "Topic-X",routing_key="in.sales.put",body=Msg)
channel.basic_publish(exchange = "Topic-X",routing_key="in.sales.post",body=Msg)
channel.basic_publish(exchange = "Topic-X",routing_key="in.sales.delete",body=Msg)
channel.basic_publish(exchange = "Topic-X",routing_key="in.rnd.put",body=Msg)
channel.basic_publish(exchange = "Topic-X",routing_key="in.rnd.post",body=Msg)
channel.basic_publish(exchange = "Topic-X",routing_key="in.rnd.delete",body=Msg)
"""Close the communication channel """
connection.close()
Consumer 1: Creates a queue named “Topic-Q1” and binds with exchange “Topic-X” for all the “post” messages.
import pika

""" define a callback function to receive the message """
def callback(channel,method,properties,body):
    print "[X] Received Message ",body

""" Establish connection """
connection = pika.BlockingConnection(pika.ConnectionParameters(host='localhost')
channel = connection.channel()

""" Declare the queue & bind to the exchange with routing key """
channel.queue_declare(queue="Topic-Q1")
channel.queue_bind(exchange="Topic-X",queue="Topic-Q1",routing_key="*.*.post")
""" register the call back function """
channel.basic_consume(callback,queue="Topic-Q1",no_ack=True)

""" listen to the queue """
channel.start_consuming()
Consumer 2: Creates another queue named “Topic-Q2” and binds with the same exchange “Topic-X” for all messages coming from “rnd”.
import pika

""" define a callback function to receive the message """
def callback(channel,method,properties,body):
    print "[X] Received Message ",body

""" Establish connection """
connection = pika.BlockingConnection(pika.ConnectionParameters(host='localhost')
channel = connection.channel()

""" Declare the queue & bind to the exchange with routing key """
channel.queue_declare(queue="Topic-Q2")
channel.queue_bind(exchange="Topic-X",queue="Topic-Q2",routing_key="in.rnd.*")
""" register the call back function """
channel.basic_consume(callback,queue="Topic-Q2",no_ack=True)

""" listen to the queue """
channel.start_consuming()
4.4 Headers Exchange
Header exchanges route message based on attributes in message header and it ignores the routing-key. If a message header attributes matches with the queue binding parameters, then the message is forwarded to those queues.
Producer can set key, value pair (dictionary) in the header of the message sent.
import pika

""" A dictionary to store the customer headers """
header={}
header['Source']='Core-Banking'
header['Destination']='Message-System'

""" Establish Blocking Connection with RabbitMQ Server """
conn = pika.BlockingConnection(pika.ConnectionParameters(host='localhost'))
chan = conn.channel()

""" Declare an exchange and set type as headers """
chan.exchange_declare(exchange="Header-X",exchange_type="headers")

"""Set the headers using BasicProperties api """
prop = pika.BasicProperties(headers=header)

"""Publish the message to the exchange """
msg = "Hello Message-System, I am Core-Banking"
chan.basic_publish(exchange='Header-X',routing_key="Key1",body=msg,properties=prop)
chan.close()
The above producer, creates an exchange named “Header-X” and set the type to “headers”. Then it sends a message with header key set to “Source” and the respective value set to “Core-Banking”. Basically the message header is bundled with the originator of the message, in this example it is “Core-Banking”.
The below Consumer creates a queue named “Header-Q1” and binds it with “Header-X” along with header information it is interested. If you refer the post Method, it
que='Header-Q'
exg = 'Header-X'
key='Source'
val='Core-Banking'

""" Declare a call back function to receive the message """
def callback(ch,method,properties,body):
 print "[X] Received Msg",body

""" Establish blocking connection to the server """
conn = pika.BlockingConnection( pika.ConnectionParameters(host='localhost'))
chan = conn.channel()

""" Declare a Queue """
chan.queue_declare(queue=que)

"""Bind the queue to exchange and set arguments to match any of the given header """
chan.queue_bind(exchange=exg,queue=que, arguments={key:val,'x-match':'any'})

print '[*] Wait for messages. To exit press CTRL+C'

""" Link the callback function to the queue """
chan.basic_consume(callback,queue=que,no_ack=True)

"""Wait for the messages to arrive """
chan.start_consuming()
Note that the queue_bind statement takes additional argument, named “arguments” which takes the key-value pair. If there are more than one key-value pair present, x-match:any will ensure that even if a single entry matches the message will be delivered to this queue.
5. Summary
We have seen how RabbitMQ works, understand various componenets and messaging models. RabbitMQ supports high available clustering environments, which will ensure zero down time, higher throughput and increased capacity, which makes it suitable for cloud based installations.
6. References
1. Message Broker – https://msdn.microsoft.com/en-us/library/ff648849.aspx
2. AMQP – https://www.rabbitmq.com/tutorials/amqp-concepts.html
3. RabbitMQCtl Command Reference : https://www.rabbitmq.com/man/rabbitmqctl.1.man.html
4. PIKA Documentation – http://pika.readthedocs.org/en/latest/modules/index.html
5. AMQP Standards – https://www.amqp.org/
Appendix – A
A. Installation & Configuration
The rabbitMQ infrastrcture is installed in CentOS6.5
A.1 Installation
Please install RabbitMQ, Erlang ( RabbitMQ runs on Erlang), Python & Pika.
- To install RabbitMQ (v3.5.3) refer https://www.rabbitmq.com/download.html & follow the instructions based on your target operating system. I have installed rabbitMQ on CentOS machine.
- Erlang (v18.0)can be installed from http://www.erlang.org/doc/installation_guide/INSTALL.html
- Python 2.7.10 is available https://www.python.org/downloads/. Please install version 2.7.10, since pika support is not yet available for 3.x and it is currently under development.
- Pika (v0.9.13) can be used using Python pip.
pip install pika
A.2 Install RabbitMQ Management Plugin
RabbitMQ comes with a web based management console. The software is bundled along with the RabbitMQ installation software we have installed. To enable management console, execute the below command in your linux machine:
rabbitmq-plugins enable rabbitmq_management
RabbitMQ management console uses the port 15672. So, this port must be opened. Please refer https://www.rabbitmq.com/management.html for further information on Management Plugin.
After enabling the management plug-in, you can open the http://ipaddress:15672/ in your browser to see the Web Management Interface of RabbitMQ.
A.3 Configuring RabbitMQ (vhost/user/privileges)
Once you have installed RabbitMQ it is ready for production. But we have to make few mandatory configurations in order to allow remote clients, because the default configuration and user privilages will not allow the remove clients to access the server.
The idea here is to create a virtual environment with the RabbitMQ server and provide access to a user, where he can create a Message Queue, Exchange, Read and Write into those resources. So the users are restricted to a virtual environment and resources are contained within the environment.
A.3.1 Create a Virtual Host
rabbitmqctl add_vhost <virtual_host_name>
Note : RabbitMQ will have a default virtual host named “/”.
A.3.2 Create a New User with password
rabbitmqctl add_user <username> <password>
Eg. rabbitmqctl add_user scott tiger
Note: RabbitMQ will have a default user named “guest”, but it cannot used for remote access by external clients. But it allows when the server is acessed locally.
A.3.3 Assign permissions to the user to access a vhost
set_permissions [-p vhostpath] {user} {conf} {write} {read}Eg: set_permission -p "/" "scott" ".*" ".*" ".*"
Refer https://www.rabbitmq.com/access-control.html for more information.
A.4 Firewall Settings
We have to open the necessary ports of the Linux Firewall in order to allow remote clients. Perform the following operations on the IP table to open the ports 5672 & 15672.
sudo iptables -I INPUT -p tcp --dport 5672 --syn -j ACCEPT
sudo iptables -I INPUT -p tcp --dport 15672 --syn -j ACCEPT
To make the changes permenent, make the configuration changes in the file /etc/sysconfig/iptables and restart the iptables servers:
sudo service iptables restart
A.5 Linux commands to manage the RabbitMQ server
service rabbitmq-server start
service rabbitmq-server stop
service rabbitmq-server status
service rabbitmq-server restart
To start rabbitMQ as a daemon:
chkconfig rabbitmq-server on
A.6 RabbitMQ Commands
- List all exchanges rabbitmqctl list_exchanges
- List all queues rabbitmqctl list_queues
- List all bindings rabbitmqctl list_bindings
- List consumers rabbitmqctl list_consumers
- List connections rabbitmqctl list_connections
| Reference: | RabbitMQ : A Cloud based Message Oriented Middleware from our WCG partner Saravanan Subramanian at the Saravanan Subramanian Tech Notes blog. |
