Over the past couple of years, I’ve been using Amazon’s EC2 Container Service (ECS) to run our Docker applications. I’ve been mostly happy with the service and after working through all the hurdles of getting started, I’m pretty comfortable running multiple ECS clusters with dozens of services spread across several VPCs.
While Amazon lowers the barrier to entry for cloud computing, it still requires understanding and skills. It’s actually quite complicated to configure all the details needed to run a robust ECS cluster spread across several availability zones, use public and private subnets, configure load balancers and target groups, etc.
Despite my experience using the standard web interface, it still takes me a few hours to set up a whole new cluster along with a couple of services to run on it. This is a very tedious process that is best done with multiple browser tabs and requires a precise order of execution to satisfy dependencies.
Terraform on the other hand automatically recognizes dependencies, builds a full dependency graph, then executes as many parallel processes of work as possible.
The complexity of the AWS system leads to two problems that I hope to address in this three-part series: The first is that a lot of experience and understanding are required to properly configure everything, which results in information silos and unhealthy dependency on subject matter experts. The second problem is that with the cloud, things change at a rapid pace, and attempts to document processes can be a wasted effort.
Amazon’s web interface changes on a regular basis, and our attempts to document our processes have been invalidated in just months.
Enter Terraform
I’ve been hearing about Terraform for a while but it wasn’t until recently that I finally investigated it and quickly realized how it could solve these two problems for us.
Terraform is an open-source infrastructure-as-code tool that allows you to declare your infrastructure using an easy to read and write DSL (domain specific language). Running the Terraform CLI will either create or update your environment to match what you’ve told it you want. Change a value, like which AMI to use for EC2 instances, and it will see the change and replace any instances with new ones.
Terraform provides a declarative way to establish infrastructure rather than an imperative one. You don’t need to code or even know what it takes to establish a piece of infrastructure — you just declare what you want and Terraform figures out how to make it so.
One of the huge benefits of an infrastructure-as-code approach is that the details for configuration and component dependencies become self-documenting. I can have a single Git repository represent the full infrastructure stack for an application or cluster of applications depending on how I want to structure the code.
Also, launching new environments or changing existing ones becomes easier to understand and execute, such that more members of a team can participate, not just highly trained operations staff.
Some of you may already be familiar with Amazon’s CloudFormation infrastructure-as-code service and be wondering why use Terraform instead of CloudFormation. If 100 percent of your infrastructure is on AWS, then CloudFormation may be sufficient for you. However, it’s much more likely you’ll use AWS plus another service, eg Cloudflare in our case, and CloudFormation cannot manage Cloudflare.
Terraform supports over 70 different service providers officially and many more through community plugins. This means that, using the same scripts and syntax, you can manage and connect multiple service providers.
Okay, you’re probably ready to see this magic of which I speak.
Terraform Walkthrough
To explain everything about AWS and ECS is well beyond the scope of this series, so I will assume you are already familiar with these services. Terraform is also quite expansive, so I will limit this to what is needed for ECS.
To run any of the examples in this article, you will need to do a couple things:
- Download Terraform – At the time of this writing, it is at version 0.10.6.
- Download AWS CLI.
- Install a Terraform-aware editor (optional). I use Atom with the
language-terraform,linter-terraform-syntax, andterraform-fmtplugins, to provide nice syntax highlighting for HCL (HashiCorp Configuration Language) as well as automatic formatting on Save.
Defining terms
I’ll be using a lot of terms throughout the series that have a specific meaning in Terraform, so I’ll try to define them here first.
- Variable – Similar to any programming language, variables hold values. They can be strings, lists, or maps. Terraform has interpolation capabilities for combining variables and processing them with built in functions.
- Provider – A provider is the configuration for a specific service provider, such as AWS.
- State – When Terraform performs work, it saves the current state of your infrastructure in a file with a .
tfstateextension. The file is formatted in JSON and typically you should never need to edit it. It is recommended that this be stored in a central location with a locking mechanism for team collaboration. It may contain secrets in plain text and should be kept safe. It is not recommended to use a VCS service for this, as the manual pull/push process is ripe for human error. - Backend – Terraform stores the state of your environment in a JSON file. By default, this file is stored in the same directory as where you run the command, but it can be configured to store remotely, such as on AWS S3. Some backends support locking so two people cannot operate on it at the same time. Terraform can use AWS DynamoDB as a simple key/value store to facilitate locking.
- Resource – A resource is a piece of infrastructure, such as an EC2 instance, a DNS entry, a database, etc. A resource provides all the logic for creating, updating, reading, and deleting itself. Resources are provider specific.
- Data Resource – While Resources create or change things, Data Resources retrieve or generate data. Data Resources are used to look up information, render templates, retrieve remote Terraform states, etc.
- Module – Any folder with
.tffiles in it is technically a module. You can bundle configurations into modules to simplify common sets of infrastructure for easy reuse. - Output – When running Terraform, you can use outputs to display specific values. Outputs are also used to export information from a module or a remote Terraform environment. You can think of outputs as public properties of a class.
- Environment – In Terraform, an environment is represented by a state file. You can break your infrastructure down into multiple environments to reduce the blast radius should you make a mistake or something go wrong in the process of applying changes. Terraform has the ability to access the outputs of another environment so that you can reference values from one environment in another.
Set up environment and access
Before you can use Terraform to access your Amazon account to create and modify resources, you need to create a user for it to authenticate as.
To keep things simple for this article, I created an IAM user with admin rights to be able to create and modify any type of resource. The Terraform examples I provide create a couple IAM roles, a VPC, a load balancer, an auto-scaling group, multiple EC2 instances, security groups, and more. Spelling all this out in an IAM policy would be quite time-consuming and require a lot of troubleshooting to get right.
- Create an IAM user, give them admin rights, and save the key and secret for API access. Next we want to set Terraform up to store our state files in an S3 bucket and use DynamoDB to lock the environment to ensure two team members cannot run Terraform against the same environment at the same time and clobber each other.
- Create an S3 bucket and name it something like
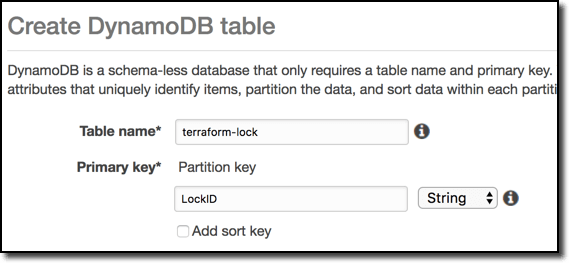
myorg-terraform-environmentnameand enable versioning just to be safe. - Create a DynamoDB table named
terraform-lockwith a primary partition key namedLockIDof typestring.
By default, Terraform operates in the directory you run it from. When run, it will load all files with a .tf extension and combine them. This means you can define everything in a single file or break it down into multiple files for easier maintainability. A common convention is to start with the following structure for each Terraform environment and expand as needed.
Create folder and empty files to match this layout:
my-terraform-environment/shared/
backend.tf    // Used for Terraform backend configuration
main.tf       // Used for all resource definitions
outputs.tf    // Used to expose outputs from the environment
providers.tf  // Used to configure credentials for providers
vars.tf       // Used for variable definition
With your folder structure set up, let’s configure the aws provider. Edit providers.tf and add the following code:
// shared/providers.tf
provider "aws" {
  region     = "${var.aws_region}"
  access_key = "${var.aws_access_key_id}"
  secret_key = "${var.aws_secret_access_key}"
}
This tells the aws provider to get its configuration from the variables named aws_region, aws_access_key_id, and aws_secret_access_key. We now need to tell Terraform these are required variables.
Edit the vars.tf file and add the following code:
// shared/vars.tf
variable "aws_region" {}
variable "aws_access_key_id" {}
variable "aws_secret_access_key" {}
variable "aws_zones" {
 type        = "list"
 description = "List of availability zones to use"
 default     = ["us-east-1c", "us-east-1d", "us-east-1e"]
}
We could put the actual values for these directly in the vars.tf file, but storing credentials in plain text in this file is not a good idea — you’ll most likely store these files in source control. Terraform must have values for all defined variables when it runs. You can set a default value by using default = value in the variable definition as seen for the aws_zones definition above.
Values for variables that are defined without supplying a default value (eg, by using the empty brackets) must be supplied at run time. Terraform can get values for variables from the command line (terraform -var 'variable=value') or from your environment if variables are exported with the naming prefix TF_VAR_. So the environment variable TF_VAR_aws_region becomes the aws_region variable inside the Terraform runtime.
You can export these variables into your environment by running the following commands (replacing values with your own):
$ export TF_VAR_aws_region=us-east-1
$ export TF_VAR_aws_access_key_id=ABC123
$ export TF_VAR_aws_secret_access_key=DEF123
When Terraform is executed, it will prompt for any variables that do not have a value.
Next, edit the backend.tf file to configure Terraform to use S3 and DynamoDB. Enter the following code (replacing any values that differ for you):
// shared/backend.tf
terraform {
 backend "s3" {
   bucket         = "myorg-terraform-environmentname"
   key            = "shared/terraform.tfstate"
   region         = "us-east-1"
   encrypt        = true
   dynamodb_table = "terraform-lock"
 }
}
Terraform backends are loaded before any variables are loaded, so unfortunately you cannot provide your access credentials to them in the same way you can providers. You can export your access key and secret into the environment again as AWS_ACCESS_KEY_ID and AWS_SECRET_ACCESS_KEY. Terraform can also read from your ~/.aws/credentials file, which allows you to configure multiple accounts (profiles).
This is a convenient way to use Terraform against multiple AWS accounts. See the backends documentation for more information on that.
Okay, your environment should be configured and ready to initialize. You initialize your environment by running terraform init. You should see output similar to:
$ terraform init
Initializing the backend...

Initializing provider plugins...
- Checking for available provider plugins on https://releases.hashicorp.com...
- Downloading plugin for provider "aws" (0.1.4)...
- Downloading plugin for provider "template" (0.1.1)...
- Downloading plugin for provider "random" (1.0.0)...

The following providers do not have any version constraints in configuration,
so the latest version was installed.

To prevent automatic upgrades to new major versions that may contain breaking
changes, it is recommended to add version = "..." constraints to the
corresponding provider blocks in configuration, with the constraint strings
suggested below.

* provider.aws: version = "~> 0.1"
* provider.random: version = "~> 1.0"
* provider.template: version = "~> 0.1"

Terraform has been successfully initialized!

You may now begin working with Terraform. Try running "terraform plan" to see
any changes that are required for your infrastructure. All Terraform commands
should now work.

If you ever set or change modules or backend configuration for Terraform,
rerun this command to reinitialize your working directory. If you forget, other
commands will detect it and remind you to do so if necessary.
With the backend initialized, try running a plan to confirm all credentials are working properly:
$ terraform plan
Refreshing Terraform state in-memory prior to plan...
The refreshed state will be used to calculate this plan, but will not be
persisted to local or remote state storage.


------------------------------------------------------------------------

No changes. Infrastructure is up-to-date.

This means that Terraform did not detect any differences between your
configuration and real physical resources that exist. As a result, no
actions need to be performed.
Releasing state lock. This may take a few moments...
If you received any errors, go back and check the configuration files as well as ensure you entered the right credentials for the IAM user you created earlier. As a troubleshooting step, you can define the TF_LOG environment variable when running terraform commands and get a more verbose output. So if you get an error, run it again as TF_LOG=DEBUG terraform plan.
!Sign up for a free Codeship Account
Describing desired infrastructure
To use Terraform to build and manage your infrastructure, you need to know what you want and how the various components interact and depend on one another. Terraform does not ensure that what you create will work, it just creates what you tell it. So if you do not understand how things work together, you will likely frustrate yourself wondering why things aren’t working even when Terraform completes successfully.
So let’s go over what we want for running an ECS cluster of Docker services. There are lots of ways to do this (some easier, some more complicated), but I’ll focus on my preferred approach. Here is a general list of the infrastructure components involved for running a single Docker service. Running multiple services may require extras of some of these, especially ALBs and RDS instances.
- A VPC
- Multiple availability zones
- Public and private subnets for each availability zone
- Internet gateway
- NAT gateway
- Default security group for VPC members
- Security group to restrict public access to HTTPS (used with Application Load Balancer)
- Application Load Balancer (ALB) + Target Group + Listener
- Auto-scaling group for EC2 instances
- RDS database instance
- SSL certificate
- ECS Task Definition + Service
- DNS with Cloudflare (you can use Route53 or other DNS provider; I’m using Cloudflare as example of multi-provider use)
So yeah, that’s a lot of stuff. Configuring all this manually is very tedious and can be error prone. Writing Terraform definitions for it all is also quite tedious, but like most coding efforts, once you have it working you can reuse it over and over again with less effort and time. With so many components and layers involved, it is best to break them down into separate environments.
In a real production environment, I’d probably break this down into several Terraform environments, but to keep this as simple as possible, I’ll only use two. One will contain any resources that could be shared/reused by multiple ECS services and a second for everything specific to the ECS service. Here is that resource list again in the two categories:
Shared resources
- A VPC
- Multiple availability zones
- Public and private subnets for each availability zone
- Internet gateway
- NAT gateway
- Default security group for VPC members
- Security group to restrict public access to HTTPS (used with Application Load Balancer)
- Application Load Balancer (ALB) + Target Group + Listener
- Auto-scaling group for EC2 instances
Service specific resources – Application Load Balancer (ALB) + Target Group + Listener – Auto-scaling group for EC2 instances – RDS database instance – SSL certificate – ECS Task Definition + Service – DNS with Cloudflare (you can use Route53 or other DNS provider; I’m using Cloudflare as example of multi-provider use)
Summing It Up
Today we’ve done a lot of setup and preparation for building our Terraform environments. We defined a lot of terms for a common understanding, we created the necessary backend resources for locking and maintaining Terraform’s state, and we started creating the necessary Terraform definition for our shared environment.
In the next post, we’ll complete the shared environment definition and get it up and running!
| Published on Web Code Geeks with permission by Phillip Shipley, partner at our WCG program. See the original article here: Terraforming Your Docker Environment on AWS Opinions expressed by Web Code Geeks contributors are their own. |
