One of the greatest changes of HTML5 was the native support for multimedia content, with tags for audio and video, that allow to reproduce them without the need of plugins for our browser or software in our computer. In this tutorial, we will see the usage of the audio element.

For this tutorial, Chromium 56.0.2924.76 has been used for testing.
Table Of Contents
1. The audio element
Using the HTML5 audio tag is really simple. Actually, it’s just about adding the tag, and specifying the path to the audio file:
1_audio_element.html
<!DOCTYPE html>
<html>
<head>
    <meta charset="utf-8">
    <title>HTML5 Audio</title>
    <style>
        #wrapper {
            width: 60%;
            margin: 0 auto;
            text-align: center;
        }
    </style>
</head>

<body>
    <div id="wrapper">
        <h1>HTML5 Audio</h1>
        <p>Audio:</p>
        <audio src="../bell.mp3"></audio>
    </div>
</body>
</html>
This is enough to have ready the audio to be played. But not enough to be able to control it, because no controls are being displayed:
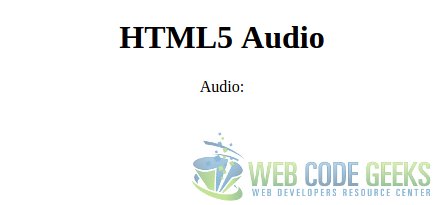
When using the audio element, we should always add the controls attribute, in order to display the controls of the audio player:
1_audio_element.html
<!-- ... -->

<audio src="../bell.mp3" controls></audio>

<!-- ... -->
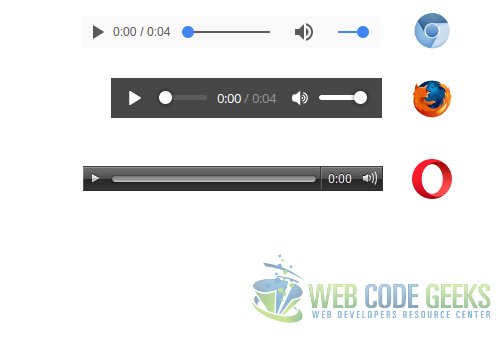
This attribute will make the browser render natively a control interface. The next image shows it for Chromium:

So, don’t forget to add the controls if you want to provide a real audio player (unless you want to create your own one with JavaScript!).
controls is not the only attribute for the audio tag. These are the other available attributes:
autoplay: for playing the audio on page load. Use this attribute with caution, if you don’t want to disturb the user.loop: for replaying the audio file after it ends, indefinitely. This may be used in combination withautoplayfor, for example, setting a background sound for the page. Again, this should be used carefully.preload: for specifiying if the file should be loaded on page load or not.
2. Building a cross-browser custom player
The second image has shown the rendering of the audio controls interface for Chromium. But as usual with these new HTML5 elements, each browser engine renders them in a different way. The following image shows how it’s rendered by each browser.
We shouldn’t use the default rendering for the audio. We must care about the consistency of our web pages for every browser, or at least the most relevant ones. Now, we are going to make the audio look more attractive, for every browser.
But, for customizing our audio player for making it look the same for every browser is, actually, to “build” our own player. This means that we will be using the audio element, but without its controls, but with our own ones. For this, of course, we will be using JavaScript, but this part will be pretty easy, so it won’t be a big concern.
For this, we will use jQuery, since it’s much more easier, faster and readable than using native JavaScript. The version used is the 3.2.1.
2.1. HTML
The HTML is actually pretty simple:
custom_player.html
<!DOCTYPE html>
<html>
<head>
    <meta charset="utf-8">
    <title>HTML5 Audio</title>
    <script src="https://code.jquery.com/jquery-3.2.1.min.js"></script>
    <script src="controls.js"></script>
    <link rel="stylesheet" href="styles.css">
    <style>
        #wrapper {
            width: 60%;
            margin: 0 auto;
            text-align: center;
        }
    </style>
</head>

<body>
    <div id="wrapper">
        <h1>HTML5 Custom Player</h1>
        <div class="audio-player">
            <audio src="../bell.mp3"></audio>
            <button class="play controls button"></button>
            <progress class="progress custom-progress" value="0" max="1"></progress>
            <progress class="volume custom-progress" value="0.5" max="1"></progress>
        </div>
    </div>
</body>
</html>
In this case, we create a div that will be the wrapper of the player, and, inside it, we set the audio element without the native controls, the play button, and the time and volume progress bars.
2.2. JavaScript
Obviously, we need some JavaScript for making the controls work. This is neither complex at all.
controls.js
$(document).ready(function() {
    var audioplayer = $('.audio-player'),
        audioElement = $('.audio-player audio')[0],
        play = $('.audio-player .play'),
        progress = $('.audio-player .progress')[0],
        volume = $('.audio-player .volume');

    function updateProgressBar() {
        var progressPercentage = audioElement.currentTime / audioElement.duration;

        progress.value = progressPercentage;
    }

    function playOrPause() {
        if (audioElement.paused) {
            audioElement.play();
        } else {
            audioElement.pause();
        }
    }

    function updateVolume(event) {
        var xPosition = event.pageX - this.offsetLeft,
        clickedValue = xPosition * this.max / this.offsetWidth;

        clickedValue = (clickedValue > 1) ? 1 : clickedValue;
        clickedValue = (clickedValue < 0) ? 0 : clickedValue;

        volume[0].value = clickedValue;
        audioElement.volume = clickedValue;
    }

    play.click(playOrPause);

    volume.click(updateVolume);

    setInterval(updateProgressBar, 10);

});
After retrieving the elements of our audio player, we define the functions for our player.
The first one is to update the progress bar. This is actually very simple, we just calculate the percentage dividing the current audio time by its total duration, and set that value (between 0 and 1) to the progress bar. Of course, to make sense, this has to be executed periodically, so that’s why we set an interval later.
The second one is to playing and pausing the audio. This is so basic, if the audio is being played, we stop it, and vice-versa.
The one for updating the volume when clicking the volume bar is still simple. We get the coordinate on the X axis, and we transform it to a floating value in the [0, 1] range multiplying it by the max value (which is actually 1) and dividing it with the offset width. Finally, we just make sure that it’s a value between 0 and 1, and, then, assign it to both the progress bar, and to the audio element.
After defining these functions, the remaining step is to just add the listeners to the button and the bars, and the previously mentioned interval for updating the audio progress bar.
With this, we have a functional player, but still not styled, so it’s like having nothing.
2.3. CSS
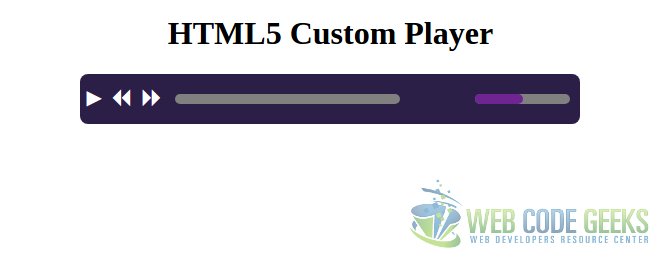
The part that requires more work is the CSS. We will style our player like in the image below:

Note that in that image, the audio has been reproduced until almost the half of its duration, and that the volume has its max value.
The CSS for this is the following:
styles.css
/**
 * Audio controls
 */

.audio-player {
    height: 50px;
    min-width: 300px;
    max-width: 500px;
    margin: 0 auto;
    background-color: #2b1e47;
    border-radius: 8px;
    position: relative;
}

.audio-player * {
    height: 100%;
    color: #ffffff;
    position: absolute;
}

.audio-player .controls.button {
    background: transparent;
    left: 10px;
    top: -2px;
}

.audio-player .play {
    color: #ffffff;
    background-color: #2b1e47;
    border: none;
    font-size: 20px;
}

.audio-player .play {
    left: 0;
    background:transparent;
}

.audio-player .play:after {
    content: '▶';
}

.audio-player .progress {
    left: 55px;
    width: 55%;
}

.audio-player .volume {
    right: 10px;
    width: 19%;
}


/**
 * Progress bar customisation
 */

.custom-progress {
    -webkit-appearance: none;
    -moz-appearance: none;
     appearance: none;

    /* Outer bar */
    border: none;
    border-radius: 5px;
    height: 10px;
    margin: 20px 0px 30px;
}

/**
 * Progress bar - Webkit
 */

/* Outer bar */
.custom-progress::-webkit-progress-bar {
    border-radius: 5px;
}

/* Inner bar */
.custom-progress::-webkit-progress-value {
    border-radius: 5px;
    background-color: #6f2591;
}

/**
 * Progress bar - Mozilla
 */

/* Inner bar */
.custom-progress::-moz-progress-bar {
    border-radius: 5px;
    background-color: #6f2591;
}

/**
 * Progress bar - IE/Edge
 */

 /* Inner bar */
.custom-progress::-ms-fill {
    border-radius: 5px;
    background-color: #6f2591;
}
Let’s start from the most general part, to the most specific.
We start styling the audio wrapper (lines 5-13). The most important part here, is that we have set a minimum and maximum width, and its position as relative. We have made this for having a consistent player for different widths, without using media queries, that would take pretty much work, taking into account our objective (but, of course, consider using them when necessary). This way, we limit the width, and, later, we will set its children elements’ position as absolute (line 18), to be able to define their position in respect to the wrapper.
The following rules of this section are just for defining positions, widths and colors. We set the starting positions of the elements (buttons, progress bars) absolutely in pixels, and the width relatively in percentage, to make the bars bigger or smaller depending on the width of the player, but avoiding the overlapping of the elements.
The second half of the stylesheet is for the cross-browser progress bar customization. With the first rules (lines 58-68), we get rid of the default appearance rendered by the browsers, to be able to write our rules for our custom appearance. For the color of the inner bar, we have to use the selectors for each browser engine.
Note: for the play button we are using an Unicode character instead of images, to avoid using proprietary content in this tutorial.
3. Allowing reproducing multiple audio files
We may have the need of reproducing multiple audio files. This wouldn’t suppose many changes, taking as base the player we built in the previous section.
In the HTML, we have to change the way we specify the path to the audio files:
custom_player.html
<!-- ... -->
<audio>
    <source src="../bell.mp3">
    <source src="../bell2.mp3">
</audio>
<!-- ... -->
So, for these cases, we have to specify each audio in a source tag, inside the audio tag.
Regarding to the JavaScript, we have to do the following changes:
controls.js
// ...
var audios = $('.audio-player audio source'),
    currentAudioIndex = 0;

function playNext() {
    currentAudioIndex++;

    if (currentAudioIndex >= audios.length) {
        currentAudioIndex = 0;
    }

    audioElement.src = audios[currentAudioIndex].src;

    audioElement.play();
}

function updateProgressBar() {
    var progressPercentage = audioElement.currentTime / audioElement.duration;

    progress.value = progressPercentage;

    if (progressPercentage == 1) {
        playNext();
    }
}
That is, we have to retrieve all the audios, and have a counter for knowing which one is the one being currently played. Of course, we need a piece of code for jumping to the next audio, which just consists on updating the source value for the audio element. This function has to be called the same time the one for updating the progress bar is called, but just when the current audio it’s finished, i.e., when the value of the progress bar is 1.
3.1. Adding controls for switching between audios
With the previous code, the audio will automatically jump to the following one, but without option to switch between them manually. Now we will add controls for this.
We have to edit the HTML to add those buttons:
custom_player.html
<!-- ... -->
<div class="audio-player">
    <audio>
        <source src="../bell.mp3">
        <source src="../bell1.mp3">
    </audio>
    <button class="play controls button"></button>
    <button class="previous controls button"></button>
    <button class="next controls button"></button>
    <progress class="progress custom-progress" value="0" max="1"></progress>
    <progress class="volume custom-progress" value="0.5" max="1"></progress>
</div>
<!-- ... -->
About the JavaScript, we just have to define a function for playing the previous audio, because we already have the one for playing the next one:
controls.js
// ...

function playPrevious() {
    audioElement.pause();

    currentAudioIndex--;

    if (currentAudioIndex < 0) {
        currentAudioIndex = audios.length - 1;
    }

    console.log(currentAudioIndex);
    audioElement.src = audios[currentAudioIndex].src;

    audioElement.play();
}

// ...
But, in this case, we also have to retrieve the buttons, and add the functions as click listeners:
controls.js
// ...

previous = $('.audio-player .previous'),
next = $('.audio-player .next'),

// ...

next.click(playNext);

previous.click(playPrevious);

// ...
To make it look properly, we also have to update the CSS:
styles.css
/* ... */
.audio-player .play,
.audio-player .previous,
.audio-player .next {
    color: #ffffff;
    background-color: #2b1e47;
    border: none;
    font-size: 20px;
}

.audio-player .play {
    left: 0;
    background:transparent;
}

.audio-player .previous {
    left: 24px;
}

.audio-player .next {
    left: 54px;
}

.audio-player .previous:after {
    content: '⏪';
    font-size: 27px;
}

.audio-player .next:after {
    content: '⏩';
    font-size: 27px;
}

.audio-player .progress {
    left: 95px;
    width: 45%;
}

.audio-player .volume {
    right: 10px;
    width: 19%;
}
Apart for the styles for the previous and next buttons, we also have to update the starting points of each element.
The result is the following:
4. Summary
In this tutorial we have seen how to use the HTML5 audio element, which actually just consists on specifying the audio file, and adding the attributes that we may consider suitable for our page. One of the attributes is for showing the controls of the audio, i.e., for playing/stopping, controlling the volume, etc., but the disadvantage of this is that every browsing engine renders it in a different way. That’s why we have also seen how to build our own cross-browser audio player, using CSS and JavaScript.
5. Download the source code
This was a tutorial of HTML5 Audio Controls.
You can download the full source code of this example here: HTML5AudioControlsTutorial

Thank you for this tutorial.
It’s a real life saver.