In this example we will go through a simple clean contact form.
Contact forms are sections within a webpage that you add with a set of input fields for users to have the possibility to contact the website admins.
Normally, you can choose how many fields you want the contact form to have, like name, e-mail, subject and message, or more if you need.
You can also choose different types of field align like inline or block, according to the layout of your website and space available.
This is how our final contact form is going to look like: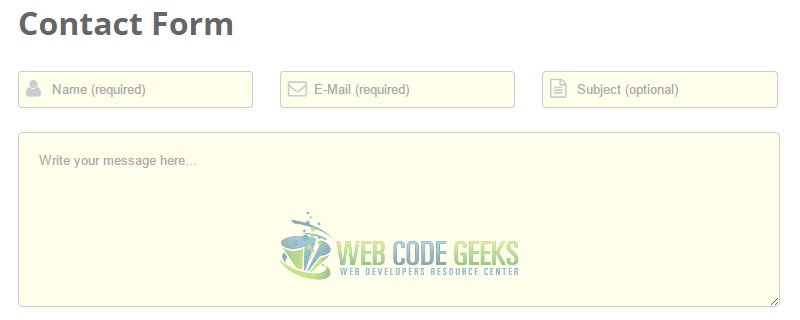

1. Basic Setup
Go ahead and create a new html file with the basic syntax inside like below:
<!DOCTYPE html>
<html>
<head>
	<title>HTML5 Contact Form</title>
	<link rel="stylesheet" href="css/font-awesome.min.css">  <!-- link FontAwesome -->
</head>
<body>

	<!-- STYLE SECTION -->

	<style type="text/css">

  	</style>


	<!-- HTML SECTION -->

</body>
</html>
Add these two FontAwesome folders inside your project folder (we’ll need font icons):
Notice that I have already linked FontAwesome css file in the head section of the basic html.
2. Step by Step – Contact Form
Now let’s code the contact form step by step and see how we can make it better and better.
2.1 Coding the HTML
In the html code section we will have the following components:
1. A form tag – this will wrap all input/textarea fields. Give it a class of form, a method and an action.
2. Three div tags – these divs will wrap inputs and fonticons, each div is going to have a class of wrapper.
2.1 – Inputs with a class, type, name and placeholder. The class is going to be input-group for all of them.
2.2 – Icons inside i tags and with respective classes according to the fonticon being used.
3. A textarea element – it will be needed for the message section. It will have a class of textarea and a placeholder.
4. A button element – it will send/post the data to the destination. It will have a class of send-btn and a href.
<!-- HTML SECTION -->

<form class="form" action="/post" method="post">

<h2>Contact Form</h2>   <!-- just a title -->

	  <div class="wrapper">
   <i class="fa fa-user"></i> 		 <!-- user icon for name field -->
   <input class="input-group" type="password" name="name" placeholder="Name (required)"></div>
       <div class="wrapper">
   <i class="fa fa-envelope-o"></i>	<!-- envelope icon for email field -->
   <input class="input-group" type="text" name='email' placeholder="E-Mail (required)"></div>
	   <div class="wrapper">
   <i class="fa fa-file-text-o"></i>	<!-- file text icon for subject field -->
   <input class="input-group" type="text" name='subject' placeholder="Subject (optional)"></div>

	<textarea class="textarea" placeholder="Write your message here..." ></textarea>

   <button href="#" class="send-btn">Send</button>
</form>
For now, because only the html section has been coded, you will get a really creepy view of the form like this:
2.2 Styling with CSS
This is where the form gets a makeup and becomes in a final state for the website.
First, we are going to refer to the .input-group class to style the input fields.
Look at the code below:
.input-group {
	width: 15em;
	height: 2.5em;
	margin-bottom: 1.8em;            /* some space below other field */
	margin-right: 1.7em;             /* some space from the next field */
	padding-left: 2.5em;             /* space from left to accommodate icons */
	border: 0.1em solid #ccc;        /* light gray border applied */
	border-radius: 0.3em;            /* small border radius */
	background-color: #ffffea;       /* light yellow field background color */
	}
Up until now, the three input fields we have styled will look like this:
Now lets work with the .wrapper and .wrapper .fa classes to make icons sit inside the fields.
By giving these classes relative and absolute positioning in the page, we will be able to stick the fonticons inside the inputs.
This is very tricky and hard to achieve in forms, so look carefully at the code below:
.wrapper {
	position: relative;
	display: inline;       /* displays the three input fields in the same row */
}

.wrapper .fa {
	position: absolute;
	padding: 0.4em;      /* sat the icons with a right spacing referring to the border */
	font-size: 1.2em;   /* chose a suitable font size according to the size of the field */
	color: #ccc;       /* gave icons a light gray color */
}
Done this kind of icon positioning and styling, we’d get the following vieW: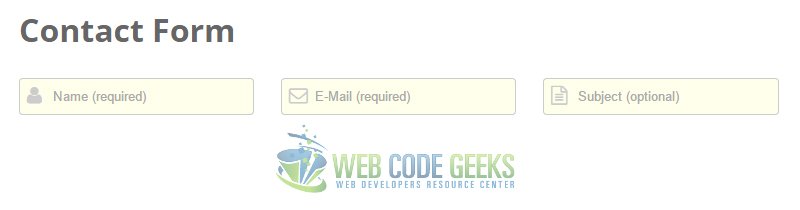
Now you understand better why we needed all that left padding when styling the input fields.
It’s time to style the textarea element. This element will sit below the input fields.
.textarea {
	width: 54em;          /* initial width */
	max-width: 54em;      /* maximum width */
	height: 10em;         /* initial height */
	display: block;       /* show below input fields */
	padding: 1.5em;       /* sit text/placeholder with some edges padding */
	border: 0.1em solid #ccc;  /* same border style as the input fields */
	border-radius: 0.3em;      /* same border radius as the input fields */
	background-color: #ffffea; /* same background color as the input fields */
}
The textarea will be resizable by height but not by width as that looked better to me.
I have also given these fields simple hover and active states like below:
.input-group:hover {
	border-color: #3399FF;
	box-shadow: 0em 0em 0.2em #3399FF;
}

.input-group:active {
	border-color: #006699;
}

.textarea:hover {
	border-color: #3399FF;
	box-shadow: 0em 0em 0.2em #3399FF;
}

.textarea:active {
	border-color: #006699;
}
In the image below, the message field is in hover state: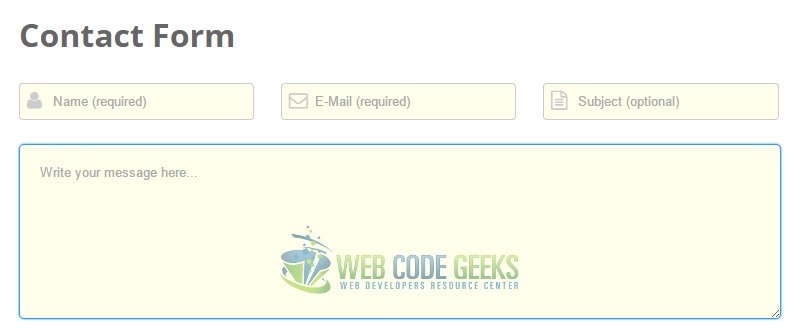
The last element we need to style is the button:
.send-btn {
	padding: 0.5em 4em;
	font-size: 1em;
	margin-top: 2em;
	background-color: #319cd5;
	color: white;
	border: none;
	border-radius: 0.3em;
	margin-left: 37em;   /* this value depends from page to page */
}
And the final view of the form would be:
3. Conclusion
To conclude, we can say that there are a lot of ways you can code a contact form and it is pretty simple.
However, do consider design elements like spacing, colors and icons when creating a form to make them more usable.
Feel free to create forms both from scratch or using css frameworks to help you get through this.
This was just a nice example of how you can do it yourseld in minutes.
4. Download
You can download the full source code of this example here: HTML5 Contact Form Example

How do you tell this form which email address you would like it to go to?
When I try to send a message, I get this error. Where and how do I put the email address to send the message to?
Hmm, we can’t reach this page.
Try this
•Make sure that you’ve got the right web address: ms-appx-web://microsoft.microsoftedge/assets/errorpages/dnserror.html#file:///C:/post?email=bruce.evans%40grapevine.com.au&subject=Test