HTML5, among other things, introduced new features and improvements for the forms. One of these is the datalist element, which allows to define a list of suggested options, but without enforcing the user to choose one of them, and allowing him to introduce any other value, having also an autocomplete feature.

For this example, the following browsers have been used for testing:
- Chromium 56.0.2924.76.
- Firefox 52.0.1.
- Opera 44.0.
And, apart from the browser, we will install a web server, running in Linux Mint 18.1. Not for using any server-side language, but for a reason we will see later.
You may skip web server installation and jump directly to the beginning of the example below.
1. Installing the web server
As said before, we are not using any server-side language, so we just need a web server, without any interpreter for any language.
For example, we can install Nginx:
sudo apt-get update
sudo apt-get install nginx
After the installation the web server service should automatically start, and, if we access localhost or 127.0.0.1, we should see the Nginx welcome page.
2. The datalist element
In the first moment, just because of the name, we may confuse the datalist element with the select element. With this second element, well known by every web developer, we define a list of options, for which the user has to choose one, with no chance for selecting any other thing. The datalist is similar in the way that we also define a list of options, but the user is not enforced to choose one of them; they are just suggestions of what the user can choose. So with this element, we offer options to the user, but without limiting him.
Another difference with select is that a datalist needs a text input element. This is actually quite obvious, since for allowing the user to enter a value that may not be in the list, we need a text input, but is something that we have to keep in mind.
Now that we understand the difference with the select element and that we have the main idea of when we should use the datalist, let’s see how to use it.
1_datalist.html
<!DOCTYPE html>
<html>
<head>
    <meta charset="utf-8">
    <title>1 - Datalist element</title>
    <style>
        #wrapper {
            width: 40%;
            margin: 0 auto;
        }
        #wrapper h1 {
            text-align: center;
        }
        #wrapper .form-row {
            margin-top: 20px;
        }
    </style>
</head>
<body>
    <div id="wrapper">
        <form action="#">
            <h1>1 - Datalist element</h1>
            <div class="form-row">
                <label for="favorite-color">Type your favorite color:</label>
                <input type="text" id="favorite-color" list="color-datalist">
                <datalist id="color-datalist">
                    <option value="Blue">
                    <option value="Purple">
                    <option value="Black">
                    <option value="Yellow">
                    <option value="White">
                    <option value="Green">
                </datalist>
            </div>

            <div class="form-row">
                <input type="submit" value="Submit">
            </div>
       </form>
    </div>
</body>
</html>
Note that, this HTML, would be perfectly fine if we would delete the datalist; would just be a text input and a submit button. Remember that the datalists work together with the text input: a datalist needs a text input, but a text input may not need a datalist.
But, note that the text input has an “uncommon” attribute (line 25): list. This is, as you probably guessed, to link the datalist to the given text input. The value of this attribute has to be the id of the datalist.
The definition of the datalist, from line 26 to 33, is pretty similar to the select element with its options. But see that the datalist doesn’t have a name attribute because, remember, the element that sends the value in the form is the text input, not the datalist.
The following image shows the rendering of this HTML page for Chromium:
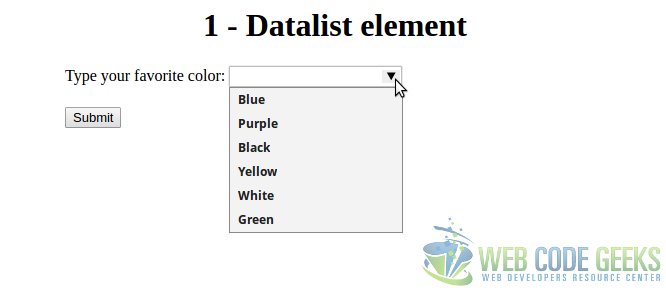
As we can see, it’s a normal text input, but with the dropdown list of the values we defined in the datalist. And, if we start typing into the textbox, we will have an autocomplete, with the values that coincide with what we have typed.
2.1. Styling the input for cross-browser compatibility
Until here, everything is fine. But, if we open the HTML with Firefox, we will see that the render is quite different:
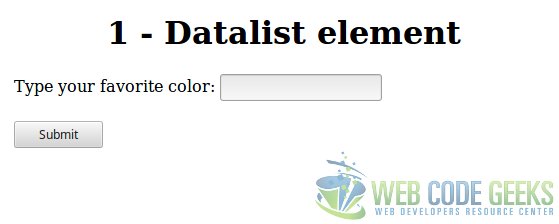
As we can see, Firefox doesn’t render the arrow for showing the dropdown list. Instead, we have to double click into the text input to show the values defined in the datalist.
This should be considered a problem, because our pages and applications shouldn’t render and behave in different ways for different browsers. For solving this issue, there would be two options:
- Make the arrow appear always.
- Make the arrow disappear.
Unfortunately, the first one is not possible, because, even if an arrow can be easily added for each browser, there’s no JavaScript specification for showing the datalist dropdown programatically. This means that we have to live with the second option, making the arrow disappear.
This can be easily achieved with CSS with just a couple of lines:
/**
 * Remove the arrow in Webkit browsers.
 */
input::-webkit-calendar-picker-indicator {
    display: none;
}
This means that that the arrow displayed for the text inputs that have a datalist associated is defined with the -webkit-calendar-picker-indicator pseudo-selector.
To apply it just for datalists, we should declare a class for the text inputs in question, e.g.:
<!-- ... -->
<input type="text"
       id="favorite-color"
       class="datalist-autocomplete"
       list="color-datalist"
       >
<!-- ... -->
And of course, updating the CSS:
/**
 * Remove the arrow in Webkit browsers.
 */
.datalist-autocomplete::-webkit-calendar-picker-indicator {
    display: none;
}
3. Loading dynamically the data
When we want to offer an autocomplete functionality, usually, the data to be loaded is stored somewhere else, like a database or a text file. For this scenarios, we probably have used AJAX in combination with some jQuery plugin for the autocomplete feature.
Using datalists, we just have to use AJAX for this purpose, being a pretty easy task, as we will see in this section.
For the AJAX request, we will use jQuery, since it’s much more easier, faster and readable than using the native XMLHttpRequest object. For this example, the jQuery version 3.2.1 has been used.
3.1. Setting up the web server
Note: These steps are just necessary if you want to test the code of this section on your own computer. In real-life scenarios, this should be responsibility of the sysadmin.
For serving our resource, we need a web server. And that web server has to be configured for allowing CORS (Cross-Origin Resource Sharing).
This consists on adding the following line into the Nginx configuration file:
/etc/nginx/sites-enabled/default
# ...

server {
    # ...
    add_header 'Access-Control-Allow-Origin' '*';
    # ...
}
Now, we have to place our JSON file (we will see later the content) in the web directory, /var/www/html/, to access it file via web browser, instead of locally. In my case, http://localhost/colors.json.
Finally, we have to fix the permissions for the file:
sudo chown www-data:www-data /var/www/html/colors.json
3.2. The code
First of all, we will define our data model. The simplest option could be to define a JSON file, defining an array of colors:
colors.json
[
    "Blue",
    "Purple",
    "Black",
    "Yellow",
    "White",
    "Green",
    "Red",
    "Magenta",
    "Lilac",
    "Cyan",
    "Fuchsia"
]
In the HTML, we have to include jQuery (from a CDN in this case), and our script; and also remove the current datalist values, leaving it empty:
2_loading_dynamically_data.html
<!DOCTYPE html>
<html>
<head>
    <meta charset="utf-8">
    <title>2 - Loading dynamically data</title>
    <script src="https://code.jquery.com/jquery-3.2.1.min.js"></script>
    <script src="load_data.js"></script>
    <style>
        <!-- The style... -->
    </style>
</head>
<body>
    <div id="wrapper">
        <form action="#">
            <h1>2 - Loading dynamically data</h1>
            <div class="form-row">
                <label for="favorite-color">Type your favorite color:</label>
                <input type="text" id="favorite-color" list="color-datalist">
                <datalist id="color-datalist">
                </datalist>
            </div>

            <div class="form-row">
                <input type="submit" value="Submit">
            </div>
        </form>
    </div>
</body>
</html>
The JavaScript is just about making an AJAX request, and manipulating the DOM, creating the elements for the datalist:
load_data.js
$(document).ready(function() {
    var colorsUrl = 'http://127.0.0.1/colors.json';

    /**
     * Defines and returns the AJAX request, for later specifiying
     * the handlers for success and failure.
     */
    function getAjaxRequest() {
        return $.ajax({
            url: colorsUrl,
            dataType: 'json',
            type: 'GET',
        });
    }

    /**
     * Called on AJAX request success, iterates through the response
     * data, creating an "option" value for each color, and appending
     * each element into the datalist element defined in the HTML.
     */
    function loadDatalist(responseData) {
        var datalist = $('#color-datalist');

        for (var colorIndex in responseData) {
            color = responseData[colorIndex];

            var option = $(
                '<option>',
                { value: color }
            );

            datalist.append(option);
        }
    }

    /**
     * Called on AJAX request error.
     */
    function handleRequestError(xhr, status) {
        alert('An error occurred in the AJAX request.');
    }

    getAjaxRequest().done(loadDatalist);
    getAjaxRequest().fail(handleRequestError);
});
Apart from all the AJAX stuff, the important thing for us is in the highlighted lines, where we are iterating through each color, and creating the option element that will be created in the DOM, inside the specified datalist.
With this, we have a complete autocomplete feature for our forms, with data loaded from the server, in an incredibly easy way!
4. Summary
With the datalist element we have seen how easy can be to have an autocompletion feature with HTML5. In this example we have seen how to have a datalist statically, that is, with the options hardcoded in the HTML; and also how to load dynamically from the server, using AJAX in combination with jQuery, being so easy and immediate to load the data from a resource in a server.
5. Download the source code
This was an example of HTML5 Datalist.
You can download the full source code of this example here: HTML5DatalistExample
