EDITORIAL NOTE: In this post, we feature a comprehensive HTML5 Form Validation Example. Form validation is when you enter data, the web application checks it to see that the data is correct. If correct, the application allows the data to be submitted to the server and (usually) saved in a database; if not, it gives you an error message explaining what corrections need to be made.
Introduction
HTML5 has introduced a lot of changes welcomed by developers, including adding additional types of form input elements that helps in form processing activities like validation. Validating web forms has always been a painful task for many developers. Performing client side validation in a user-friendly as well as developer-friendly way is really hard. Furthermore informing users about the validation error in a pleasant way is a tedious task.

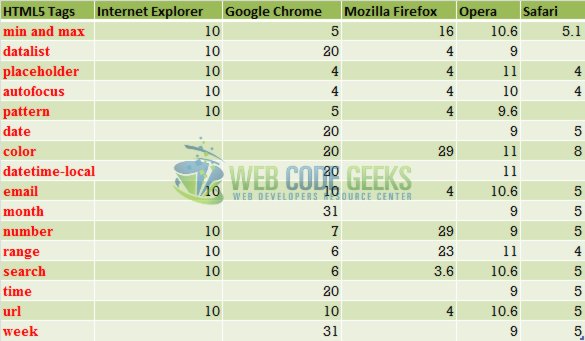
Before HTML5 there was no means of implementing validation natively; therefore, developers resorted to a variety of JavaScript based solutions. Let’s get started with some coding using the new and exciting features of HTML5. Lot of these features are dependent on a specific browser versions. The version supports are getting updated every day. We have tried to present the features (that we intend to use) versus the browser version in the example in a table.
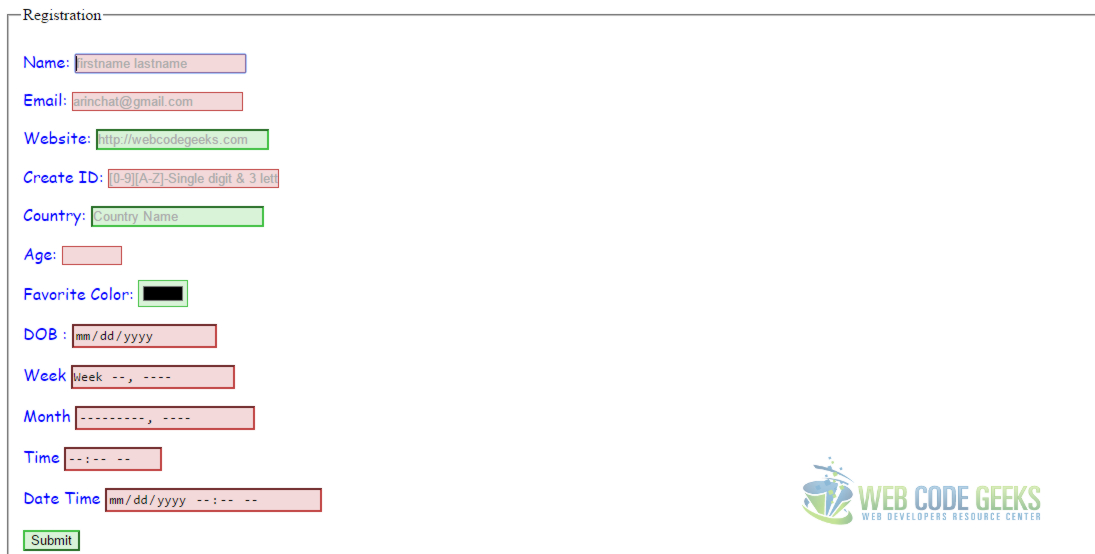
Here is a screenshot of what we we will develop today.
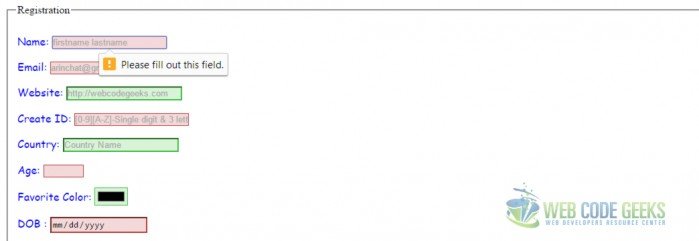
Note how the elements are color coded depending on whether they are required or not. Here is how we did it. First mark the element in html as required.
<input type="email" id="email" name="email" value="" required placeholder="arinchat@gmail.com">
Then use a style to color code the required fields.
input:required {
 background: hsl(180, 50%, 90%);
 border: 1px solid #999;
}
If you don’t fill out a required field and try to submit, you will get a prompt with the error as shown below.
min and max
In HTML5 the min attribute together with the max attribute to create a range of legal values. The attributes works with the following input types: number, range, date, datetime, datetime-local, month, time and week. Let’s look at few interesting things before we look at the attributes.
<div>
<label for="Age">Age:</label>
<input type="number" id="Age"name="Age" value="" required min="18" max="75">
The associated label tag has for attribute for the label tag matches up with the id attribute of the associated input tag. On top of the fact that the label is helping to give meaning to the input controls, it also means that if you click the label, the associated input tag receives the focus.
They also help with accessibility, as the text in the label will be read out to screen reader users: This is old trick, thought that I though is wort mentioning. Another thing that we did here was to have , providing context-sensitive help when field it describes receives focus. Again this trick is in addition to the feature placeholder feature that we will look at a little bit later.
<div>
<label for="Age">Age:</label>
<input type="number" id="Age"name="Age" value="" required min="18" max="75">
<span id="age-format" class="help">Format: Number between 18 and 75</span>
</div>
We have a little css style element that defines the way we view the span
.help {
display: none;
font-size: 90%;
}

input:focus+.help {
display: inline-block;
}
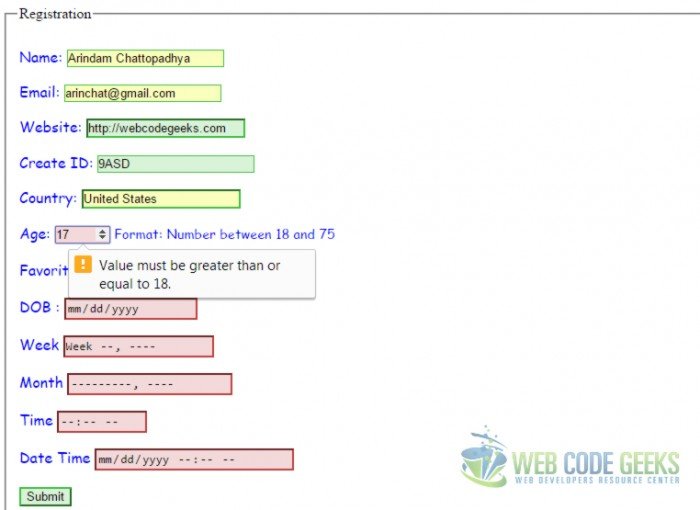
Here is the screenshot of validation error for min and max attributes:
datalist
A datalist element gets an ID attribute and contains numerous OPTION elements, just as a <select> element would: Once the datalistelement is in place, a list attribute gets added to an <input> element which refers to the list id. In a nutshell, the datalist tag is used to provide an “autocomplete” feature on <input> element.
<input list="Countries" placeholder="Country Name">
 <datalist id="Countries">
 <option value="USA">
 <option value="Greece">
 <option value="UK">
 <option value="India">
 <option value="France">
 </datalist>
Please see the screenshot of datalist usage below:

placeholder
The ability to set placeholder text in an input field is new and welcome addition to Html5 webforms. The placeholder attribute can only contain text, not HTML markup. Placeholder text is displayed inside the input field as long as the field is empty. When you click on (or tab to) the input field and start typing, the placeholder text disappears.
<input type=text autofocus id="name" name="name" value="" placeholder="firstname lastname" required>
autofocus
HTML 5 has introduced a new Boolean attribute called autofocus attribute on all webform controls. As soon as the page loads, it moves the input focus to a particular input field. See the example below:
<input type=text autofocus>
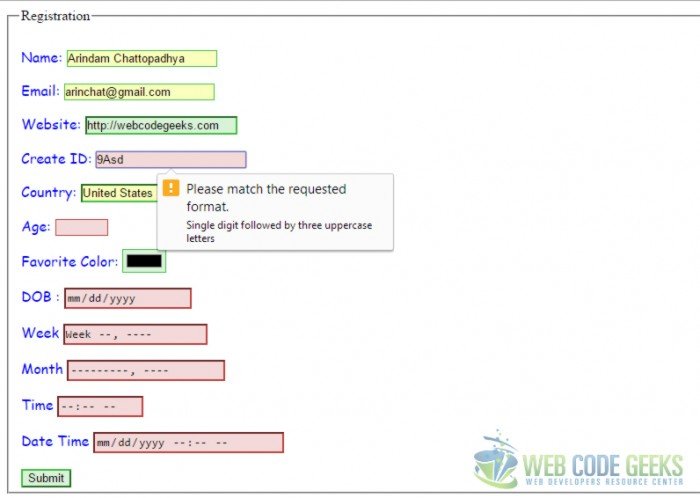
pattern
This attributes helps the developer to specify a JavaScript regular expression for the field’s value to be checked against. Hence we can use pattern to implement specific validation like phone number, product code, zip code etc. The pattern attribute works with the following input types: text, search, url, tel, email, and password. See the example code below.
<input type="text" id="ID"required name="ID" pattern="[0-9][A-Z]{3}"
 placeholder="[0-9][A-Z]-Single digit & 3 letters"
 title="Single digit followed by three uppercase letters">
Here is screenshot of validation error if you don’t enter the field in the expected pattern:
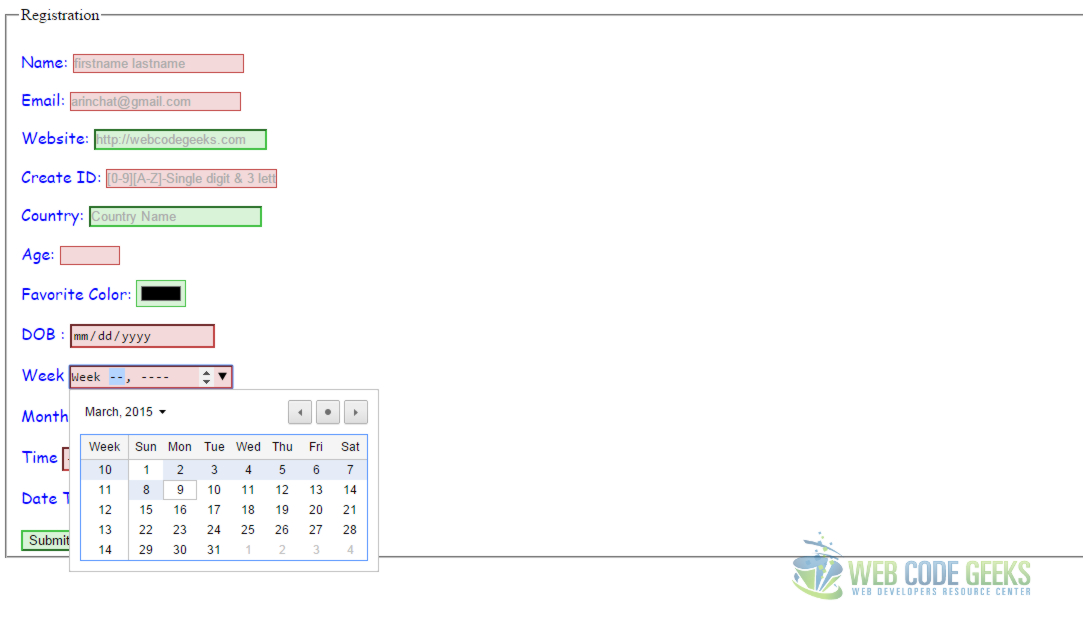
date, datetime-local,month,time,week
HTML5 finally defines a way to include a native date picker control without having to script it yourself. In fact, it defines 5 kinds of them: date, month, week, time, datetime-local.
<input type="date" id="Date" name="Date">

<input type="week" id="Week" name="Week">

<input type="month" id="Month" name="Month">

<input type="time" id="Time" name="Time">

<input type="datetime-local" id="DateTime" name="DateTime">
Below is screenshot of datepicker included in HTML5:
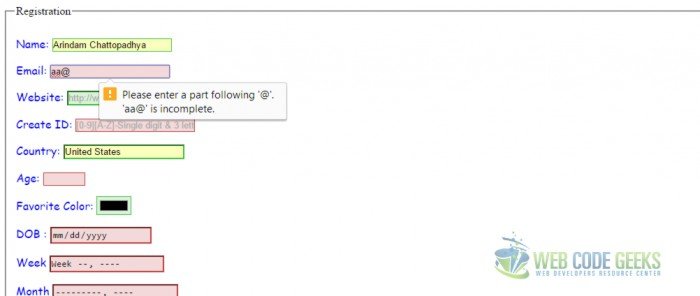
The input type as email is used for input fields that should contain an e-mail address. Depending on browser support, the e-mail address can be automatically validated when submitted. Here is a screenshot of an error shown if you do not fill the email in the correct way. Some smartphones recognize the email type, altering their virtual keyboard to the keyboard to match email input.
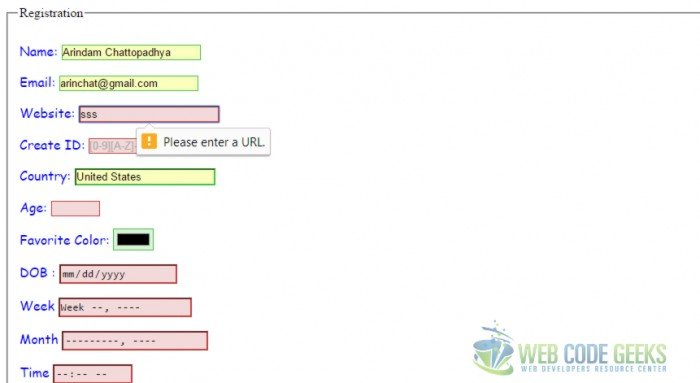
url
The <input type="url"> is used for input fields that should contain a URL address. Most modern desktop browsers simply render type="url" like a regular text box, so users won’t even notice until they submit the form. Depending on browser support, the url field can be automatically validated when submitted. Some smartphones like iPhone recognize the url type, alters its virtual keyboard and adds “.com” a period, a forward slash, to the keyboard to match url input. Here is a screenshot of validation error for url.
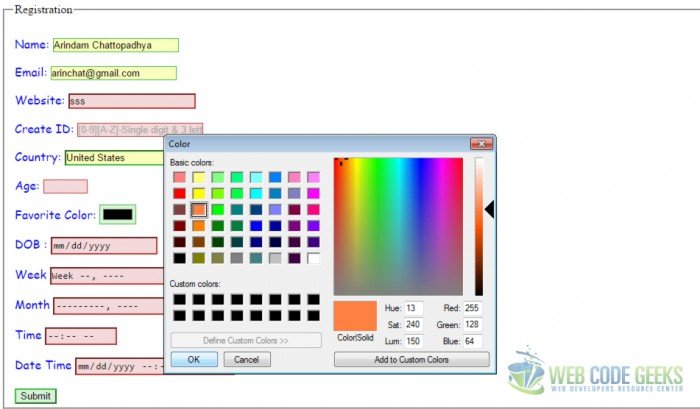
color
The <input type="color"> is used for input fields that should contain a color. You will get a color picker if your browser supports. This has not much of a usage for validation.I thought of mentioning it as the feature is pretty cool .
You can download the full source code of this example here: HTML5Validation

It is worth noting that even though you validate the data “client side” as described in this article, you *MUST* still validate server-side. Attackers can proxy their connection and intercept any data from the browser that is on its way to the server, and modify it “in flight”. So there is no guarantee that the “perfect” data that you created with the HTML validation processing is the same data that the server will receive. (client side validation is EXCELLENT for response time, as errors are caught w/o and network or server-side involvement, so it is very worthwhile – BUT for… Read more »