Introduction
At the heart of every location-based application is positioning and Geolocation. Geolocation is similar to the use of positioning systems but is more focused on determining a meaningful location (e.g. a street address) rather than just a set of geographic coordinates.
In this tutorial you will learn the Geolocation capabilities of HTML5. The API provides a method to locate the user’s more or less exact position. This is useful in a number of ways ranging from providing a user with location specific information to providing route navigation.

There is more than one way to figure out where you are — your IP address, your wireless network connection, which cell tower your phone is talking to, or dedicated GPS hardware that calculates latitude and longitude from information sent by satellites. Gone are the days when we would inspect the client IP address and make a reasonable guess as to the where that device was located.
In HTML5, we have a set of APIs to effectively allow the client-side device (i.e. your iPhone 3G+, Android 2.0+ phones, or even your conventional desktop browsers) to retrieve geographic positioning information with JavaScript.
The Geolocation API is supported by the following browsers and smartphones. Minimum version requirements are mentioned as well.
- Google Chrome 5.0
- Internet Explorer 9.0
- Firefox 3.5
- Safari 5.0
- Opera 16.0
- Iphone 3.0
- Android 2.0
- Opera Mobile 10
- Blackberry OS 6.0
Security And Accuracy
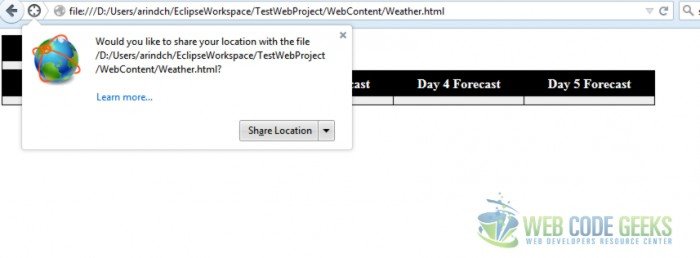
When you’re talking about sharing your physical location with a remote web server, note that this can compromise user privacy, the position is not available unless the user approves it. The browser will take care of this, and a message will either appear as a popup box (as shown below), or at the top of the browser (implementation is browser specific) requesting the user’s permission. In case of smartphones, the relevant apps that uses GeoLocation may request the permission during installation itself.
The infobar that pops up in the browser, depicts a lot of information. It is non-modal and tab-specific so it will disappear while switching to another browser window or tab. There is no way for a website to bypass the permission infobar. The blocking nature of the infobar ensures that the website cannot determine your location before you answer. As the end user,
- are told which website wants to know your location
- can choose to share or not to share your location
- can opt to remember your choice (share or don’t share) to make this infobar disappear for ever for this website
Different techniques are used to obtain the user’s location, and each technique has its own varying degree of accuracy. A desktop browser is likely to use WiFi (accurate to 20m) or IP Geolocation which is only accurate to the city level and can provide false positives. Mobile devices tend to use triangulation techniques such as GPS (accurate to 10m and only works outside), WiFi and GSM (Global System for Mobile) / CDMA (Code division multiple access) cell IDs (accurate to 1000m). Please refer to the reference section link that talks in details about wireless geolocation techniques.
Weather Widget
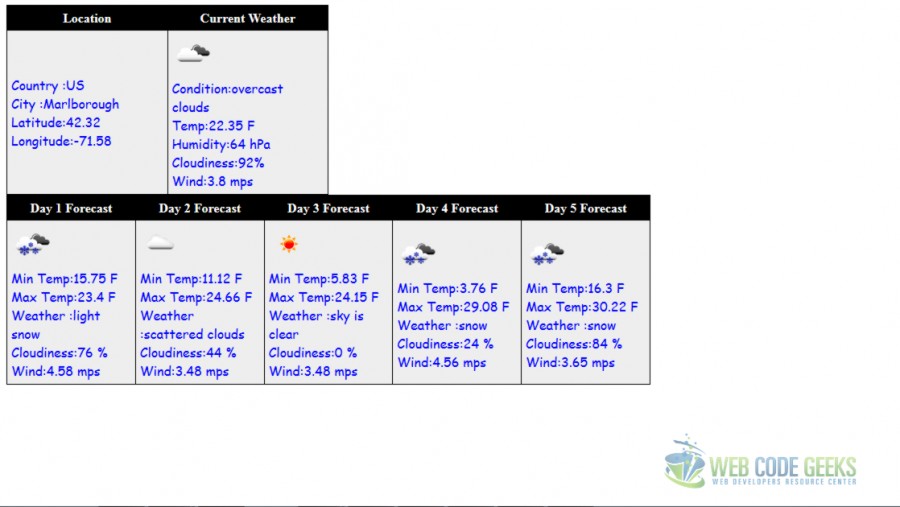
In this example, we will develop a simple weather widget using the HTML geolocation API and OpenWeather APIs. I must admit that I did not pay much emphasis on the display aspect of the example. Neither have I fully exploited the API offerings from OpenWeather API. Here is a screenshot of what we are going to develop today.
We will start of with the html. We refer to the external JavaScript and CSS and call the inital JavaScript function in body onload()
<link rel="stylesheet" href="WeatherStyle.css">
<script src="WeatherWidget.js"></script>
</head>
<body onload="getLocation()">
2 different html table elements are defined and assigned a CSS style
<table class="myTable">
<table class="ForeCastTable">
We have also defined div element inside the table and assigned a specific id so that we can overwrite the content using JavaScript
<tr>
<td><div id="location"></div></td>
<td><div id="weatherNow"></div></td>
</tr>
We will be using the free OpenWeather API to access the weather info in JSON format. We will parse the inputs and display them
For more information and additional capabilities please refer to OpenWeather API link in the Reference section.
Let’s get started by defining the global variables. The reason we have broken the URLs is that we have to build the URLs at the runtime
Notice the separate static URLs for current weather, 5 day forecast and Image URL
//define the global variables
//current weather URL
var BASE_URL = "http://api.openweathermap.org/data/2.5/weather?";
var UrlParams = "&units=imperial&type=accurate&mode=json";
// forecast URL
var Forecast_URL = "http://api.openweathermap.org/data/2.5/forecast/daily?";
var ForeCast_Params = "&cnt=5&units=imperial&type=accurate&mode=json";
// Image base URL
var IMG_URL = "http://openweathermap.org/img/w/";
In the getLocation() function we will determine if Geolocation is supported
if (navigator.geolocation) {
If the geolocation is not supprted by the browser, display the error message.
} else {
        alert("Geolocation is not supported by this browser");
In the API there are two functions available to obtain a user’s location:getCurrentPosition and watchPosition. We will discuss the difference between the functions shortly. For now let’s see how they work. Both of these methods return immediately, and then asynchronously attempt to obtain the current location. They take the same number of arguments.
1. successCallback – called if the method returns successfully. For example , getCurrentWeatherData is called.
2. errorCallback – In case we encounter error for getCurrentPosition the errorCallback (displayError) is invoked.
3. [options] – a number of options are available:
a. enableHighAccuracy – Defaults setting is false. Setting this property to true may cause a slower response time and in the case of a mobile device, greater power consumption as it may use GPS.
b. timeout – Default is 0 which indicates infinite. depicts the maximum length of time in milliseconds to wait for a response. We set the timeout value to our computed value
var timeoutVal = 10 * 1000 * 1000;
c. maximumAge – in Milliseconds and the default value is 0 which means get new position object immediately. It denotes the maximum age of a cached position that the application will be willing to accept.
navigator.geolocation.getCurrentPosition(getCurrentWeatherData, // successCallback
displayError, { //errorCallback
enableHighAccuracy : true, // high accuracy
timeout : timeoutVal, //  in milliseconds
maximumAge : 0 // in milliseconds
});
Inside our error callback function, we handle the error graciously by converting the return code to a simple error message
function displayError(error) {
    var errors = {
        1 : 'Permission denied',
        2 : 'Position unavailable',
        3 : 'Request timeout'
    };
    alert("Error: " + errors[error.code]);
}
Let’s summarize the steps :
- Determine if Geolocation is supported
- If supported, run the
getCurrentPosition()method. If not, call theerrorcallback(displayError) - If the
getCurrentPosition()method is successful, it returns a coordinates object to the function specified in the parameter ( getCurrentWeatherData) - The getCurrentWeatherData() function uses the
positionobject for further processing.
getCurrentPosition and watchPosition
The main difference between getCurrentPosition and watchPosition is that watchPosition keeps informing your code when the position change, thereby updating the user’s position. This is very useful if you want to track the movement of your end user like developing a driving direction apps. On the other hand the getCurrentPosition is a once off.
The watchPosition method return watchID which can be used to call the clearWatch when you want to stop the position constantly being updated
Position
When the user’s position is returned, it is contained within a Position object which contains a number of properties
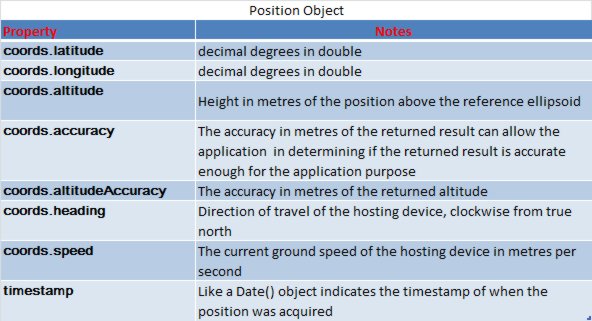
If we are able to obtain a Position object we will use the relevant properties to form the URL as shown below.
var WeatherNowAPIurl = BASE_URL + "lat=" + position.coords.latitude
            + "&lon=" + position.coords.longitude + UrlParams;
    var WeatherForecast_url = Forecast_URL + "lat=" + position.coords.latitude
            + "&lon=" + position.coords.longitude + ForeCast_Params;
In order to call the OpenWeather API we will use the XMLHttpRequest object is used to exchange data with a server behind the scenes. When a request to a server is sent, we want to perform some actions based on the response.The onreadystatechange event is triggered every time the readyState changes. It stores a function (or the name of a function) to be called automatically each time the readyState property changes The readyState property holds the status of the XMLHttpRequest.
Following are the possible values for readystate:
0: request not initialized
1: server connection established
2: request received
3: processing request
4: request finished and response is ready
The status property returns 200: “OK” or 404: Page not found. When readyState is 4 and status is 200, the response is ready. We are taking the JSON(Java Script Object Notation) responseText and parsing it before calling the Parse() function that takes cares of displaying the content from the JSON object.
var xmlhttp = new XMLHttpRequest();
xmlhttp.onreadystatechange = function() {
if (xmlhttp.readyState == 4 && xmlhttp.status == 200) {
var JSONobj = JSON.parse(xmlhttp.responseText);
Parse(JSONobj);
}
}
Now you can use the open annd send properties of XMLHttpRequest object to call the API as shown below.
xmlhttp.open("GET", WeatherNowAPIurl, true);
xmlhttp.send();
Handling JSON
To access the JSON object in JavaScript, parse it with JSON.parse(), and access it via “.” or “[]”. To refresh our memories . JSON is similar to XML as it is “self describing” , hierarchical and can be fetched using XMLHttpRequest and parsed with many programming languages. However, JSON doesn’t use a end tag, shorter in size and permits usage of arrays.
Unlike XML, JSON can use JavaScript and doesn’t need a XML parser to be parsed. The data in JSON is name/value pairs separated by commas.Curly braces hold objects while Square brackets hold arrays.Here is an example of JSON response we got back from OpenWeather API call.
{
"cod": "200",
"message": 0.3399,
"city": {
"id": 4945840,
"name": "Northborough",
"coord": {
"lon": -71.641182,
"lat": 42.319538
},
"country": "US",
"population": 0
},
"cnt": 5,
"list": [{
"dt": 1424970000,
"temp": {
"day": 24.73,
"min": 18.86,
"max": 25.9,
"night": 18.86,
"eve": 21.69,
"morn": 20.59
},
"pressure": 1009.86,
"humidity": 51,
"weather": [{
"id": 803,
"main": "Clouds",
"description": "broken clouds",
"icon": "04d"
}],
"speed": 4.02,
"deg": 24,
"clouds": 76
},
Here is an example of how we have parsed the JSON response
// current Location
document.getElementById("location").innerHTML = "Country :"
+ obj.sys.country + "<br>" + "City :" + obj.name + "<br>"
+ "Latitude:" + obj.coord.lat + "<br>" + "Longitude:"
+ obj.coord.lon + "<br>";
// current weather
document.getElementById("weatherNow").innerHTML = "<img src='" + IMG_URL
+ obj.weather[0].icon + ".png'> " + "<br> Condition:"
+ obj.weather[0].description + "<br>" + "Temp:" + obj.main.temp
+ " F<br>" + "Humidity:" + obj.main.humidity + " hPa <br>"
+ "Cloudiness:" + obj.clouds.all + "% <br>" + "Wind:"
+ obj.wind.speed + " mps <br>";
As mentioned earlier, I have only touched the tip of the iceberg here. Please refer to the API documentation from OpenWeather and feel free to experiment with the various API functions.
Download
Download the project of this tutorial:
You can download the full source code of this example here: Geolocation Example

Hi i believe that `if (xmlhttp.readyState == 4 && xmlhttp.status == 200) {`
shoud be `if (xmlhttp.readyState == 4 && xmlhttp.status == 200) {`.
Here it is displayed correct, but in your tutorial code appears “& a m p; & a m p”.
Being new to programming this tutorial is very confusing as it is written here. However downloading your scripts did clear things up.
For example, you start off by writing out ‘getLocation() function’ written out in sentence form, then you switch it up as you go into the ‘ if (navigator.geolocation) ‘ by displaying it as it would look on scripts.
Even more confusing is when you mouse over the small menu of the script and click ‘view source’ you do not have ‘getLocation() function’ and ‘if (navigator.geolocation)’ joined together. Regardless I appreciate you putting it out there.