In this post we will look at Internationalization in HTML5. We will be translating the web page to use the language chosen by the user. At the same time we will keep the process passive, in the sense that, instead of making the decision on language ourselves, we will let the user choose a language of choice from a set of options.

To keep things simple we will display three options, viz., German, French and of course English. We will let the user decide after initially displaying the page in English. So lets get started with the implementation of our example.
Table of Content
1. Project Layout
The project structure of our example application is as follows:

| css | This folder contains the css files for the application. |
| js | We place the client side JavaScript files in this folder. These files contain JavaScript code that works on the client end in the browser. |
| i18n | This is the location of our JSON resource files, they basically contain name value pairs used in translation by our application. They play a key role in enabling support for different languages on the UI. |
| images | I have downloaded and placed images of flags of the countries whose languages we plan to support in this application. These include the french, german and british flag images. |
| index.html | This is our application’s landing page and hosts our UI. |
| index.js | Our barebones nodejs web server resides in this file. All our server side JavaScript code sits in this file. It is the entry point of our application. |
2. Tools & Technologies
To build the application for this example, I have used the following toolset. Some of them are required whilst others could be replaced by tools of your own choice.
- HTML5
- CSS
- JavaScript
- Nodejs v6.3.0
- Express
- Visual Studio Code IDE
Node.js, in essence, is JavaScript on the server-side. The Express module is used to create a barebones server to serve files and resources to the browser. I prefer the Visual Studio Code IDE but you can use any text editor of choice.
3. Internationalization
To implement our internationalization example we will proceed stepwise, first we will create the language resource files next we write markup. Then we use JavaScript to enable the user to transition from one language to another for the UI.
3.1. Creating Resource files
We will create resource files that will allow us to replace the text with their translated one depending on the language the user switches to. These resource files are in JSON format and are basically key-value pairs. The key being the value of the data-langkey attribute of tags in the HTML markup. So in a file named france.json, for example, will be keys and corresponding text in the french language.
We use three resource files in this application one each for the three languages we intend to support in our example, i.e., france.json, germany.json and britain.json. I have created these by getting translations from Google Translate. These files look like below:
france.json
{
    "Name": "Prénom",
    "Company": "Compagnie",
    "Email Address":"Adresse e-mail",
    "Mobile No.": "Numéro de portable",
    "Application Form":"Formulaire de demande",
    "Telephone No.":"Numéro de téléphone",
    "Gender":"Le genre",
    "Male": "Mâle",
    "Female":"Femelle",
    "Prefer not to say":"Je préfère ne pas le dire",
    "WCG -- HTML5 Internationalization Example": "WCG - Exemple d'internationalisation HTML5"
}
germany.json
{
    "Name": "Name",
    "Company": "Unternehmen",
    "Email Address":"E-Mail-Addresse",
    "Mobile No.": "Handynummer",
    "Application Form": "Anmeldeformular",
    "Telephone No.":"Telefonnummer",
    "Gender":"Geschlecht",
    "Male":"Männlich",
    "Female": "Weiblich",
    "Prefer not to say":"Mache lieber keine Angabe",
    "WCG -- HTML5 Internationalization Example": "WCG - HTML5 Internationalisierung Beispiel"
}
britain.json
{
    "Name": "Name",
    "Company": "Company",
    "Email Address":"Email Address",
    "Mobile No.": "Mobile No.",
    "Application Form": "Application Form",
    "Telephone No.":"Telephone No.",
    "Gender":"Gender",
    "Male":"Male",
    "Female": "Female",
    "Prefer not to say":"Prefer not to say",
    "WCG -- HTML5 Internationalization Example": "WCG -- HTML5 Internationalization Example"
}
3.2. HTML5 Markup
We will implement a generic application form to demonstrate internationalization. Following markup spins up a application form for us:
index.html
<!DOCTYPE html>
<html lang="en">
    <head>
    <meta charset="utf-8">
    <meta http-equiv="X-UA-Compatible" content="IE=edge">
    <meta name="viewport" content="width=device-width, initial-scale=1">
<!-- The above 3 meta tags *must* come first in the head; any other head content must come *after* these tags -->
    <title>WCG -- HTML5 Internationalization Example </title>

    <link rel="stylesheet" href="css/html5.internationalization.css" type="text/css" />
<!-- HTML5 shim and Respond.js for IE8 support of HTML5 elements and media queries -->
<!-- WARNING: Respond.js doesn't work if you view the page via file:// -->
<!--[if lt IE 9]>
<script src="https://oss.maxcdn.com/html5shiv/3.7.3/html5shiv.min.js"></script>
<script src="https://oss.maxcdn.com/respond/1.4.2/respond.min.js"></script>
<![endif]-->
</head>
<body>
    <h1 data-langkey="WCG -- HTML5 Internationalization Example">WCG -- HTML5 Internationalization Example </h1>
    <div id='languages'>
        <img src='images/if_FR_167740.png' class='language' data-lang='france' alt='French Flag' />
        <img src="images/if_DE_167808.png" class='language' data-lang='germany' alt='German Flag' />
        <img src="images/if_GB_167794.png" class='language' data-lang='britain' alt='British Flag' />
    </div>
    <fieldset>
        <legend>
            <span data-langkey="Application Form">Application Form</span>
        </legend>
        <span data-langkey="Name">Name</span><br /><input type="text" /><br />
        <span data-langkey="Company">Company</span><br /><input type='text' /><br />
        <span data-langkey="Mobile No.">Mobile No.</span><br /><input type='text' /><br
        />
        <span data-langkey="Telephone No.">Telephone No.</span><br /><input type='text'
        /><br />
        <label data-langkey="Gender">Gender</label><br />
        <select>
            <option data-langkey="Male">Male</option>
            <option data-langkey="Female">Female</option>
            <option data-langkey="Prefer not to say">Prefer not to say</option>
        </select>
    </fieldset>

    <script src='js/html5.internationalization.js' ></script>
</body>
</html>
One thing to notice is the decoration of each tag with text data with the attribute data-langkey. This proves to be a key in our attempt to translate all the text in the page to another language. We use the key of a tag to look up the translation of its text in our resource files. We replace the innerText of a tag with the value from the resource file. The UI of our application looks like below in browser.

3.3. JavaScript
Now that we have the resource files and the markup in place let us write some JavaScript to make it all tick. In our code we bind to the click event of each flag icon that we are displaying. On trigger of the event we send an AJAX request to the server to fetch the correct resource file with the translations.
The name of the resource file is again picked up from the data-lang attribute of the respective image tags. Once we receive the same we go about translating the text in the UI with appropriate translations from the resource file. Our code looks like below:
html5.internationalization.example.js
var languages = Array.from(document.getElementsByClassName('language'));
var xhttp = new XMLHttpRequest();
var langDocument = {};

languages.forEach(function(value, index){
    languages[index].addEventListener('click', function(){
        switchLanguage(this.dataset.lang);
    });
});
xhttp.onreadystatechange = function(){
    if (this.readyState === 4 && this.status === 200) {
        langDocument = JSON.parse(this.responseText);
        processLangDocument();
    }
};
function switchLanguage(language){
    xhttp.open("GET", "i18n/" + language + ".json", true);
    xhttp.setRequestHeader("Content-type", "application/json");
    xhttp.send();
}
function processLangDocument(){
    var tags = document.querySelectorAll('span,img,a,label,li,option,h1,h2,h3,h4,h5,h6');
    Array.from(tags).forEach(function(value, index){
        var key = value.dataset.langkey;
        if(langDocument[key]) value.innerText = langDocument[key];
    });
}
3.4. Demonstration
Now that we have all the pieces in place, let us see the results at runtime. We run the project and navigate to the URL http://localhost:8090/index.html which displays the following:
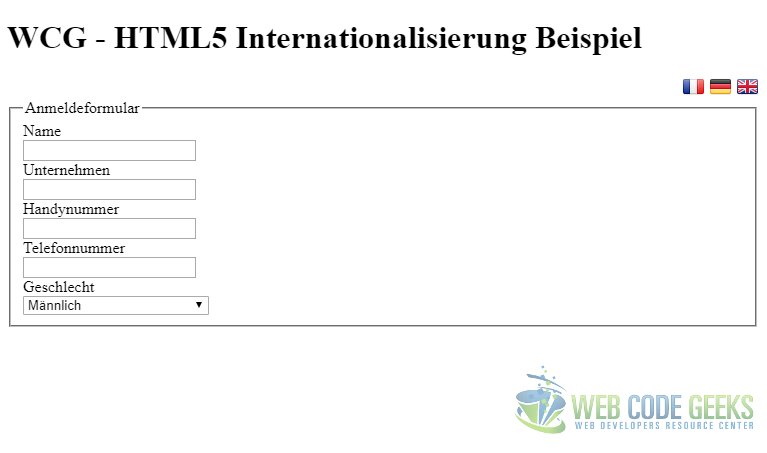
If we click on any of the flag icons we should see the switch to the appropriate language. Below are the results when we click on the german flag:
Similarly the french version of the page looks like below:

4. Running the Project
To run the project, Run the commands below at the root of the project:
> npm install
then
> node index.js
Now navigate to the URL http://localhost:8090/index.html in a browser of choice. This should take us to the landing page of the application.
5. Download the Source Code
This was a look at the HTML5 Internationalization Example
You can download the full source code of this example here : WCG — HTML5 Internationalization Example

Nice article, keep up the good work!
Nice example,
what if i just want to use the navigator.language of the browser?
So the user dont have to click on the icons!