In this article we look at how to use the noscript tag. This tag enables us to present alternate content to the user if they have JavaScript disabled in their browsers. The tag presents content wrapped inside in case JavaScript is disabled. If JavaScript is enabled then the content of this tag is not displayed. So let’s get going with a example on how to leverage the noscript tag and use it.
To be precise let us look at creating a tooltip widget which works even if JavaScript is disabled. We will implement the functionality of the widget using both JavaScript and CSS to accommodate the possibility of JavaScript being disabled in the user’s environment. We will attempt to make the tooltip work in both cases.

1. Tools & Technologies
To build the application for this example, I have used the following toolset. Some of them are required whilst others could be replaced by tools of your own choice.
- HTML5
- CSS3
- JavaScript
- Nodejs v6.3.0
- Express
- Visual Studio Code IDE
2. Project Layout
The layout of this project is as below:
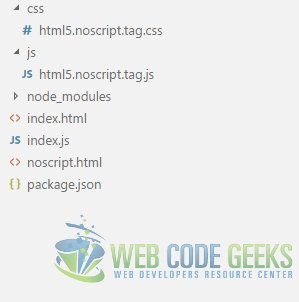
| css | This folder contains all our CSS stylesheet resources like html5.noscript.tag.css |
| js | Our JavaScript files reside in this folder like html5.noscript.tag.js |
| index.js | This is the entry point of our application. It contains server side JavaScript which implements a barebones Web Server using Express module to serve application resources to the browser. |
| index.html | This is the landing page of our application. When one navigates to our application this is the page the displayed to them. |
| noscript.html | This page demonstrates the working UI similar to the index page but without the use of JavaScript. |
3. What is noscript tag?
The noscript tag is special because it helps deal with JavaScript disabled clients. It can be used to gracefully degrade by using JavaScript-less ways to implement our UI. The contents of the noscript tag’s contents are displayed only when JavaScript is disabled in the rendering browser. We can put a message for the user about degraded experience since JavaScript is disabled and we can include CSS styles and HTML markup in the noscript tag to enable graceful degradation. This CSS and markup allows us to insert content to provide similar experience as original page with things relegated to server side which cannot be implemented without JavaScript.
A few thing to note is the content of the noscript tag is limited to the meta, link and style tags when used in the head section of the page. And this tag can be used both in the head as well as the body section of a web page.
4. Implementing a Tooltip
To demonstrate the concept of how we can use noscript tag we will try to implement a little tooltip feature on a web page. We will use the noscript tag to ensure the feature works even when JavaScript is blocked. We will implement the same experience first with JavaScript and then use just css to account for JavaScript being disabled in the browser.
4.1. HTML Markup
To start off we create an HTML page with the following HTML Markup:
index.html
<!DOCTYPE html>
<html lang="en">
    <head>
       <meta charset="utf-8">
       <meta http-equiv="X-UA-Compatible" content="IE=edge">
       <meta name="viewport" content="width=device-width, initial-scale=1">
 <!-- The above 3 meta tags *must* come first in the head; any other head content must come *after* these tags -->
       <title>WCG -- HTML5 noscript Tag Example</title>
       <noscript>
           <link rel="Stylesheet" href="css/html5.noscript.tag.css"/>
       </noscript>
 <!-- HTML5 shim and Respond.js for IE8 support of HTML5 elements and media queries -->
 <!-- WARNING: Respond.js doesn't work if you view the page via file:// -->
 <!--[if lt IE 9]>
       <script src="https://oss.maxcdn.com/html5shiv/3.7.3/html5shiv.min.js"></script>
       <script src="https://oss.maxcdn.com/respond/1.4.2/respond.min.js"></script>
 <![endif]-->
     </head>
     <body>
         <h1>WCG -- HTML5 noscript Tag Example</h1>

         <div >This is a demo text for the article</div>

         <noscript>
             <div class="tooltip">WCG -- HTML5 noscript Tag Example
                 <span class="tooltiptext">
                      This is a tooltip!
                 </span>
             </div>
         </noscript>

         <script src="js/html5.noscript.tag.js"></script>

    </body>
</html>
4.2. JavaScript
To make the tooltip work we will write JavaScript to handle the mouseenter & mouseleave events of the element for which we want to show tooltip. In the mouseenter event we will show the tooltip and hide it in the mouseleave event handler. But initially when our JavaScript we also need to create markup for the element we intend to use as tooltip. Our JavaScript code for the same would look like below:
html5.noscript.tag.js
var tooltip = document.createElement("DIV");
var tooltiptext = document.createTextNode("WCG -- HTML5 noscript Tag Example");
var textspan = document.createElement("SPAN");
var spantext = document.createTextNode("This is a tooltip!");

tooltip.style.position = "relative";
tooltip.style.display = "inline-block";
tooltip.style.borderBottom = "1px dotted black";

textspan.style.width = "120px";
textspan.style.top = "100%";
textspan.style.left = "0";
textspan.style.visibility = "hidden";
textspan.style.backgroundColor = "black";
textspan.style.color = "whitesmoke";
textspan.style.textAlign = "center";
textspan.style.padding = "5px 0";
textspan.style.borderRadius = "6px";
textspan.style.position = "absolute";
textspan.style.zIndex = "1";

textspan.appendChild(spantext);
tooltip.appendChild(tooltiptext);
tooltip.appendChild(textspan);
document.body.appendChild(tooltip);

tooltip.addEventListener("mouseenter", function(){
    textspan.style.visibility = "visible";
});
tooltip.addEventListener("mouseleave", function(){
    textspan.style.visibility = "hidden";
});
4.3. CSS
Now let us create CSS rules that would allow our tooltip to work when JavaScript is blocked by the browser. We will use the :hover class to show our tooltip. The CSS for it would look like below:
html5.noscript.tag.css
.tooltip{
    position: relative;
    display: inline-block;
    border-bottom: 1px dotted black;
}
.tooltip .tooltiptext {
    visibility: hidden;
    width: 120px;
    background-color: black;
    color: #fff;
    text-align: center;
    padding: 5px 0;
    border-radius: 6px;
    position: absolute;
    z-index: 1;
}
.tooltip:hover .tooltiptext {
    visibility: visible;
}
5. Running the Project
Now that we have implemented all the changes, let us run the project and look at the results. Navigate to the root of the project in a command window and execute the following commands in order:
> npm install
then
> node index.js
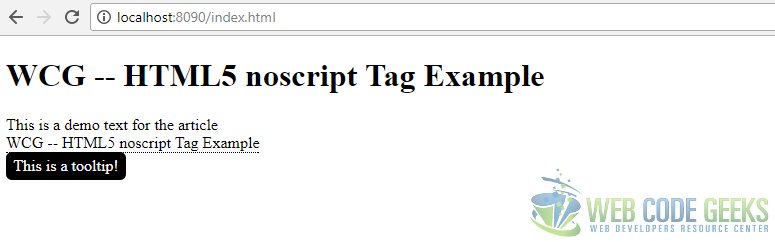
Now, navigate to the URL http://localhost:8090/index.html, with JavaScript enabled the results look like below:
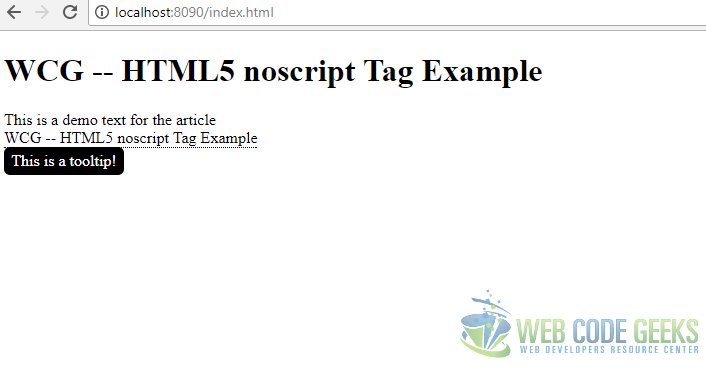
With JavaScript disabled the same URL shows up like below:
6. Download the Source Code
This concludes the example on noscript tag.
You can download the full source code of this example here : WCG —
HTML5 noscript Tag Example
