There are several possibilities for which we may use a progress bar in a web page. The most typical ones are for showing the download or upload state of a file.
HTML5 introduced a native element for this, the tag progress. So, we don’t need any jQuery plugin or custom-complicated HTML in combination with CSS for showing a progress bar; the browsers are actually able to interpret natively an element showing a progress.

As it is an HTML example, we won’t need any web server or back-end language installed in our machine, just a web browser.
For this example, the following browsers have been used for testing:
- Chromium 56.0.2924.76.
- Firefox 52.0.1.
- Opera 44.0.
- Microsoft Edge 38.14393.0.0.
1. Basic usage
The simplest use of the progress bar in HTML5 is extremely simple. We just have to add the progress tag, setting the max and value attributes. For example:
progress-bar.html
<!DOCTYPE html>
<html>
<head>
    <meta charset="utf-8">
    <title>HTML5 Progress Bar</title>
    <style>
        .wrapper {
            width: 60%;
            margin: 0 auto;
            text-align: center;
        }
    </style>
</head>
<body>
    <div class="wrapper">
        <h1>HTML5 progress bar</h1>
        <progress class="custom-progress" max="100" value="40"></progress>
    </div>
</body>
</html>
Let’s see how it’s rendered by each browser:
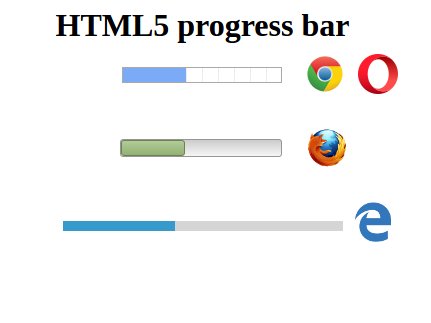
As we can see, the default rendering of the bar is pretty inconsistent across the different browsers. Let’s see how to customize it, making the progress bar look the same for each browser.
2. Styling the bar
As seen before, we shouldn’t use the default progress bar rendering. We must care about the consistency of our web pages for every browser, or at least the most relevant ones. Now, we are going to make the bar look more attractive, for every browser.
For example, for the following progress bar:

Customizing the progress bar is a bit tricky, since each browser interprets the progress tag differently. So, we will have to use pseudo-classes for different browser engines. This is how we have done it for the bar above:
style.css
/**
 * Cross-browser/Non specific selector
 */

.custom-progress {
    -webkit-appearance: none;
    -moz-appearance: none;
    appearance: none;
    width: 100%;
    height: 40px;

    /* Outer bar */
    border: none;
    border-radius: 18px;
    background-color: #303a52;
}

/**
 * Webkit
 */

/* Outer bar */
.custom-progress::-webkit-progress-bar {
    border-radius: 18px;
    background-color: #303a52;
}

/* Inner bar */
.custom-progress::-webkit-progress-value {
    border-radius: 18px;
    background: repeating-linear-gradient(
        135deg,
        #606dbc,
        #606dbc 10px,
        #465298 10px,
        #465298 20px
    );
}

/**
 * Mozilla
 */

/* Inner bar */

.custom-progress::-moz-progress-bar {
    border-radius: 18px;
    background: repeating-linear-gradient(
        135deg,
        #606dbc,
        #606dbc 10px,
        #465298 10px,
        #465298 20px
    );
}

/**
 * IE/Edge
 */

 /* Inner bar */

.custom-progress::-ms-fill {
    border-radius: 18px;
    background: repeating-linear-gradient(
        135deg,
        #606dbc,
        #606dbc 10px,
        #465298 10px,
        #465298 20px
    );
}
PD: don’t forget to include the stylesheet in the HTML page:
progress-bar.html
<head>
    <!-- ... -->
    <link rel="stylesheet" href="style.css">
    <!-- ... -->
</head>
Firstly, when using no browser selector, we do two things: reset the appearances applied by the browsers, for styling the progress bar from the scratch; and outer bar’s border and color for every browser that is not Webkit engine. This is because, for Webkit, we have to use a specific selector for this outer bar.
After this, we have to define the style for the inner bar for the remaining browsers (and also the outer one, for Webkit). The selectors are the following ones:
- For Webkit:
:-webkit-progress-barfor the outer bar, and:-webkit-progress-valuefor the inner one. - For Mozilla:
:-moz-progress-barfor the inner bar. - For IE/Edge:
:-ms-fillfor the inner bar.
Note: you may have noticed that we could reduce the repetition of the rules for the inner bar and group them, but, for some reason, when grouping them, the progress bar is not being rendered according to those rules.
3. Animations
After seeing how to customize our progress bar, it’s time for animating it. This can be easily done with a piece of JavaScript code. The simplest way is just making a “fixed” animation, that is, updating the progress manually, without actually showing a current task that is being loaded.
For this, the following JavaScript code would be enough:
script.js
setInterval(function(){
    var progress = document.getElementById('custom-progress');

    if (progress.value < progress.max) {
        progress.value += 1;
    }

}, 25);
So simple: the progress bar value will be incremented by one unit, every 25 milliseconds, until it has reached its maximum value.
PD: Don’t forget to include the script in the HTML file:
progress-bar.html
<head>
    <!-- ... -->
    <script src="script.js"></script>
    <!-- ... -->
</head>
And, for this case, we have also defined an id for the element. And, we also set the value to 0, from loading the bar from the beginning:
<!-- ... -->
<progress id="custom-progress" class="custom-progress" max="100" value="0"></progress>
<!-- ... -->
3.1. Displaying the progress value
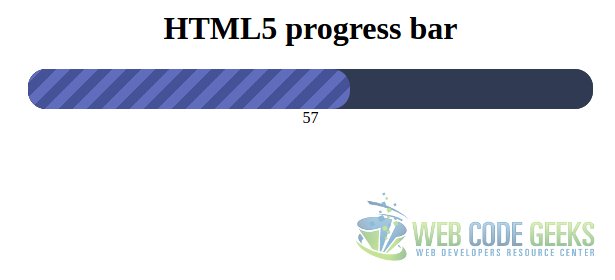
When a progress bar is being loaded, usually, the numerical value representing the progress is show with it. This can be easily done with the content property in combination with attr, showing it after the bar, for example:
style.css
/* ... */

.custom-progress:after {
    content: attr(value);
}

/* ... */
The value will be shown as in the following image, for example.
We have to take into account that, if for any case, we don’t use [0, 100] value range in our progress bar, we should use JavaScript in order to calculate the actual percentage. Otherwise, we would be showing a senseless number to the user.
4. Summary
This example has shown the usage of the HTML5 progress element, which has a native support by the browsers. But, despite that, each browser engine renders it in a different way by default, so that’s why we should customize it with CSS, for keeping a consistency, paying always attention to the selectors needed for each browser. Finally, we have seen how to make an easy animation with a very simple JavaScript script.
5. Download the source code
This was an example of progress bar with HTML5.
You can download the full source code of this example here: HTML5ProgressBarExample

Really nice article on HTML5