In this post, we will take a look at the implementation of an In-browser text editor. The editor will provide basic editing functionality like making the text bold, italic, underline, strikeout and indentation, alignment of blocks of text. A text editor provides useful functionality that can be leveraged in blog comments section apart from other kinds of websites.
1. Introduction
We will be using the contenteditable attribute along with execCommand method of the document object. So, let’s get started.

2. Tools & Technologies
- HTML5
- CSS3
- JavaScript
- Nodejs v6.3.0
- Express
- Visual Studio Code IDE
NodeJS, in essence, is JavaScript on the server-side. The Express module is used to create a barebones server to serve files and resources to the browser. I have used the Visual Studio Code IDE since I am the most familiar with it although you could others as per preference.
3. Project Layout
The layout of our project is as shown in the screen grab below:
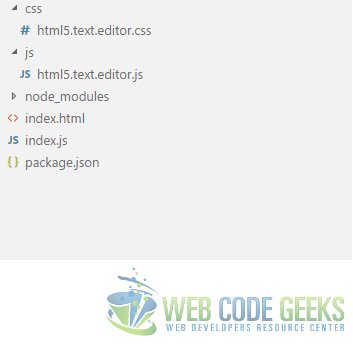
CSS Folder
This folder hosts our CSS files, namely, html5.accordion.example.css. We stylize our UI with classes in this file.
JS Folder
Our client side JavaScript files reside here. These are referenced in our HTML page(s).
index.js
I have used NodeJS and Express module to spin up a barebones Web Server for this example.
index.html
This is our Markup file, it hosts the UI of this example.
4. Implementation
To implement our editor we will proceed as in the steps listed below:
4.1. HTML Markup
We add a series of buttons, sort of like a toolbar, with each being responsible for one feature. Like a button with text “bold” to make any text selection bold and so on and so forth. The HTML markup for the same looks like below:
index.html
<!DOCTYPE html>
<html lang="en">
    <head>
        <meta charset="utf-8">
        <meta http-equiv="X-UA-Compatible" content="IE=edge">
        <meta name="viewport" content="width=device-width, initial-scale=1">
<!-- The above 3 meta tags *must* come first in the head; any other head content must come *after* these tags -->
        <title>WCG -- HTML5 Text Editor Example</title>

        <link rel="stylesheet" href="css/html5.text.editor.css" />

<!-- HTML5 shim and Respond.js for IE8 support of HTML5 elements and media queries -->
<!-- WARNING: Respond.js doesn't work if you view the page via file:// -->
<!--[if lt IE 9]>
<script src="https://oss.maxcdn.com/html5shiv/3.7.3/html5shiv.min.js"></script>
<script src="https://oss.maxcdn.com/respond/1.4.2/respond.min.js"></script>
<![endif]-->
    </head>
    <body>
        <h1>WCG -- HTML5 Text Editor Example</h1>
        <div>
            <button id="btnBold" >Bold</button>
            <button id="btnItalic" >Italic</button>
            <button id="btnUnderline" >Underline</button>
            <button id="btnStrike" >Strike Through</button>
            <button id="btnSubscript" >Subscript</button>
            <button id="btnSuperscript" >Superscript</button>
            <button id="btnRemoveFormat" >Remove Format</button>
        </div>
        <div>
            <button id="btnCenter" >Justify Center</button>
            <button id="btnRight" >Justify Right</button>
            <button id="btnLeft" >Justify Left</button>
            <button id="btnIndent" >Indent</button>
            <button id="btnOutdent" >Outdent</button>
        </div>
        <div id="editor" contenteditable="true" spellcheck="false" >
        </div>

        <script type="text/javascript" src="js/html5.text.editor.js"></script>
    </body>
</html>
Below our toolbar we add a div where the user is able to type and edit text. To make the div editable we decorate it with the contenteditable="true" attribute.
4.2. CSS Rules
We setup CSS rules to style our text editor and to set the height, width and a border around it. We also make the display of the editor div as block. Our CSS file should look like below:
html5.text.editor.css
#editor{
    width: 50%;
    height: 400px;
    display: block;
    border: 2px solid lightblue;
    margin-top: 4px;
}
4.3. JavaScript
To make our editor tick we handle the mousedown events of each of our toolbar button. In the event handler we pass the appropriate parameters to the execCommand() method of the document object. Our JavaScript code looks like below:
html5.text.editor.js
var btnBold = document.getElementById("btnBold");
var btnItalic = document.getElementById("btnItalic");
var btnUnderline = document.getElementById("btnUnderline");
var btnStrike = document.getElementById("btnStrike");
var btnSubscript = document.getElementById("btnSubscript");
var btnRemoveFormat = document.getElementById("btnRemoveFormat");
var btnSuperscript = document.getElementById("btnSuperscript");
var btnCenter = document.getElementById("btnCenter");
var btnRight = document.getElementById("btnRight");
var btnLeft = document.getElementById("btnLeft");
var btnIndent = document.getElementById("btnIndent");
var btnOutdent = document.getElementById('btnOutdent');
btnOutdent.addEventListener('mousedown', function(event){
    document.execCommand("outdent")
    event.preventDefault();
});
btnIndent.addEventListener("mousedown", function(event){
    document.execCommand("indent");
    event.preventDefault();
});
btnLeft.addEventListener("mousedown", function(event){
    document.execCommand("justifyLeft");
    event.preventDefault();
});
btnRight.addEventListener("mousedown", function(event){
    document.execCommand("justifyRight");
    event.preventDefault();
});
btnCenter.addEventListener('mousedown', function(event){
    document.execCommand("justifyCenter");
    event.preventDefault();
});
btnSuperscript.addEventListener("mousedown", function(event){

    document.execCommand("superscript");
    event.preventDefault();

});
btnRemoveFormat.addEventListener("mousedown", function(event){

    document.execCommand("removeFormat");
    event.preventDefault();

});
btnSubscript.addEventListener("mousedown", function(event){

    document.execCommand("subscript");
    event.preventDefault();

});
btnStrike.addEventListener("mousedown", function(event){

    document.execCommand("strikethrough");
    event.preventDefault();

});
btnBold.addEventListener("mousedown", function(event){

    document.execCommand("bold");
    event.preventDefault();

});
btnItalic.addEventListener("mousedown", function(event){

    document.execCommand("italic");
    event.preventDefault();

});
btnUnderline.addEventListener("mousedown", function(event){

    document.execCommand("underline");
    event.preventDefault();

});
5. Running the Project
Now that we have everything setup let us go ahead and run the project and look at the output. Firstly, we need to run the following commands at the root of the project.
>npm install
and
>node index.js
Now we need to navigate to the URL http://localhost:8090/index.html, We should see the below screen:

6. Download the Source Code
That wraps up our look at building an In-browser text editor.
You can download the full source code of this example here : WCG — HTML5 Text Editor Example

Nice article, keep up the good work!