As you probably already know, the XMLHttpRequest object is used for making asynchronous requests from the client to the server, with the technique known as AJAX.
The XMLHttpRequest object is far from being new: it’s more than 10 years old. But, with HTML5, a “level 2” of this object was introduced, with some improvements.

For this example, the following browsers have been used for testing:
- Chromium 56.0.2924.76.
- Firefox 52.0.1.
- Opera 44.0.
And, apart from the browser, we will install a web server, running in Linux Mint 18.1. Not to use any server-side language, but for a reason we will see later.
You may skip web server installation and jump directly to the beginning of the example below.
1. Installing the web server
As said before, we are not using any server-side language, so we just need a web server, without any interpreter for any language.
For example, we can install Nginx:
sudo apt-get update
sudo apt-get install nginx
After the installation the web server service should automatically start, and, if we access localhost or 127.0.0.1, we should see the Nginx welcome page.
2. Transferring BLOBs
One of the improvements was the option of allowing to transfer binary data. The simplest case can be to GET or POST some image, for example.
Let’s imagine that we want to have a page, with a button that, when clicked, creates a request for getting an image and show it. Obviously, images are binary data, which is something to take into account for making these requests.
We have chosen getting an image instead of posting one, not to have to install a web server. That means that we have to GET an image from some server. So, let’s GET the WebCodeGeeks logo, for example.
The HTML would just consist on including the script, a button and an image element, apart from additional styles:
1_blob.html
<!DOCTYPE html>
<html>
<head>
    <meta charset="utf-8">
    <title>1 - BLOBs</title>
    <script src="1_blob.js"></script>
    <style>
        #wrapper {
            width: 60%;
            margin: 0 auto;
            text-align: center;
        }
        #img {
            display: block;
            margin: auto;
        }
    </style>
</head>
<body>
    <div id="wrapper">
        <h1>1 - BLOBs</h1>
        <button id="button">Click me!</button>
        <img id="img">
    </div>
</body>
</html>
If we open it with a browser, we will just see a blank page. with a header and a button.
The interesting part is the script, let’s see it:
1_blob.js
document.addEventListener('DOMContentLoaded', function(domEvent) {
    document.getElementById('button').onclick = function(clickEvent) {
        var xhr = new XMLHttpRequest(),
            resource = 'http://localhost/WebCodeGeeks-logo.png';

        xhr.onreadystatechange = function() {
            var finishedAndSuccess = this.readyState == 4 && this.status == 200,
                finishedAndError = this.readyState == 4 && this.status != 200;

            if (finishedAndSuccess) {
                var img = document.getElementById('img');
                var url = window.URL || window.webkitURL;
                img.src = url.createObjectURL(this.response);
            } else if (finishedAndError) {
                alert('An error occured in the request, check the log.');
            }
        }

        xhr.open('GET', resource);
        xhr.responseType = 'blob';

        xhr.send();
    }
});
The first listener is to load the second listener (the one setting the onclick event) when the whole document is loaded, actually nothing to see with the request.
The first step is to instantiate the XMLHttpRequest class, often shortened to xhr. Note that we don’t have to specify that it’s its second version or similar.
Then, we set the handler to execute every time the request state changes. The request suffers changes on its state several times from the very beginning, to its end; it’s not just beginning/end. This is way we have to check that the state of the request is 4 (finished), apart from checking that it was successful (HTTP 200 code).
Checking if the request was successful or not doesn’t have any secret: if it was successful, we just add the image to its corresponding tag; and, if not, we show the error.
After defining what to do when the request is ended and successful, we have to open it, specifying the method and the resource; set that the response type is blob, and send it.
If we now try to click the button… Nothing happened. In theory, our script is correct. But this is a special case for which we have to do something different, but it’s not related to the transfer of the BLOB.
If we check the console of the browser, we should see an error message similar to the following one:
XMLHttpRequest cannot load https://www.webcodegeeks.com/wp-content/uploads/2015/12/WebCodeGeeks-logo.png. No ‘Access-Control-Allow-Origin’ header is present on the requested resource. Origin ‘null’ is therefore not allowed access.
By default, for security reasons, browsers (should) block AJAX requests to different domains, which are known as CORS (Cross-Origin Resource Sharing). If a web server doesn’t allow CORS, there’s no chance for the client: it won’t be able to get the resource.
Note: actually, transferring BLOBs is not the only change in what to data format regards. We can also set, besides text, arraybuffer or document.
2.1. Making the request to our own server
Note: these steps are not necessary. The code above is correct and it will work for contents that are allowed to be shared from other domains. What we make here is just to test it with a server that we make sure it allows CORS (our own local server).
The first thing is to allow CORS in Nginx:
cd /var/www/html/
So, for testing this, we need a server that allows cross-origin resource sharing. That’s for what we installed our own server.
Before, we have configure Nginx to send the Access-Control-Allow-Origin HTTP header to the client:
/etc/nginx/sites-enabled/default
# ...

server {
    # ...
    add_header 'Access-Control-Allow-Origin' '*';
    # ...
}
Now, we have to place our HTML and JavaScript files in the web directory, /var/www/html/, to access the HTML file via web browser, instead of locally. In my case, http://localhost/html5_xmlhttprequest_example/1_blobs/1_blob.html.
Now, we have to download the image to our server:
cd /var/www/html/
sudo wget https://www.webcodegeeks.com/wp-content/uploads/2015/12/WebCodeGeeks-logo.png
sudo chown www-data:www-data WebCodeGeeks-logo.png
Of course, we have to update our JavaScript file to GET the image locally:
1_blob.js
// ...
resource = 'http://localhost/WebCodeGeeks-logo.png';
// ...
If we now access the HTML file and click the button, we will see the image!

3. Setting a timeout
Setting a timeout is something we should do for most of the times we request an external resource, regardless the technique or method, specially asynchronous ones. Because we shouldn’t wait leave the possibility of waiting forever for the request, unless it’s explicitly necessary for the scenario.
With the level 2 of XHR, we can easily set a timeout for a request. For this, we will use the same HTML as for the example before (just changing the title of the page, the header, and the name to the script.
The script would be almost the same:
2_timeout.js
document.addEventListener('DOMContentLoaded', function(domEvent) {
    document.getElementById('button').onclick = function(clickEvent) {
        var xhr = new XMLHttpRequest(),
            resource = 'http://localhost/WebCodeGeeks-logo.png';

        xhr.onreadystatechange = function() {
            var finishedAndSuccess = this.readyState == 4 && this.status == 200,
                finishedAndError = this.readyState == 4 && this.status != 200;

            if (finishedAndSuccess) {
                var img = document.getElementById('img');
                var url = window.URL || window.webkitURL;
                img.src = url.createObjectURL(this.response);
            } else if (finishedAndError) {
                alert('An error occured in the request, check the log.');
            }
        }

        xhr.open('GET', resource);
        xhr.responseType = 'blob';
        xhr.timeout = 100; // milliseconds.

        xhr.send();
    }
});
As we can see, it’s just about setting a value to the timeout attribute of our xhr object, in milliseconds.
Additionally, we can set an ontimeout event for executing a piece of code if the timeout is reached:
2_timeout.js
// ...
xhr.ontimeout = function(timeoutEvent) {
    alert('Timeout reached');
}

// ...
4. Setting key/value as attributes of the request
In the previous specification, when we wanted to send data to the server, we had to define a string with the format key1=value1&key2=value2, which is actually quite dirty and unreadable.
In this second level of XMLHttpRequest, we can set this data in a much more tidier way, thanks to the FormData object.
Before seeing how, let’s define a HTML page with some inputs for the user:
3_sending_data.html
<!DOCTYPE html>
<html>
<head>
    <meta charset="utf-8">
    <title>3 - Sending data</title>
    <script src="3_sending_data.js"></script>
    <style>
        #wrapper {
            width: 60%;
            margin: 0 auto;
            text-align: center;
        }
        .row {
            margin-bottom: 20px;
        }
    </style>
</head>
<body>
    <div id="wrapper">
        <h1>3 - Sending data</h1>

        <div class="row">
            <input type="text" name="key1" id="key1" placeholder="Key 1" required>
            <input type="text" name="value1" id="value1" placeholder="Value 1" required>
        </div>

        <div class="row">
            <input type="text" name="key2" id="key2" placeholder="Key 2" required>
            <input type="text" name="value2" id="value2" placeholder="Value 2" required>
        </div>

        <button id="button">Send</button>
    </div>
</body>
</html>
Now, the JavaScript:
3_sending_data.js
document.addEventListener('DOMContentLoaded', function(domEvent) {
    document.getElementById('button').onclick = function(clickEvent) {
        var xhr = new XMLHttpRequest(),
            requestData = new FormData();

        xhr.onreadystatechange = function() {
            var finishedAndSuccess = this.readyState == 4 && this.status == 200,
                finishedAndError = this.readyState == 4 && this.status != 200;

            if (finishedAndSuccess) {
                alert('Success! (you can check the request with the dev tools)');
            } else if (finishedAndError) {
                alert('An error occured in the request, check the log.');
            }
        }

        var key1 = document.getElementById('key1').value,
            value1 = document.getElementById('value1').value,
            key2 = document.getElementById('key2').value,
            value2 = document.getElementById('value2').value;

        xhr.open('POST', '3_sending_data.html');

        requestData.append(key1, value1);
        requestData.append(key2, value2);

        xhr.send(requestData);
    }
});
In this case, as we don’t expect any answer from the server, we just make the checks on the status for showing if it was successful or not, nothing else.
The work has to be done before checking the state. For this situation, we have set the HTML itself as endpoint, in open, even if it won’t process the data; but if we set an non-existing file, or an endpoint of another domain, we will get an error (404 and CORS non-allowed, respectively).
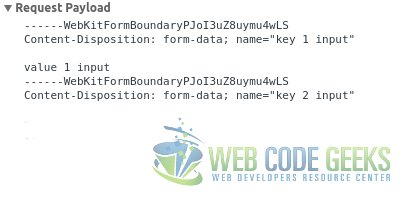
After retrieving the values, we instantiate a FormData object, and we append them in (key, value) format. Finally, we just have to pass this object to the send method.
As we don’t process this data in the backend, we can check that the data has been transferred correctly with the developer tools of the browser. The following is the output for Chromium.
5. Summary
This example has shown the improvements of the specification of XMLHttpRequest object for HTML5. This improvements include the specification of the file format, when before we could just send data in text format; setting a timeout for the request, to avoid possible infinite or very large requests, may caused by a high latency or huge files; and the improvement of setting the data, in key-value format, with the FormData object.
6. Download the source code
This was an example of HTML5 XMLHttpRequest example.
You can download the full source code of this example here: HTML5XMLHttpRequestExample
