Welcome readers, in this tutorial, we will learn the basic concepts behind routing in angular.
1. Introduction
Routing in angular is an essential part of the angular framework contained in the @angular/router package. It,
- Helps developers build single page applications with multiple states and views using routes and components
- Allows client-side navigation and routing between various components
- Allows lazy loading of modules
- Add router guards for client-side protection and allow or disallow access to the components or modules
- Various path matching strategies (i.e. prefix and full) to tell the router how to match a specific path to a component
- Easy access to route and query parameters
1.1 Routes and Paths in Angular Routing
In angular, a route is an object that provides information about which component maps to a specific path. A path is a fragment of a url that determines where exactly the resource is located the user wants to access. In angular, developers can define a route using route configurations or instance of the Router interface. Each route has the following properties i.e.
path: Specifies the path of the routepathMatch: Specifies the matching strategy (i.e. prefix or full)component: Specifies the component that is mapped to a routeredirectTo: Url which users will be redirected to if a route is a matched
For instance,
{ path: 'products', component: ProductlistComponent }
1.1.1 Route Parameters
In angular, dynamic routes are used in a web application to pass the data or application state between different components and pages. Developers define a route parameter using the colon syntax followed by the parameter name. For instance,
{ path: 'product/:product_id', component: ProductdetailComponent }
To access the route parameters, developers either use the ActivatedRoute service or the ParamMap observables starting Angular 4.
1.2 Router Outlet
The router-outlet tag in angular is a directive exported by the RouterModule and acts as a placeholder to the router where it needs to insert the matched components. It is represented by the following syntax.
<router-outlet></router-outlet>
1.2.1 Navigation Directives in Angular Routing
Angular Router provides the routerLink directive to create links. This replaces the href attribute in the anchor tag. It also provides the routerLinkActive for marking a link as active. For instance,
<a [routerLink]='/product'>Products</a>
Always remember, an angular router can support more than one outlet in the same application. The main outlet is called as a primary outlet and other outlets are called secondary outlets. Now open the visual studio code and let us see how to implement this tutorial in angular 6 frameworks.
2. Angular 6 Routing Example
Here is a systematic guide for implementing this tutorial.
2.1 Tools Used
We are using Visual Studio Code and Node Terminal to compile and execute the angular code on a browser.
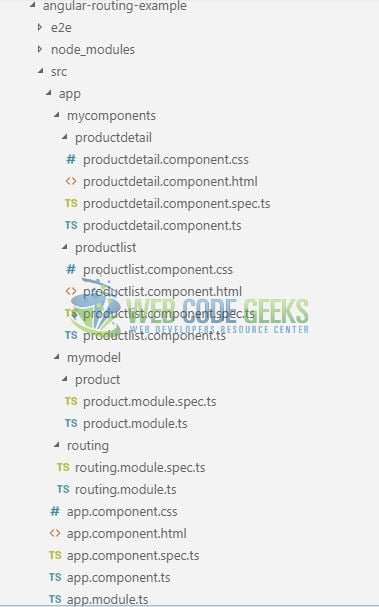
2.2 Project Structure
In case you are confused about where you should create the corresponding files or folder, let us review the project structure of the angular application.
3. Creating Angular application
Run the ng new angular-routing-example command in the npm console to create a new angular project. Once the new project is created, following the below steps.
3.1 Creating Product Model
Run the ng g m mymodel/product command in the npm console to create a product module having two member variables. Add the following code to the product.module.ts file.
product.module.ts
import { NgModule } from '@angular/core';
import { CommonModule } from '@angular/common';

@NgModule({
  imports: [
    CommonModule
  ],
  declarations: []
})

export class ProductModule {

  productid: Number;
  productname: String;

  constructor(id: number, name: string) {
    this.productid = id;
    this.productname = name;
  }
}
3.2 Creating Product Components
Follow the below steps to create the two different product components.
3.2.1 Product List Component
Run the ng g c mycomponents/productlist command in the npm console to create the product list component. Add the following code to the productlist.component.ts file.
productlist.component.ts
import { Component, OnInit } from '@angular/core';
import { Router } from '@angular/router';

// Importing the product model service
import { ProductModule } from '../../mymodel/product/product.module';

@Component({
  selector: 'app-productlist',
  templateUrl: './productlist.component.html',
  styleUrls: ['./productlist.component.css']
})

export class ProductlistComponent implements OnInit {

  public productsarray: ProductModule[];

  constructor(private _router: Router) {
    console.log('Product list component is initialized.');
  }

  // Initializing the products array at the component startup
  ngOnInit() {
    this.productsarray = [
      new ProductModule(1, 'Apple iPhone'),
      new ProductModule(2, 'Google Home Mini'),
      new ProductModule(3, 'Sony Walkman'),
      new ProductModule(4, 'Samsung Galaxy'),
      new ProductModule(5, 'Sony Playstation Portable'),
      new ProductModule(6, 'LG 4K HDR Television'),
      new ProductModule(7, 'Google Pixel 3 XL'),
      new ProductModule(8, 'Amazon Alexa')
    ];
  }

  // Method to get the selected product id to display details on the "product-detail" component
  getproductdetails(product: ProductModule) {
    this._router.navigate(['/product', product.productid]);
  }
}
Add the following code to the productlist.component.html template file to display the product list to the user.
productlist.component.html
<div class="container">
  <h3 class="text-danger">Product List</h3>
  <small class="text-muted">This component displays the product list.</small>
  <div> </div>

  <table class="table table-bordered">
    <thead>
      <tr class="text-center">
        <th scope="col">Product Id</th>
        <th scope="col">Product Name</th>
      </tr>
    </thead>
    <tbody>
      <tr class="text-center" *ngFor="let product of productsarray">
        <td><a style="text-decoration: none; cursor: pointer; color: blue;"
            (click)="getproductdetails(product);">{{product.productid}}</a></td>
        <td>{{product.productname}}</td>
      </tr>
    </tbody>
  </table>
</div>
3.2.2 Product Details Component
Run the ng g c mycomponents/productdetail command in the npm console to create the product list component. Add the following code to the productdetail.component.ts file.
productdetail.component.ts
import { Component, OnInit } from '@angular/core';
import { ActivatedRoute } from '@angular/router';

@Component({
  selector: 'app-productdetail',
  templateUrl: './productdetail.component.html',
  styleUrls: ['./productdetail.component.css']
})

export class ProductdetailComponent implements OnInit {

  selected_productid: Number;

  constructor(private _acroute: ActivatedRoute) {
    console.log('Product detail component is initialized.');
  }

  ngOnInit() {
    // Fetching the id and showing the selected product details on the "product-detail" component
    this._acroute.params.subscribe(
      param => this.selected_productid = param.product_id
    );
  }
}
Add the following code to the productdetail.component.html template file to display the selected product details to the user.
productdetail.component.html
<div class="container">
    <h3 class="text-danger">Product Detail</h3>
    <small class="text-muted">This component displays the details of the selected product.</small>
    <div> </div>

    <div id="productdetail">
        <h5>Selected product is= <span class="text-success">{{selected_productid}}</span></h5>
    </div>
    <div> </div>

    <div style="text-align: right;">
        <a routerLink="/products" class="text-muted" style="text-decoration: none;">Go To
            Products List</a>
    </div>
</div>
3.3 Creating a Routing Module
Run the ng g m routing command in the npm console to create a routing module. Add the following code to the routing.module.ts file.
routing.module.ts
import { NgModule } from '@angular/core';
import { Routes, RouterModule } from '@angular/router';

// My product-list and product-detail components
import { ProductlistComponent } from '../mycomponents/productlist/productlist.component';
import { ProductdetailComponent } from '../mycomponents/productdetail/productdetail.component';

// Configuring the routing paths
const routes: Routes = [
  { path: '', redirectTo: '/products', pathMatch: 'full' },
  { path: 'products', component: ProductlistComponent },
  { path: 'product/:product_id', component: ProductdetailComponent }
];

@NgModule({
  imports: [RouterModule.forRoot(routes)],
  exports: [RouterModule]
})

export class RoutingModule { }
3.4 Add Data to the Application Module
Add the following code to the default module of the angular application
3.4.1 Application Module
Add the following code to the app.module.ts file.
app.module.ts
import { BrowserModule } from '@angular/platform-browser';
import { NgModule } from '@angular/core';

import { AppComponent } from './app.component';

// My application components
import { ProductlistComponent } from './mycomponents/productlist/productlist.component';
import { ProductdetailComponent } from './mycomponents/productdetail/productdetail.component';

// Injecting the routing module
import { RoutingModule } from './routing/routing.module';

@NgModule({
  declarations: [
    AppComponent,
    ProductlistComponent,
    ProductdetailComponent
  ],
  imports: [
    BrowserModule,
    RoutingModule
  ],
  providers: [],
  bootstrap: [AppComponent]
})
export class AppModule { }
3.4.2 Application Template
Add the following code to the app.component.html template file.
app.component.html
<div class="container">
  <h2 align="center" class="text-info">Welcome to Angular Routing example!</h2>
  <hr />

  <!-- To activate the routing the angular application -->
  <router-outlet></router-outlet>
</div>
4. Run the Application
As we are ready with all the changes, let us compile and run the angular application with ng serve –o command. Once the projects are successfully compiled and deployed, open the browser to test it.
5. Project Demo
Open your favorite browser and hit the angular application url (http://localhost:4200/) to display the index page of the application.
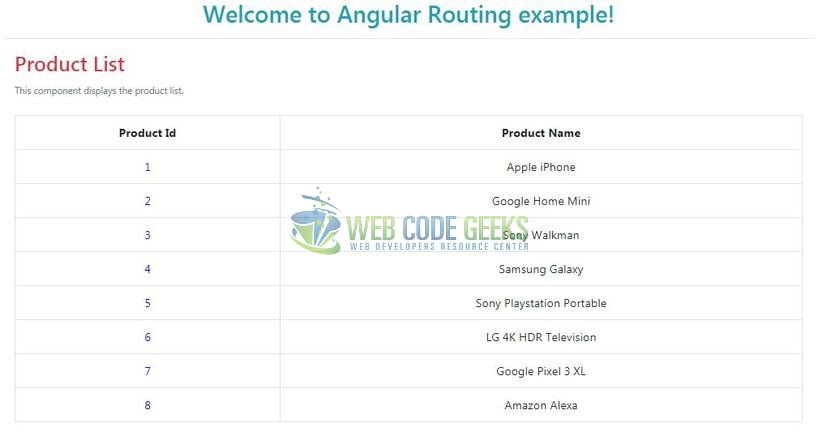
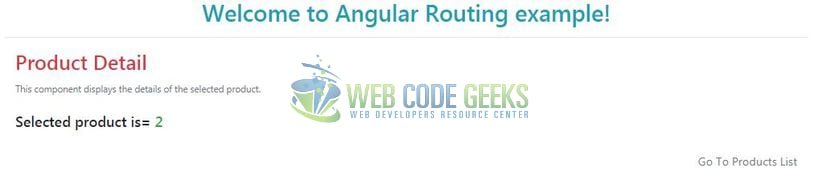
Click on the product id to navigate to a “product-detail” component and display the selected product details to the user.
That is all for this tutorial and I hope the article served you whatever you were looking for. Happy Learning and do not forget to share!
6. Angular 6 Routing – Conclusion
In this section, developers learned how to create an Angular Routing example. Developers can download the sample application as an Eclipse project in the Downloads section.
7. Download the Eclipse Project
This was a tutorial of Routing in an angular application.
You can download the full source code of this example here: Angular 6 Routing Example
