Angular.js is one of the frameworks in the programming world that is acutely becoming one of the most widely-used of them, as it’s incomparable in providing us with the means to create dynamic and efficient web-apps.
There are a number of useful features that have made Angular not only famous for, but also irreplaceable in web-developing. One of these features is routing, or more accurately ng-route, which is best represented by it’s most characteristic form of usage: Single Page Apps!
Table Of Contents
1. What are Single Page Apps?
1.1 The Good
If you are even remotely familiar with Angular.js’ benefits, then you have had the chance to already hear about “Single Page Applications” or SPAs. Single Page Apps are websites that are built with the concept of phone/tablet apps in mind. That means that you only have to load the website once and when going from one page to another you’ll have the view automatically loaded ahead of time, so that you don’t have to wait for them loading each time you click something.
Of course it has a number of benefits, one of the most obvious ones being having a very sleek, not-annoying appearance. In fact, not only it is simply not annoying, but your app will be fast and responsive, giving the user the feel of a native app. Which immediately translates to improved user experience, and a considerable one at that.
To get you different views in each page loaded without having to reload or refresh the app is one of the ways this goal is reached. Angular pre-loads and caches all your pages, so that is not needed. That also gives your app the ability to work offline too, as the views are already loaded and cached, and ready for use.
Another benefit for the programmer is the fact that you will not have to repeat and copy paste code from one view to the other to give your app a coherent feel. You will only have to write that code once, and just go on coding the part that will be different. No more repeating anything, and while practice makes perfect, it can become so burdensome at times that you might feel tempted to give it up for good. With SPAs this temptation is definitely gone.
Is Angular the only one able to provide us with these perks? No, you can also use vanilla Javascript and AJAX calls, but Angular does make it simpler and easier to understand, while being more efficient at that.
1.2 The Bad
So what is the catch? Well, nothing is perfectly perfect, Angular SPAs have their own pitfalls too. One of the most obvious ones is that while you don’t have to reload each page whenever you click something, the initial load of your app will take longer. That’s because you are loading everything at once and every resource your app will need should be downloaded right away.
Another thing that you may or may not encounter depending on the level of expertise you have on Angular is the fact that while your code will be shorter, it will also be more complex. There’s a saying in my country which basically translates to “it’s harder to write short and explain all I mean”, and it’s very fitting in this case. You will have to write less code, but you’ll have to think well every line of it.
Another negative aspect of SPAs is the fact that to make your app SEO friendly, you will have to use special techniques and perform regular maintenance on them, as Javascript apps are not automatically SEO friendly. That happens because the content is built dynamically and it’s very difficult for these things named crawlers to index your page content. While we will not go too deep into explaining them, Google has already provided us with a guide which can be used to make these kind of apps crawlable.
Finally, your user will have to have Javascript enabled in their browser in order for your Single Page Application to work properly. However, almost everyone has it nowadays, so I’d say it is not that big of a deal.
2. A Head start on our SPA
The Single Page App that we will build in this example will be a very simple one that will only have three pages so that our point can be illustrated but we won’t add any fancy stuff there. That is an opportunity for you to use the knowledge and build bigger and more complex apps similar to this one in the future, combining Angular.js with a number of other technologies, be it front or back-end.
2.1 What we’ll use
We will use a number of other technologies except AngularJS to make our project more complete and to give a head start to those of you who are still in the beginning of your journey as a developer. Those would be:
- npm as a packet manager for Javascript. It will help us find the necessary packages for our project. Of course, in this one, it’s use will be minimal, so if you’re here only for the Angular part, you don’t have to worry at all. However, if you’re working on a team it can facilitate your work in a lot of ways.
- Bower will be our manager of every framework, library, asset and utility, helping us keep track of them and making sure they’re up to date. Bower is more focused on front-end technologies, while
npmis usually used for backend and everything else. - Twitter’s Bootstrap will be the visuals of the website. It’s a framework that will take care of all the styling part of the app, from grids, to button, to colors, to everything CSS as it’s a framework of exactly that.
- As an alternative to Bootstrap you might want to use MaterializeCSS which some people might find easier to use and in very small projects like ours, it might be more fitting. However, we’ll stick to Bootstrap with this one, as it’s usually a more popular choice and this way this tutorial will help more people.
Let’s see how to get everything ready!
2.2 Getting everything ready!
First of all we have to create a directory where we’ll keep everything, in our case I named it SinglePageApps but the choice is yours. Next up we create a basic HTML file named index.html and a Javascript file named app.js. Then we get the packages we mentioned above and start installing them one by one.
2.2.1 Installing npm
First we install npm, and it’s very easy to do so. You just have to go and download Node.js here and that is it, npm comes with it as a whole package. You can try and see if it really is installed by opening the terminal in your directory and running npm -v which will give you the version of npm if you have it or a notice if you don’t.
2.2.2 Installing Bower
After doing that we will install Bower, and we’ll use npm to do it. You have to run the command below in the terminal:
terminal
npm install bower
After this command takes effect you will see the folder node_modules added to your directory. After installing Bower, you have to run the command below to set up your bower.json file:
terminal
bower init
You will be asked to enter a bit of data related to the project and then the manifesto file is ready, which means you can now use Bower to your liking.
2.2.3 Installing Angular, Angular-Route and Bootstrap
You can use Bower to install Angular, Angular-Route and Bootstrap specifically. You only have to run one line for each of them, namely these:
terminal
bower install angular
bower install angular-route
bower install bootstrap
You’ll find everything stored in the new bower_components folder, together with jQuery, since it’s needed for Bootstrap to function properly. With this, all the needed installments are done, we just have to go on with the app.
3. The HTML part
As usually, we’ll divide our app into an HTML part and a Javascript part (which will in fact be all Angular). Let’s start with the HTML part, to give a structure to our app and start changing things to reach into a full all step by step. First, we’ll only have the basic setup of the HTML file, no links no scripts. It’ll look like below:
index.html
<!DOCTYPE html>
<html lang="en">
<head>
    <meta charset="UTF-8">
    <title>Single Page App for WebCodeGeeks</title>


</head>
<body>

</body>
</html>
But where are all the other parts we mentioned above? Let’s add them!
3.1 Linking and Scripting external parts
First of all we have to add Angular and Angular-Route as that’s the whole point of the functionality of our app. You can do that by adding the code snippet below in the <head> section of our index.html file:
index.html
<script src="bower_components/angular/angular.min.js"></script>
<script src="bower_components/angular-route/angular-route.min.js"></script>
After doing that we link and script the Bootstrap components doing the same with the code below as we did with the one above:
index.html
<link rel="stylesheet" href="bower_components/bootstrap/dist/css/bootstrap.min.css"/>
<script src="bower_components/bootstrap/dist/js/bootstrap.min.js"></script>
There are also a number of other external parts that we will have to link and script into our page but we will mention them when we use them to avoid confusion.
3.2 The common part
As we said, there is a part that will be common for every page of the app. That is what we will be building now. But first we have to add the attribute ng-app="app" into our <body> tag to show the browser where the Angular app will be placed. You can place it anywhere, which means that you can make your whole website an Angular app or just a part of it, depending on your user’s needs and what you want to show them.
Then we create the buttons which will be used as triggers to go from one page to the other. The code would go like below:
index.html
<a href="#/"><button class="btn btn-primary">Homepage</button></a>
<a href="#/about"><button class="btn btn-info">About</button></a>
<a href="#/date"><button class="btn">Date</button></a>
What we’ll have by now is this:
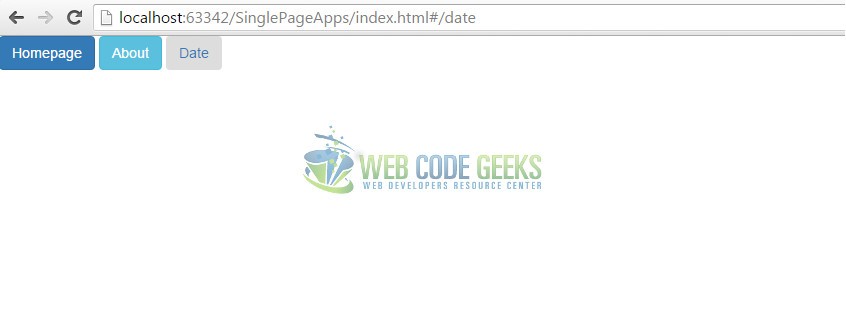
How did the colors and the styling come into play? And also, if you notice the URL even the link changes if you click one of them (despite the fact that nothing else changes when you click, but we’ll get to that in a minute). That is a result of the class attribute that we added to each button. Bootstrap allows us to change the style of the buttons by changing that attribute. Except for the ones we used there are also btn-success, btn-warning and btn-danger which would make the buttons go green, yellow and red respectively.
The URL is changed using the href attribute. Note that we use the # to navigate to the pages, so that our browser doesn’t get confused and think that we’re really changing the website we’re visiting. It’s important because then we wouldn’t have an SPA at hand at all but just a regular website.
The next part is showing the browser where is the part of the app that will change. To do that you just have to add the code below whenever you want them to appear:
index.html
<div class="row">
    <div ng-view>
        <!-- View goes here -->
    </div>
</div>
That’s basically all that you have to put in the main file in order for you to have a SPA: the trigger for the multiple pages and the ng-view directive which makes it possible for what you see on that part to be different each time you click a different button.
4. The Javascript part
We’ll call this part the Javascript part because basically Angular is a Javascript framework, but you can call it Angular if you want things to be more strict, it won’t change a thing for the app.
4.1 Creating the main module
First of all, in order for you to have an Angular app, you will first have to create the Angular module. You remember that we placed the attribute ng-app="app" inside our <body> tag. app will be the name of our module, which you’ll see included in the code snippet below:
app.js
var app=angular.module('app',['ngRoute']);
As you see, besides the name of the module we have added ngRoute as an injected dependency, which is necessary for the routing process which we’ll discus below in detail.
4.2 Configuring the routes
angular.module() provides us with another function named config() which will help us set up our routes.
But let’s create a folder named pages first, which will contain all three of the pages we’ll create. For the moment leave it at that, and we’ll get back to the pages later.
To configure the routes you have to use the config() function like below:
app.js
app.config(function($routeProvider){
    $routeProvider

        //default page
        .when('/',{
           templateUrl : 'pages/homepage.html',
           controller  : 'Homepage'
        })

        //about page
        .when('/about',{
            templateUrl : 'pages/about.html',
            controller  : 'About'
        })

        //date page
        .when('/date',{
           templateUrl : 'pages/date.html'
           controller  : 'Date'
        });
});
You see that we have used $routeProvider right away when using the config() function. It is just a provider for the ngRoute module. We have injected $routeProvider as a parameter to the function whose when() function can be used to configure the routes. $routeProvider is also used in case we want the route paths to be case sensitive, as it provides us with a property named caseInsensitiveMatch to do just that. By default the route paths are case insensitive, which would mean that this property is by default set to false, and to make the path case sensitive you’d have to change it’s value to TRUE. However, it’s not really advised, as it can make browsing directly to the link by writing it in the URL bar of the browser more difficult.
The when() function will take two parameters: the route name and the route definition. The route definition is an object which contains multiple details for a route, such as templateURL which is a relative location of the view file, starting from index.html; and the controller associated with the view. With that the routes are configured, but what about the controllers? We didn’t see them anywhere!
4.3 Creating the controllers
Controllers are basically what makes the pages appear in the ng-view and be functional, else they wouldn’t be visible even though we did create them. We will create a separate file for them, to keep the code clean and organized. Let’s name it controllers.js.The code for each of them would go like below:
controllers.js
app.controller('Homepage',['$scope',function($scope){
    $scope.homepage = "Homepage";
}]);

app.controller('About',['$scope', function($scope){
    $scope.about = "Lorem ipsum...";
}]);

app.controller('Date',['$scope', function($scope) {
    $scope.now = new Date();
}]);
We use the function app.controller() to create each controller. Notice that the first part, app, is also the name of the angular module, as we defined it in the previous section when we created the module, and also the attribute on the <body> tag. If you don’t want it to be similar to the name of the attribute which is ng-app you can call it something else, it doesn’t matter. What matters is that it’s used properly in every part of the code.
This function takes two parameters: the name of the controller, and it’s function, or what you want the controller to do. Both are obligatory, and you have to pay very close attention to the second parameter because it’s what your controller will do. It’s customized, so you can do whatever you wish.
As you see, each page will just show a small phrase, except for the third one, which will show us the date. With this, we’re done with the Javascript part.
5. The HTML for the pages
All that’s left to be done now, is to only write the markup of each of the pages of our SPA. We already created a folder that will contain the HTML files for each page, so now we create these HTML files. In our case, I’ve named them homepage.html, about.html and date.html.
Below you’ll ave everything that goes into the homepage.html file:
homepage.html
{{homepage}}
Yes, it’s just that expression! No, not even the basic HTML structure is needed, that is already set by the common part of the HTML! The next two files will contain the code snippet below:
about.html
{{about}}
For this one too we’ve used an AngularJS expression, which are generally written inside double braces and are Angular’s way of binding data to the HTML structure. Of course, you wont see {{about}} displayed in your page but the information that this expression carries. That is specified when building the controllers. The expressions can even contain variables and operators, but in our case, we’ve kept it simple.
However, keep in mind that if you place the expression outside the jurisdiction of ng-app, it will be displayed just as it is written and will not be resolved by Angular.
date.html
{{now |date:'medium'}}
In the last one we’ve also used a filter to stylize the date format a bit, but yeah, it’s just that. There are a number of predefined filters for numbers in general and date in particular. The one we’re using here is medium, which would display the date in the MMM d, y h:mm:ss a format, making it look something like this: Jan 11, 2016 9:05:08 AM.
6. Wrapping up
To wrap it all up, you shouldn’t forget to link and script all the custom files we created into the main one. Those would be: the app.js file and the controllers file. If you want to add any files for styling etc. you have to add them all for your SPA to work properly. Just add the part below:
index.html
  <!-- Custom files -->
    <script src="app.js"></script>
    <script src="controllers.js"></script>
With that, you’re good to go! When you click the Homepage button, you’ll look at this view:

It looks very simple and unflattering when you compare it to other websites on the internet, but keep in mind that this is only the beginning. Step by step you can make your website one of the very best you could find!
7. Making your App SEO friendly
You might have heard of SEO a lot lately since it’s no more just an added bonus for websites but it’s starting to become a requirement as website owners vie for the attention and views of an always bigger and expanding audience. It is, of course, understandable, as everything is starting to be measured by number of clicks, and even getting paid for them, so why not make your app SEO friendly too, while you’re at it?
SEO is an acronym for search engine optimization, which is a number of techniques and methods used to make a website appear as higher as possible in the list of the Search results of a search engine, because a higher ranking in the search results would definitely mean higher user traffic. But how you can do that depends on how the search engines index your website.
Google has released a guide to this, which boils down to this: They use crawlers to index pages. These crawlers find URL that look legit and uncluttered (which means that you should give some thought to what you place in templateURL for each page) and ask the servers for the contents of the webpage corresponding to it. The webserver returns an HTML snapshot of the page which contains it’s content and is used to index your page based on it.
Problem is, since our app is basically built with Javascript (as Angular is a Javascript framework in essence) that would mean that the content is built dynamically. So when the crawler asks for the content of the page it will be difficult because it might be still not generated by the browser.
Thankfully there are senior developers out there that believe that SEO is not a privilege but a right, so they created services that make Javascript based webpages crawlable, and Angular in particular too. These solutions include:
- Set up a Prerender service with Prerender.io which would take HTML snapshots of your website and then serve them to the crawlers when needed. It can also be used for BackboneJS and EmberJS except for Angular
- You can use similar services such as Brombone, SEO.js or SEO4Ajax.
- Another solution would be to create a similar service of your own.
Even for the biggest pitfalls in Angular can be found a solution, and that is one of the reasons why it is being so widely used in the programming world.
8. Download the source code
This was an example of Single Page Apps with AngularJS.
You can download the full source code of this example here: SinglePageApps

In your app.js file, you are missing a comma (,) after the line 20: templateUrl: ‘pages/date.html’
Dear Ms. Balliu:
I’m sorry to inform you that I couldn’t get neither your published nor your downloaded code to work properly. I tried running it on Ubuntu 16.04 but it was impossible. Debugging it would be rather difficult as I am a complete noob at Angular. Would greatly appreciate some sort of errata file.
Thanks
Jorge
Hello Mr. Reyes-Spindola, In your case, you will have to install jQuery manually (execute “npm install jquery” in the terminal and script it into index.html), the logic of the app will be the same. That should make your code work properly if you’ve followed all the other instructions properly. However, I’m updating the downloadable code with this new line so that you can retry it from that (and for who might encounter the same problem as you ^.^ ). Please don’t hesitate to let me know about any other thing that you need help or clarification on. PS: The best… Read more »
This article has enhanced my comprehension in this area. Check this out, it is something similar that might be helpful http://bit.ly/29WF6Qi.
The code you provide with the link does not work properly : when opening index.html in Chrome the browser dev tools complain about several errors… I started by trying this example in the AngularJS Cookbook, I installed jquery and included it but still I got errors.
Ok. That didn’t work ??? I found the missing “,” and did the “npm install jquery” thing, which gave me a node_modules/jquery/.. subdir. Comparing to the “SinglePageApps” structure, tell me that it maybe is wrong. npm uninstall jquery and bower install jquery gives me something similar to the zipfile. I notice that your index.html don’t <script jquery but I put it in over the angular and bootstrap stuff. Still no reaction. The homepage is displayed as default, but nothing happens when clicking on "About" and "Date". This code is live at http://spa-1.fumlersoft.dk if someone feels the need to see the… Read more »
Really appreciated this tutorial; I learnt a lot; please do keep them coming :-)
Just to give something back, here are a couple of fixes that seem to be needed with the v1.6.1 of Angular that I am using…
Something in Angular has changed and your original routing no longer works. Fixed it by adding exclamation marks (!) in index.html like so:
Homepage
About
Date
Also, Bootstrap complains in the web browser console that it needs JQuery, so again, in index.html, before the bootstrap script sources, added:
and the error has gone.
Once again, many thanks!
Oh, how annoying: HTML gets removed from posts!
The above should show:
{code}
Homepage
About
Date
{code}
and
{code}
{code}
I give up!
can you plz tell me this code is working properly.if yes so this code is good for my single page website..
This coding is very helpful for me to apply it on my single page.
Thanks for helpful information.