These days, Todo Apps are considered much like the former “Hello World!”, which means that a considerable part of the programming community uses Todo apps as a mean to get started with using a particular technology, especially in front end.
This is one of the reasons why the number of Todo apps available on the internet by now is reaching very outstanding numbers. However, for a variety of reasons, these apps are often obsolete and do not help people actually do their tasks at all. How can you build a Todo app of your own, which serves not only as the start to learning a programming technology, but also to be used afterwards? Let’s see!
1. Why build Todo Apps?
By now we have hundreds of apps ranging from simple lists of things that need to be done, to apps that curse at you until you complete the tasks you have yet to do. But why build these apps at all? It’s remarkably fulfilling to spend so much time organizing and planning instead of actually getting stuff done. I’m not the only one who does that! Actually doing these tasks that you have listed is all what matters, and time has proven that actually writing them in to todo lists doesn’t actually help do them. In particular, the iDoneThis startup revealed that over 41% of the tasks placed into its system were never completed. So why do so many programmers build them?
First things first, as a programmer, the reason why I built my first Todo App was as a rite of passage of learning a new programming language, which is a more common reason than you’d think. Trailing closely after the Hello world, the Echo, and the simple calculator examples, creating a TODO list is one of the rite of passage entering the world of whatever language or environment. Let’s see how to implement a TODO using AngularJS.
2. What we’re doing
The Todo App we’ll be building is a very usual shopping list, one that you can later on adapt into a more and more complex app, until it grows to the point of screeching at you when you leave something unfinished. Kids, these days! So where do we start?
2.1 Getting started
Before getting on the crust of building a todo app, we will have to do some preparing first, get the field ready. Let’s create a very basic index.html main file, in which except for the customary HTML structure, we also place the angular.min.js file, making it look like below:
index.html
<!DOCTYPE html>
<html lang="en">
<head>
    <meta charset="UTF-8">
    <title>TodoApp</title>

    <script src="https://ajax.googleapis.com/ajax/libs/angularjs/1.4.8/angular.min.js"></script>

</head>
<body>

</body>
</html>
The first real step would be to create an Angular app, which we’re calling myShoppingList and add a controller named myCtrl to it. That would be done using the code below, after first having created a custom Javascript file named app.js:
app.js
var app = angular.module("myShoppingList", []);
app.controller("myCtrl", function($scope) {
    $scope.products = ["Milk", "Bread", "Cheese"];
});
In the first line of the code above we have actually created the module for our app, and the rest is just creating a simple controller. Our controller is pretty simple: its only function being to add an array of products to the already existing $scope of it. We have placed Milk, Bread and Cheese as default values, which can be changed at will by our user.
But this is only the back part, the one invisible. How do we make all of this appear on the app?
2.2 HTML to make miracles visible
Let’s get back to the HTML file and make some changes there, in order to make it possible for all the Angular stuff to be linked to the view. First of all, do not forget to script the file in, or just use one file for all if you’re more comfortable like that. Take a look at the snippet below:
index.html
<div ng-app="myShoppingList" ng-controller="myCtrl">
    <ul>
        <li ng-repeat="x in products">{{x}}</li>
    </ul>
</div>
We have placed the ng-app="myShoppingList" inside a div tag in order to make that into the Angular App, everything outside of it is not considered Angular. Except for that you see that we have placed also ng-controller="myCtrl" in order to show the jurisdiction of the controller, and this is how we know that everything inside that is changeable by this controller.
What we see except for these, is an unordered list made of each product in the products array. Even though all you see there looks like a single list item, the ng-repeat="x in products" makes it possible for this to be repeated as many times as there are items in the array. The rest is a simple Angular expression that displays the value of the x variable.
3. Adding Items
After setting the field, what’s left is learning how to add and delete items from a list. But let’s start with adding and then go on from there, since it is much more possible for you to be involved in a new thing for which you have things to do, than actually do previous ones in your list!
This will be done by making changes both in the HTML main file and also in the custom Javascript file where we have stored previous Angular.js code. First of all, let’s focus on the main file. We add the code snippet below just after the unordered list:
index.html
<input ng-model="addMe">
<button ng-click="addItem()">Add</button>
What we have done here is add an input field after the list of items and bound that to our application using the ng-model directive. After that we have placed a button, which uses the ng-click directive in order to help it run the addItem function. Haven’t heard it before?
As we said, there is still a part of adding items to our list that we have not dealt with yet. That would be the function addItem() and addMe. The code would go like this:
app.js
$scope.addItem = function () {
        $scope.products.push($scope.addMe);
    }
We add this inside our controller, just after stating our array items. As you see, we have created a function named addItem() which uses the value of addMe that the user has put in the input field and adds it to the list of products that we have specified before. With this, now the user is fully able to add new items to the shopping list you just created!
4. Removing Items
Removing items from a Todo list is just as easy as adding them, and also performed into two small tasks: changing the HTML main file and changing the app.js file. This time we’ll start by creating a function that removes items from your list by using an index for each of them as a parameter. The code would go like below:
app.js
$scope.removeItem = function (x) {
        $scope.products.splice(x, 1);
    }
The code would go right after the addItem() function inside the controller, and simply removes the item with the index passed as a parameter to it. What is a bit more different than usual is the HTML part of removing an item from the list. What we do is nest the code snippet below inside the <li> tag, right after the expression in double brackets:
app.js
<span ng-click="removeItem($index)">×</span>
In the HTML, what we do is simply make a <span> element for each item, and give them an ng-click directive which calls the removeItem() function with the current $index. Easy, right?
5. Handling Errors
Our app works! But not quite, unfortunately. There are cases such as when the user tries to enter the same item twice or when the item to be entered is an empty one, that the app wouldn’t work. In these cases, what we usually do is put out a warning or an alert of some type to let the user know of this. In order to do that, we would have to make some small changes in the code that we have used for our controller.
The inside of our function for adding items in the list should now be replaced with the code snippet below:
app.js
$scope.errortext = "";
        if (!$scope.addMe) {return;}
        if ($scope.products.indexOf($scope.addMe) == -1) {
            $scope.products.push($scope.addMe);
        } else {
            $scope.errortext = "The item is already in your shopping list.";
        }
What you see above means that, firstly, if the value of addMe is empty, then to not take any action, and not include the empty string in the list. The second part of it is an if-else conditional, meaning that in case the item that you want to add to the list is not previously there (or its index is -1, the default for invalid indexes) then you do add it, but if it already is, you just show a message to the user alerting them that the item is on the list already.
The next change would be that of the removeItem() function. The code for the contents of this function would go like below:
app.js
$scope.errortext = "";
$scope.products.splice(x, 1);
In this case we simply present the user with an empty string instead of an errortext, which we know would take the value This item is already on the list! in case of an actual error, and the rest of it is just the same. Now you have a handy Todo app in your hands, made entirely of AngularJS, that would look like below:
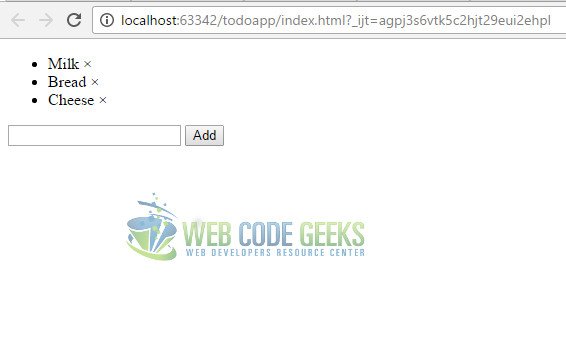
Which, admittedly, is not the coolest-looking one, but you can work on its view yourself! The inner-workings are exactly the same, and you now have a very functional Todo App! Congrats on this milestone of your learning experience!
6. Download the source code
This was an example of a Todo App in Angular.js.
You can download the full source code of this example here: todoapp

Hi, lovely example, I was able to code my first angular app ! Thank you for the simplicity of it. One simple question : is there any code to add to index.html to make the errortext appear, for it doesn’t. I tried adding
but it doesn’t work.
Also, how can I clear the input value after adding the item to the list ?
As far as the error text appearing, the if statement after $scope.errortext = “”; takes care of that. You may have to push it to a div but from the looks of it the errortext should appear in the input box. Also along the lines of input box, as part of addItem you can set the txtInput.text = “”; to clear it as part of the add operation but you may want to do that conditionally so you don’t wipe out the errortext if it exists.
Error Text not appearing. I built the app from scratch and when the error wouldn’t show I downloaded the source code and copied it all in to my project. Still no ErrorText. when I click it just stalls. NO console error either. Thoughts?