In the previous installment of this series we’ve learned how to perform End-to-End application testing using Jasmine and Protractor. In this part, we’ll discuss how to test controllers and how to automate this process. In fact, running tests manually may make the whole process tedious and may prompt one not to use tests altogether, so we’ll learn how to make test run in background and restart when you save your code.
Adding Karma to AngularJS project
As a first step, we’ll add test automation to our project. To streamline testing of Angular applications, Google created a special test automation framework called Karma which in turn can rely on various testing frameworks such as Jasmine and run tests any time you save a file in your project. To add Karma and other tools necessary for testing to the project it is necessary to execute the following command.
npm install karma karma-jasmine karma-chrome-launcher jasmine-core angular-mocks --save-dev
We added several development dependencies simultaneously. After that, we should configure Karma and the configuration file, karma.conf.js is created by issuing the command shown below.
node_modules/.bin/karma init
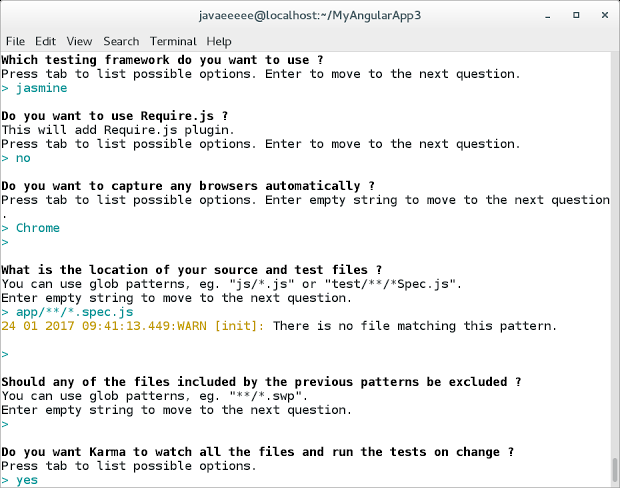
The picture shows all the answers that were given during the initialization process.
Here is the karma.conf.js configuration file file.
// Karma configuration

module.exports = function(config) {
  config.set({

    // base path that will be used to resolve all patterns (eg. files, exclude)
    basePath: '',


    // frameworks to use
    // available frameworks: https://npmjs.org/browse/keyword/karma-adapter
    frameworks: ['jasmine'],


    // list of files / patterns to load in the browser
    files: [
      'app/**/*.spec.js'
    ],


    // list of files to exclude
    exclude: [
    ],


    // preprocess matching files before serving them to the browser
    // available preprocessors: https://npmjs.org/browse/keyword/karma-preprocessor
    preprocessors: {
    },


    // test results reporter to use
    // possible values: 'dots', 'progress'
    // available reporters: https://npmjs.org/browse/keyword/karma-reporter
    reporters: ['progress'],


    // web server port
    port: 9876,


    // enable / disable colors in the output (reporters and logs)
    colors: true,


    // level of logging
    // possible values: config.LOG_DISABLE || config.LOG_ERROR || config.LOG_WARN || config.LOG_INFO || config.LOG_DEBUG
    logLevel: config.LOG_INFO,


    // enable / disable watching file and executing tests whenever any file changes
    autoWatch: true,


    // start these browsers
    // available browser launchers: https://npmjs.org/browse/keyword/karma-launcher
    browsers: ['Chrome'],


    // Continuous Integration mode
    // if true, Karma captures browsers, runs the tests and exits
    singleRun: false,

    // Concurrency level
    // how many browser should be started simultaneous
    concurrency: Infinity
  })
}
The most important part to pay attention to is the files array. There we enumerate all AngularJS files, then all our code files to be tested and tests after that; order is important. Also, to run tests on save we set the values of autoWatch to true and singleRun to false; single runs can be used by a Continuous Integration system.
Refactoring the application code to follow AngularJS style guide
Currently, the code that creates our module and the one that creates the controller reside in the same file, namely app.module.js . According to Angular 1 style guide, we should split the code according to its functionality, that is we’ll put the code of our HelloController into a separate hello folder inside the app folder. Controller is placed into the file named hello.controller.js because it’s a naming convention to describe the purpose of code using a suffix, such as controller.
Now, we copy all the code from the app.module.js file and paste it to the hello.controller.js file. After that, we remove square brackets and comma from the module() function because the former are necessary to create a module but we, here, need to add a controller to an existing module.
(function () {

  angular.module('app')
    .controller('HelloController', HelloController);

  HelloController.$inject = ['$scope'];

  function HelloController($scope) {
    $scope.myModel = 'World';
  }

})();
In app.module.js we leave only the code to create our module.
(function () {

  angular.module('app', []);

})();
Finally, we should add the file containing the controller to index.html before the closing body tag and after our other scripts.
Here is the moment where we can use Protractor to check that we haven’t broken our application after refactoring. As an experiment, you can comment out the recently-added script from the index.html file and see what happens.
Adding and running Jasmine tests for AngularJS controller
Now, we are ready to add a test for our controller. According to AngularJS Style Guide the test should be placed into the same folder where our controller lives. The name of the test file, according to the guide is the same as the one of the controller, followed by the spec suffix and js extension.
Our algorithm for testing is first, to load our module before each test, second, to inject the controller, our system under test, and finally, to check that the controller works correctly. The code for the test is shown below.
describe('HelloController tests', function () {
    var scope;
    var HelloController;

    beforeEach(function () {
        module('app');

        inject(function ($controller) {
            scope = {};
            HelloController = $controller('HelloController', { $scope: scope });
        });

    });

    it('should be World', function () {
        expect(scope.myModel).toEqual('World');
    });
});
The test file contains a single test that checks that the word ‘World’ was set as a value of the myModel variable in the controller. Generally, controllers will contain more complex logic and there will be more tests, but here we try to keep the example as simple as possible. Anyway, we described the variables to store an instance of our controller under test and a variable to pass instead of $scope and see what the controller adds to it.
The code to obtain the instance of the controller and to initialize the scope variable is placed into beforeEach() method which means that the initialization is performed before each test method and test methods does not influence each other because they use brand new instances of the controller and scope.
In the snippet above, we load the app module in the beforeEach() method and then retrieve the controller. It allows us to test the desired unit of code, namely the controller, so the name of such kind of tests is unit tests.
Now, we should change our karma.conf.js file and specify what files we need to be loaded to test our controller. The content of the files array is shown below.
...
 // list of files / patterns to load in the browser
    files: [
      'node_modules/angular/angular.js',
      'node_modules/angular-mocks/angular-mocks.js',
      'app/app.module.js',
      'app/hello/hello.controller.js',
      'app/hello/hello.controller.spec.js'
    ],
...
To run the test execute the following command.
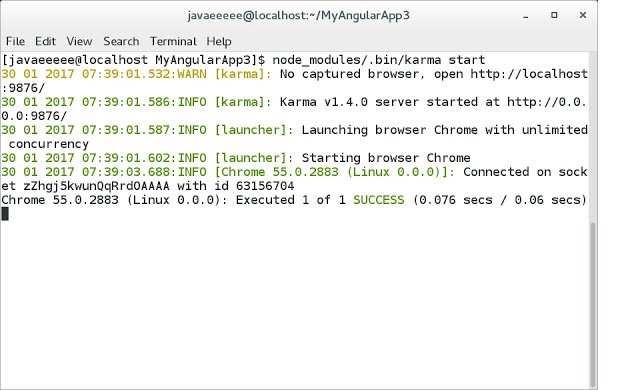
node_modules/.bin/karma start
And here is the result, the tests have successfully passed.
The command we run to start test is too long to type, so we can use npm to make it shorter, namely we could edit the package.json file and change the test command it contains. Inside the file, look for the scripts object and we’ll change the content of the test field from
"test": "echo \"Error: no test specified\" && exit 1",
to
"test": "node_modules/.bin/karma start",
After that change, it’s enough to type
npm test
to start testing our files; Karma will watch changes in our files as it was mentioned above.
Summary
In this tutorial we added unit tests for our controller and automated their execution using the test runner Karma from Google. Also, we learned some best practices of naming files and organizing our code. In the next tutorial we’ll discuss AngularJS scope in more detail, learn how to use Google Chrome extension called Batarang to analyze scopes and go over some best practices for writing code in your controllers.
Resources
- Angular 1 Style Guide
- AngularJS Templates, section Testing Non-global Controllers
- AngularJS Unit Testing
- Seed Project for AngularJS apps, Karma configuration
- Karma Configuration File
| Reference: | AngularJS Tutorial: Unit Testing Angular Applications Using Jasmine and Karma from our WCG partner Dmitry Noranovich at the Java and JavaEE blog blog. |
