Hello readers, in this tutorial we will create a simple application that uses the spring and angular framework. For this tutorial, we’ll have a button that will display the user details when it is clicked.
1. Introduction
It is very simple, but before moving further let’s take a look at the Spring, Spring MVC, and Angular framework.
1.1 Spring framework
- Spring is an open-source framework created to address the complexity of an enterprise application development
- One of the chief advantages of the Spring framework is its layered architecture, which allows a developer to be selective about which of its components they can use while providing a cohesive framework for
J2EEapplication development - Spring framework provides support and integration to various technologies for e.g.:
- Support for Transaction Management
- Support for interaction with the different databases
- Integration with the Object Relationship frameworks for e.g. Hibernate, iBatis etc
- Support for Dependency Injection which means all the required dependencies will be resolved with the help of containers
- Support for
RESTstyle web-services
1.1.1 Spring MVC framework
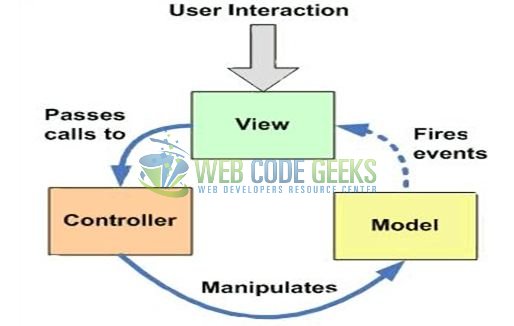
Model-View-Controller (MVC) is a well-known design pattern for designing the GUI based applications. It mainly decouples the business logic from UI by separating the roles of Model, View, and Controller in an application. This pattern divides the application into three components to separate the internal representation of the information from the way it is being presented to the user. The three components are:
- Model (M): Model’s responsibility is to manage the application’s data, business logic, and the business rules. It is a
POJOclass which encapsulates the application data given by the controller - View (V): A view is an output representation of the information, such as displaying information or reports to the user either as a text-form or as charts. Views are usually the
JSPtemplates written with Java Standard Tag Library (JSTL) - Controller (C): Controller’s responsibility is to invoke the Models to perform the business logic and then update the view based on the model’s output. In spring framework, the controller part is played by the Dispatcher Servlet
1.2 Angular framework
Angular is a JavaScript MVC or Model-View-Controller framework developed by Google that lets developers build well structured, easily testable, and maintainable front-end applications. But before we start creating a real application using the angular library, let us see what the important parts of an angular application are.
1.2.1 Templates
In Angular, a template is an HTML with added markups. The angular library compiles the templates and renders the resultant HTML page.
1.2.2 Directives
Directives are the markers (i.e. attributes) on a DOM element that tell angular to attach a specific behavior to that DOM element or even transform the DOM element and its children. Most of the directives in the angular library start with the ng.
1.2.3 Expressions
An expression is like a JavaScript code usually wrapped inside the double curly braces such as {{ expression }}. Angular library evaluates the expression and produces a result.
These new APIs make developer’s life easier, really! But it would be difficult for a beginner to understand this without an example. Therefore, let us create a simple application using the Spring and Angular libraries.
2. AngularJS with Spring MVC Example
Here is a step-by-step guide for implementing Spring MVC architecture in the angular web applications.
2.1 Tools Used
We are using Eclipse Kepler SR2, JDK 8 and Maven. Having said that, we have tested the code against JDK 1.7 and it works well.
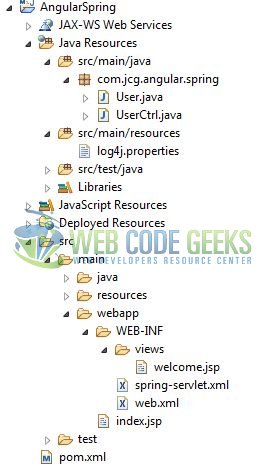
2.2 Project Structure
Firstly, let’s review the final project structure if you are confused about where you should create the corresponding files or folder later!
2.3 Project Creation
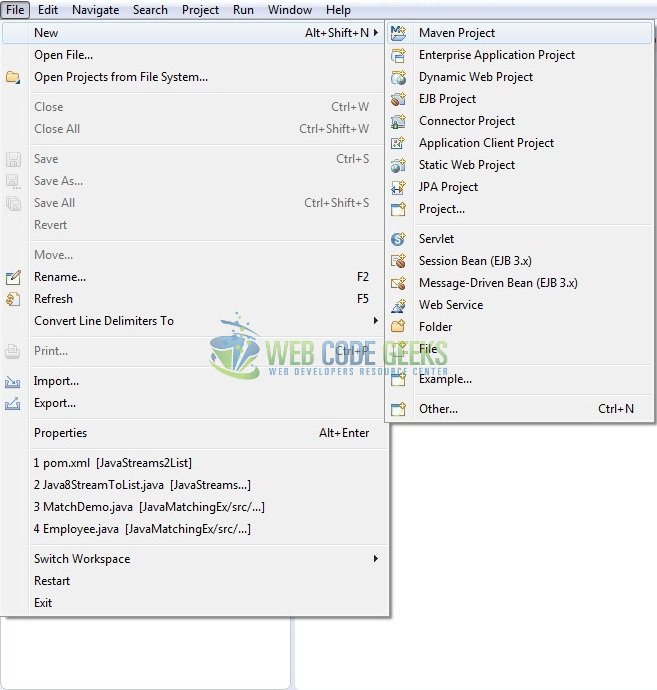
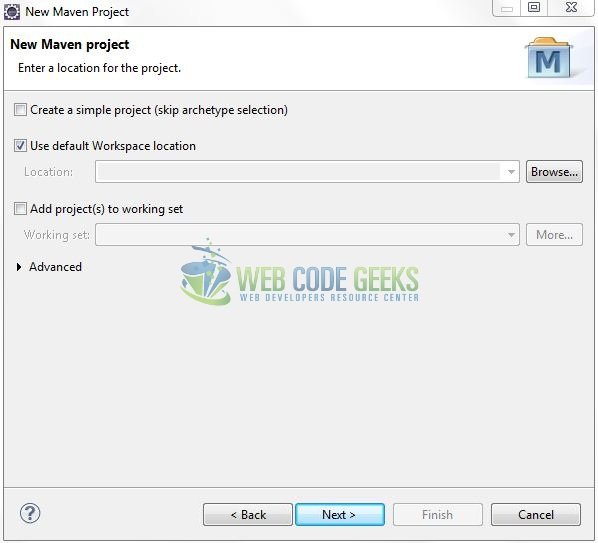
This section will show how to create a Java-based Maven project with Eclipse. In Eclipse Ide, go to File -> New -> Maven Project.
In the New Maven Project window, it will ask you to select project location. By default, ‘Use default workspace location’ will be selected. Just click on next button to proceed.
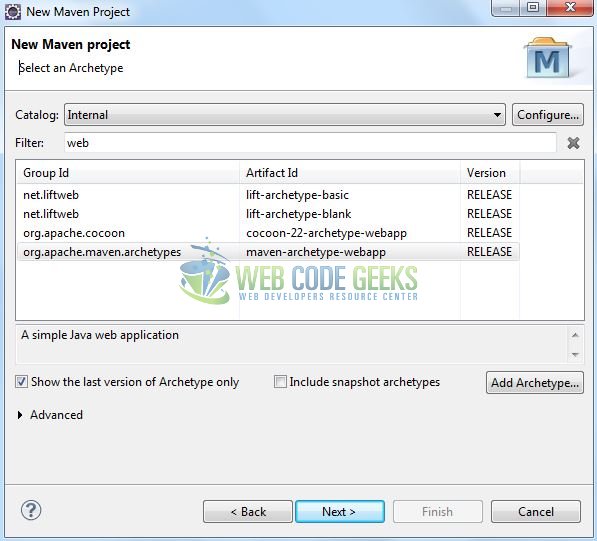
Select the ‘Maven Web App’ Archetype from the list of options and click next.
It will ask you to ‘Enter the group and the artifact id for the project’. We will enter the details as shown in the below image. The version number will be by default: 0.0.1-SNAPSHOT.

Click on Finish and the creation of a maven project is completed. If you see, it has downloaded the maven dependencies and a pom.xml file will be created. It will have the following code:
pom.xml
<project xmlns="http://maven.apache.org/POM/4.0.0" xmlns:xsi="http://www.w3.org/2001/XMLSchema-instance" xsi:schemaLocation="http://maven.apache.org/POM/4.0.0 http://maven.apache.org/xsd/maven-4.0.0.xsd">
	<modelVersion>4.0.0</modelVersion>
	<groupId>AngularSpring</groupId>
	<artifactId>AngularSpring</artifactId>
	<version>0.0.1-SNAPSHOT</version>
	<packaging>war</packaging>
</project>
Let’s start building the application!
3. Application Building
Let’s create an application to understand the basic building blocks of this tutorial.
3.1 Maven Dependencies
In this example, we are using the most stable spring web-mvc, Jackson core, and Log4j version in order to set-up the Spring MVC and Angular functionality. The updated file will have the following code:
pom.xml
<project xmlns="http://maven.apache.org/POM/4.0.0" xmlns:xsi="http://www.w3.org/2001/XMLSchema-instance"
	xsi:schemaLocation="http://maven.apache.org/POM/4.0.0 http://maven.apache.org/maven-v4_0_0.xsd">
	<modelVersion>4.0.0</modelVersion>
	<groupId>AngularSpring</groupId>
	<artifactId>AngularSpring</artifactId>
	<packaging>war</packaging>
	<version>0.0.1-SNAPSHOT</version>
	<name>AngularSpring Maven Webapp</name>
	<url>http://maven.apache.org</url>
	<dependencies>
		<!-- spring dependency -->
		<dependency>
			<groupId>org.springframework</groupId>
			<artifactId>spring-context</artifactId>
			<version>5.0.5.RELEASE</version>
		</dependency>
		<dependency>
			<groupId>org.springframework</groupId>
			<artifactId>spring-core</artifactId>
			<version>5.0.5.RELEASE</version>
		</dependency>
		<dependency>
			<groupId>org.springframework</groupId>
			<artifactId>spring-webmvc</artifactId>
			<version>5.0.5.RELEASE</version>
		</dependency>
		<!-- jstl dependency -->
		<dependency>
			<groupId>javax.servlet</groupId>
			<artifactId>jstl</artifactId>
			<version>1.2</version>
		</dependency>
		<!-- javax servlet api -->
		<dependency>
			<groupId>javax.servlet</groupId>
			<artifactId>javax.servlet-api</artifactId>
			<version>3.1.0</version>
		</dependency>
		<!-- spring and json dependency -->
		<dependency>
			<groupId>com.fasterxml.jackson.core</groupId>
			<artifactId>jackson-databind</artifactId>
			<version>2.9.5</version>
		</dependency>
		<!-- log4j dependency -->
		<dependency>
			<groupId>log4j</groupId>
			<artifactId>log4j</artifactId>
			<version>1.2.17</version>
		</dependency>
	</dependencies>
	<build>
		<finalName>${project.artifactId}</finalName>
	</build>
</project>
3.2 Java Class Creation
Let’s create the different Java files required to carry out this tutorial.
3.2.1 Implementation of POJO class
This model class defines the user schema and consists of two properties (i.e. name and department). These properties are used to save the user details and are passed on the view for further processing. Add the following code to it:
User.java
package com.jcg.angular.spring;

import java.io.Serializable;

public class User implements Serializable {

	private static final long serialVersionUID = 1L;

	public String name, department;

	public User() { }

	public User(String name, String department) {
		this.name = name;
		this.department = department;
	}

	public String getName() {
		return name;
	}

	public void setName(String name) {
		this.name = name;
	}

	public String getDepartment() {
		return department;
	}

	public void setDepartment(String department) {
		this.department = department;
	}

	@Override
	public String toString() {
		return "User [Name=" + name + ", Department=" + department + "]";
	}
}
3.2.2 Implementation of Controller class
This is a typical spring controller which is annotated by the Spring MVC annotation types. This class consists of the request mapping method which performs the business logic. Let’s write a quick Java program in the spring controller class to handle the HTTP request. Add the following code to it.
UserCtrl.java
package com.jcg.angular.spring;

import org.apache.log4j.Logger;
import org.springframework.http.MediaType;
import org.springframework.web.bind.annotation.RequestMapping;
import org.springframework.web.bind.annotation.RequestMethod;
import org.springframework.web.bind.annotation.ResponseBody;
import org.springframework.web.bind.annotation.RestController;
import org.springframework.web.servlet.ModelAndView;

@RestController
public class UserCtrl {

	private static Logger log = Logger.getLogger(UserCtrl.class);

	// Redirects the user to the index page of the application.
	@RequestMapping(value="/welcome", method = RequestMethod.GET)
	public ModelAndView index() {
		return new ModelAndView("welcome");
	}

	// Sets the dummy user details.
	@RequestMapping(value = "/userlist", method = RequestMethod.GET, produces = MediaType.APPLICATION_JSON_VALUE)
	public @ResponseBody User getDetails() {
		log.info("Fetching the user details .... !");

		User user = new User();
		user.setName("Java Code Geek");
		user.setDepartment("Technical Writing");

		log.info("User details are?= " + user.toString());
		return user;
	}
}
3.3 Configuration Files
Let’s write all the configuration files involved in this tutorial.
3.3.1 Spring Configuration File
To configure the spring framework, we need to implement a bean configuration file i.e. spring-servlet.xml which provide an interface between the basic Java class and the outside world. Put this XML file in the AngularSpring/src/main/webapp/WEB-INF folder and add the following code to it:
spring-servlet.xml
<?xml version="1.0" encoding="UTF-8"?>
<beans xmlns="http://www.springframework.org/schema/beans" xmlns:context="http://www.springframework.org/schema/context" xmlns:mvc="http://www.springframework.org/schema/mvc" xmlns:xsi="http://www.w3.org/2001/XMLSchema-instance" xsi:schemaLocation="http://www.springframework.org/schema/beans  http://www.springframework.org/schema/beans/spring-beans.xsd  http://www.springframework.org/schema/context  http://www.springframework.org/schema/context/spring-context.xsd  http://www.springframework.org/schema/mvc  http://www.springframework.org/schema/mvc/spring-mvc.xsd">

   <context:component-scan base-package="com.jcg.angular.spring" />
   <mvc:annotation-driven />

   <!-- Resolves Views Selected For Rendering by @Controllers to *.jsp Resources in the /WEB-INF/ Folder -->
   <bean class="org.springframework.web.servlet.view.InternalResourceViewResolver">
      <property name="prefix" value="/WEB-INF/views/" />
      <property name="suffix" value=".jsp" />
   </bean>
</beans>
3.3.2 Web Deployment Descriptor
The web.xml file declares one servlet (i.e. Dispatcher Servlet) to receive all kind of the requests and the default welcome page when accessing the application. Add the following code to it:
web.xml
<?xml version="1.0" encoding="UTF-8"?>
<web-app xmlns="http://java.sun.com/xml/ns/javaee" xmlns:xsi="http://www.w3.org/2001/XMLSchema-instance" version="2.5" xsi:schemaLocation="http://java.sun.com/xml/ns/javaee              http://java.sun.com/xml/ns/javaee/web-app_2_5.xsd">

    <display-name>AngularSpring</display-name>

    <!-- Spring Configuration - Processes Application Requests -->
    <servlet>
        <servlet-name>SpringController</servlet-name>
        <servlet-class>org.springframework.web.servlet.DispatcherServlet</servlet-class>
        <init-param>
            <param-name>contextConfigLocation</param-name>
            <param-value>/WEB-INF/spring-servlet.xml</param-value>
        </init-param>
        <load-on-startup>1</load-on-startup>
    </servlet>
    <servlet-mapping>
        <servlet-name>SpringController</servlet-name>
        <url-pattern>/</url-pattern>
    </servlet-mapping>

    <!-- Welcome File List -->
    <welcome-file-list>
        <welcome-file>index.jsp</welcome-file>
    </welcome-file-list>
</web-app>
3.4 Creating Angular Views
Spring MVC supports many types of views for different presentation technologies. These include – JSP, HTML, XML etc. Let us write a simple view in the AngularSpring/src/main/webapp/WEB-INF/ folder. This page is configured with Angular components and act as an index page for the application. Add the following code to it:
welcome.jsp
<!DOCTYPE html>
<html>
	<head>
	    <meta http-equiv="Content-Type" content="text/html; charset=UTF-8">
	    <title>Angularjs Spring Mvc Example</title>

	    <!-- AngularJs Javascript File -->
	    <script type="text/javascript" src="https://ajax.googleapis.com/ajax/libs/angularjs/1.6.5/angular.min.js"></script>

	    <!-- Bootstrap Css -->
	    <link rel="stylesheet" href="https://maxcdn.bootstrapcdn.com/bootstrap/4.0.0/css/bootstrap.min.css">
	    <script type="text/javascript">
	        var app = angular.module("app", []);

	        app.controller("ctrl", ['$scope', '$http', function($scope, $http) {
	            $scope.err_state = false; // Set the default error message state
	            var fetch_usr_app_url = 'http://localhost:8080/AngularSpring/userlist'; // Set the application url to fetch the user details

	            // Fetches the data from the Spring controller
	            $scope.getData = function() {
	                $http({
	                    method: "GET",
	                    url: fetch_usr_app_url,
	                }).then(function(response) {
	                    $scope.user = response.data;
	                    console.log("Success");
	                }, function(response) {
	                    $scope.err_state = true;
	                    console.log("Failure");
	                });
	            };
	        }]);
	    </script>
	</head>
	<body>
	    <div id="angularSpring" class="container">
	        <h1 align="center" class="text-primary">AngularJS - Spring Mvc Example</h1>
	        <hr />

	        <!------ AngularJs and Spring Mvc Example ------>
	        <div ng-app="app" ng-controller="ctrl">
	            <button id="submit_btn" class="btn btn-primary" ng-click="getData()">Get User</button>
	            <div> </div>

	            <!-- Success Response -->
	            <div class="user_details" ng-show="user != null">
	                <p>Name : {{ user.name }}</p><p>Department : {{ user.department }}</p>
	            </div>
	            <!-- Error Response -->
	            <div id="showError" ng-show="err_state">
	                <span class="text-danger">Error in retrieving data!</span>
	            </div>
	        </div>
	    </div>
	</body>
</html>
4. Run the Application
As we are ready for all the changes, let us compile the project and deploy the application on the Tomcat7 server. To deploy the application on Tomat7, right-click on the project and navigate to Run as -> Run on Server.
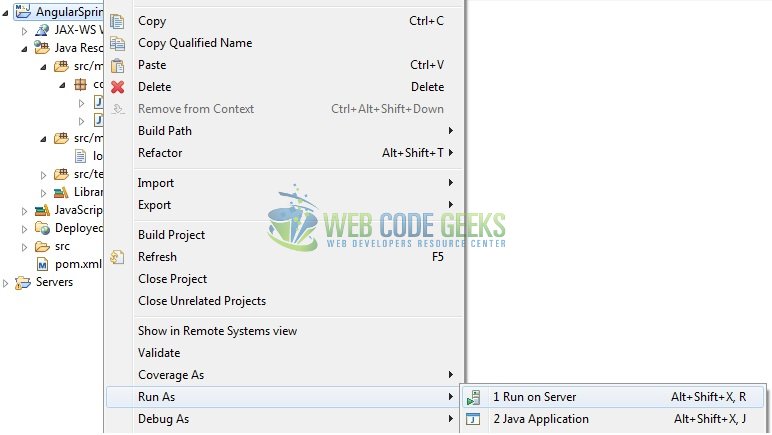
Tomcat will deploy the application in its web-apps folder and shall start its execution to deploy the project so that we can go ahead and test it in the browser.
5. Project Demo
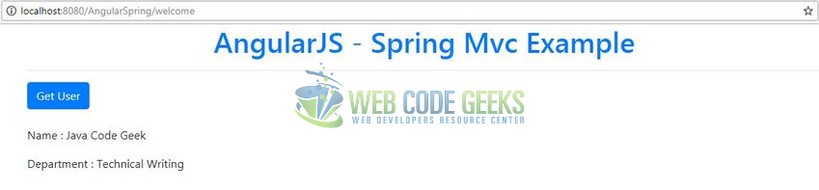
Open your favorite browser and hit the following URL to display the welcome page of the application.
http://localhost:8080/AngularSpring/welcome
Server name (localhost) and port (8080) may vary as per your Tomcat configuration.

Here, as shown in Fig. 9 if the ‘Get User‘ button is clicked, the user details are displayed.
That’s all for this post. Happy Learning!!
6. Conclusion
In this tutorial, developers learned how to create a simple application using the Spring and Angular libraries. Developers can download the sample application as an Eclipse project in the Downloads section.
7. Download the Eclipse Project
This was an example of creating a simple application using the Spring MVC and Angular framework.
You can download the full source code of this example here: AngularSpring
