These days, everyone wants to have an “App” to represent them, their company, or just to perform some common task they might have in mind.
The problem with this is that there is so much to mobile app development. iPhone apps require that you have a Mac to compile them. Android apps have to deal with platform fragmentation. iPhone apps can mean working with Objective C, Android can mean Java– and if you aren’t a polyglot and fluent in both these languages, you probably feel that mobile app development is quite the daunting task.
Luckily, though, there are other options to choose from. One option that I’ve been working with lately is Ionic, specifically the Ionic 2 framework.
In this blog, we’ll show just how easy it is to get up and running with a Ionic 2 by creating a reference mobile application. By the end of this blog, our application will have the ability to run in the browser, emulator, or be built-out to run on a device.
About Ionic
Note: As of this writing, Ionic 2 is in public preview. This means that it is more of a release candidate, and it may not be the full-fledged framework yet. That said, it’s most likely that core framework changes will no longer be happening.
Ionic leverages commonly used web technologies to build out the app, specifically Angular with TypeScript, SCSS, and HTML. You’ll want a little knowledge in each of these areas, but if you’re not extremely strong in these areas, don’t worry; the Ionic site offers plenty of examples to help get you through most situations.
Let’s Get Started
First we need to have NodeJS installed. If you don’t have this installed, head on over to NodeJs.org to a package that is Node.js 6 or greater. Once installed, open your command prompt or terminal window and type the following to install Ionic and its dependencies:
npm install -g ionic cordova
Now that we have Ionic installed, we are ready to start running forward. In your command prompt or terminal window, navigate to the folder where you’d like to save your new application. Type the following:
ionic start MyFirstApp --v2
A quick breakdown of this command is to tell Ionic we are starting an application we call MyFirstApp and that Ionic should be using version to (–v2). If we were to fail to specify the --v2 flag, Ionic would use version 1 of the Ionic framework.
Ionic, from the command above, has now created a project for you to start working with. In fact, at this point, you could even run the project in the browser to start playing.
You’ll need to make sure you’re in the right directory before you can serve up the application. You can do this by typing in CD MyFirstApp.
From here, you can type the following to serve up the application:
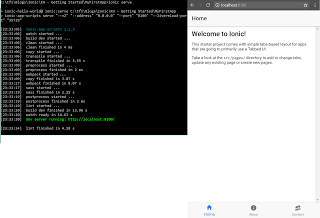
ionic serve
We just told Ionic that we want to serve the application to the browser. In order for it to do this, Ionic will take any TypeScript files and SCSS files, and transpile/compile them out to something that the browser can digest. Then it starts up a server for us to hit. When it has completed, it will launch the browser for you.
Boom, you have your first app. But this is just the beginning!
Custom App
At this point, we can start moving forward to making a custom app for our needs.
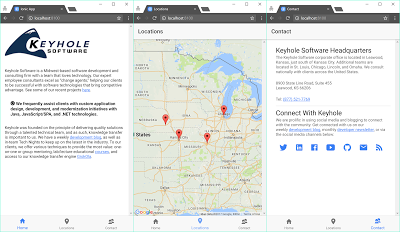
We’ll start by making a simple application for Keyhole Software. This app will give an overview of Keyhole Software, show the location of Keyhole offices, and show a contact page.
Home Page
We’ll do a quick update to the home.html page:
<ion-content padding>
  <img src="https://keyholesoftware.com/wp-content/uploads/2011/10/keyholelogo.png" alt="logo" /><br /><br />
  <p>
    Keyhole Software is a Midwest-based software development and consulting firm with a team that loves technology. Our expert employee consultants excel as “change agents,” helping our clients to be successful with software technologies that bring competitive advantage. See some of our recent projects <a href="https://keyholesoftware.com/projects/">here</a>.
  </p>
  <p class="standout">
    <strong>
      <ion-icon ios="ios-cog" md="md-cog"></ion-icon>
      We frequently assist clients with custom application design, development, and modernization initiatives with Java, JavaScript/SPA, and .NET technologies.
    </strong>
  </p>
  <p>
    Keyhole was founded on the principle of delivering quality solutions through a talented technical team, and as such, knowledge transfer is important to us. We have a weekly <a href="https://keyholesoftware.com/blog">development blog</a>, as well as in-team Tech Nights to keep up on the latest in the industry. To our clients, we offer various techniques to provide the most value: one-on-one or group mentoring, lab/lecture educational <a href="https://keyholesoftware.com/services/education/">courses</a>, and access to our knowledge transfer engine <a href="http://www.grokola.com/">GrokOla</a>.
  </p>
</ion-content>
—
page-home {
	.standout {
		margin: 3rem 0 3rem 2rem;
		font-size: 1.5rem;
	}
}
Now our application has a home page set up. There’s nothing crazy here to explain, your run-of-the-mill html with an icon.
Ionic provides its own list of icons that we can use. One neat thing about this is that it will use the appropriate icon given the platform you are using, for instance iPhone, Android, etc…
Contact Page
Okay, now let’s move on to the next easy page: the contact tab. We will update this page with the following:
<ion-header>
  <ion-navbar>
    <ion-title>
      Contact
    </ion-title>
  </ion-navbar>
</ion-header>

<ion-content padding>
	<ion-list>
		<ion-item text-wrap>
			<h1>Keyhole Software Headquarters</h1>
			<div>
				<p>
					The Keyhole Software corporate office is located in Leawood, Kansas, just south of Kansas City. Additional teams are located in St. Louis, Chicago, Lincoln, and Omaha. We consult nationally with clients across the United States.
				</p>
			</div>
			<br />
			<div>
				<p>
					8900 State Line Road, Suite 455<br />
					Leawood, KS 66206
				</p><br />
				<p>
					Tel: <a href="tel:1-877-521-7769">(877) 521-7769</a>
				</p>
			</div>
		</ion-item>
		<ion-item text-wrap>
			<h1>Connect With Keyhole</h1>
			<div class="x-text cs-ta-left">
				<p>
					We are prolific in using social media and blogging to connect with the community. Get connected with us on our weekly <a href="https://keyholesoftware.com/blog/">development blog</a>, monthly <a href="https://keyholesoftware.com/company/creations/publications/technical-newsletter-sign-up/">developer newsletter</a>, or via the social media channels below:
				</p>
			</div>
			<br />
			<div>
				<p style="font-size: 2.5rem; text-align: center;">
					<a href="http://twitter.com/keyholesoftware" target="_blank"><ion-icon name="logo-twitter"></ion-icon></a>

					<a href="http://linkedin.com/company/keyhole-software" target="_blank"><ion-icon name="logo-linkedin"></ion-icon></a>

					<a href="http://facebook.com/keyholesoftware" target="_blank"><ion-icon name="logo-facebook"></ion-icon></a>

					<a href="http://youtube.com/keyholesoftware" target="_blank"><ion-icon name="logo-youtube"></ion-icon></a>

					<a href="http://github.com/in-the-keyhole" target="_blank"><ion-icon name="logo-github"></ion-icon></a>

					<a href="mailto:asktheteam@keyholesoftware.com&subject=Website Inquiry" target="_blank"><ion-icon name="mail"></ion-icon></a>

					<a href="https://keyholesoftware.com/feed" target="_blank"><ion-icon name="logo-rss"></ion-icon></a>
				</p>
			</div>
		</ion-item>
	</ion-list>
</ion-content>
As you can see with this example, you don’t necessarily have to utilize the SCSS page for styling. You can feel free to style inline or in the SCSS page. This page also makes use of the and . This allows us to list out our information in a clean manner. We also make use of the text-wrap attribute to let Ionic know that it should wrap the text inside of the ion-item. Otherwise the overflow would run off the screen.
Location Page
Alright, on to something more complex. For this, we will be adding a new page that will show the locations of the Keyhole offices. We’ll need to generate a new page. Lucky for us, Ionic provides some help for us.
In your command prompt or terminal, make sure you’re at the root of your application in the folder MyFirstApp. Type the following command:
ionic g page Locations
With the above command, Ionic will create an HTML, SCSS, and TS file for you.
Now let’s add some content to this page. We will be making use of the Google Maps JavaScript API to show the locations of each of the Keyhole offices. To do so, we will need to update the index.html file to add the Google Maps API source. Next, we’ll add a DIV to our locations.html page to put the map into. Finally, we’ll add the TypeScript that will create the map and add the markers.
import { NgModule, ErrorHandler } from '@angular/core';
import { IonicApp, IonicModule, IonicErrorHandler } from 'ionic-angular';
import { MyApp } from './app.component';
import { ContactPage } from '../pages/contact/contact';
import { HomePage } from '../pages/home/home';
import { TabsPage } from '../pages/tabs/tabs';
import { LocationsPage } from '../pages/locations/locations';

@NgModule({
  declarations: [
    MyApp,
    ContactPage,
    HomePage,
	LocationsPage,
    TabsPage
  ],
  imports: [
    IonicModule.forRoot(MyApp)
  ],
  bootstrap: [IonicApp],
  entryComponents: [
    MyApp,
    ContactPage,
    HomePage,
	LocationsPage,
    TabsPage
  ],
  providers: [{provide: ErrorHandler, useClass: IonicErrorHandler}]
})
export class AppModule {}
—
<!DOCTYPE html>
<html lang="en" dir="ltr">
<head>
  <meta charset="UTF-8">
  <title>Ionic App</title>
  <meta name="viewport" content="width=device-width, initial-scale=1.0, minimum-scale=1.0, maximum-scale=1.0, user-scalable=no">
  <meta name="format-detection" content="telephone=no">
  <meta name="msapplication-tap-highlight" content="no">
  <link rel="icon" type="image/x-icon" href="assets/icon/favicon.ico">
  <link rel="manifest" href="manifest.json">
  <meta name="theme-color" content="#4e8ef7">
  <script src="cordova.js"></script>

  <!-- load google map api -->
  <script src="http://maps.google.com/maps/api/js"></script>

  <link href="build/main.css" rel="stylesheet">
</head>
<body>
  <!-- Ionic's root component and where the app will load -->
  <ion-app></ion-app>
  <!-- The polyfills js is generated during the build process -->
  <script src="build/polyfills.js"></script>
  <!-- The bundle js is generated during the build process -->
  <script src="build/main.js"></script>
</body>
</html>
—
<ion-header>
  <ion-navbar>
    <ion-title>Office Locations</ion-title>
  </ion-navbar>
</ion-header>

<ion-content>
	<div class="map" #map style="height: 100%;"></div>
</ion-content>
—
import {Component, ViewChild, ElementRef} from "@angular/core";
import { NavController, NavParams } from 'ionic-angular';

declare var google: any;

@Component({
  selector: 'page-locations',
  templateUrl: 'locations.html'
})
export class LocationsPage {

  public map: any;

  @ViewChild('map') mapElement: ElementRef;

  constructor(public navCtrl: NavController, public navParams: NavParams) {}

  ionViewDidLoad() {
    	console.log('ionViewDidLoad LocationsPage');
	this.loadMap();
  }

  loadMap() { // TODO: Most of this can probably be moved to the base framework
        console.log("loadMap executing");

        let latitude = 40.600920
        let longitude = -91.702881;

        let latLng = new google.maps.LatLng(latitude, longitude);

        let mapOptions = {
        	center: latLng,
        	zoom: 5,
	 	maxZoom: 5,
		minZoom: 5,
		panControl: false,
		draggable: false,
        	mapTypeId: google.maps.MapTypeId.ROADMAP,
        	mapTypeControl: false,
        	zoomControl: false,
        	streetViewControl: false
        };

        this.map = new google.maps.Map(this.mapElement.nativeElement, mapOptions);

        this.setMarkers();
        this.refreshTheMap();
    }

    refreshTheMap() { // TODO: Move this to a map handler class to reuse in our base
        // refresh map
        setTimeout(() => {
            google.maps.event.trigger(this.map, 'resize');
        }, 300);
    }

    setMarkers() {
	console.log("Setting markers");

	let lincoln = {lat: 40.832255, lng: -96.674194};
	let kansasCity = {lat: 39.046653, lng: -94.586792};
	let stLouis = {lat: 38.627331, lng: -90.214233};
	let chicago = {lat: 41.879531, lng: -87.621460};

	let lincolnMarker = new google.maps.Marker({
		position: lincoln,
		map: this.map,
		title: 'Keyhole Lincoln/Omaha'
	});

	let kansasCityMarker = new google.maps.Marker({
		position: kansasCity,
		map: this.map,
		title: 'Keyhole HQ'
	});

	let stLouisMarker = new google.maps.Marker({
		position: stLouis,
		map: this.map,
		title: 'Keyhole St Louis'
	});

	let chicagoMarker = new google.maps.Marker({
		position: chicago,
		map: this.map,
		title: 'Keyhole Chicago'
	});

	lincolnMarker.setMap(this.map);
	kansasCityMarker.setMap(this.map);
	stLouisMarker.setMap(this.map);
	chicagoMarker.setMap(this.map);

	console.log("Markers set")
   }
}
The application won’t inherently know about our new Locations page so we need to fix this by updating a few things in the app.module.ts file. At the top of the page, we add a new import for the LocationsPage that points to the path of the HTML file. Now that we have imported the page into app.module.ts, we need to insert it into the declarations and entryComponents arrays. Once we have done this, Ionic will understand what to include for compilation of the app so that we can start using it.
We now have our location page set up and ready to go. However, we need to also add the page to our tabs system so that we can quickly navigate to the page. To do so we need to update the files below:
<ion-tabs>
  <ion-tab [root]="tab1Root" tabTitle="Home" tabIcon="home"></ion-tab>
  <ion-tab [root]="tab2Root" tabTitle="Locations" tabIcon="pin"></ion-tab>
  <ion-tab [root]="tab3Root" tabTitle="Contact" tabIcon="contacts"></ion-tab>
</ion-tabs>
—
import { Component } from '@angular/core';
import { HomePage } from '../home/home';
import { LocationsPage } from '../locations/locations';
import { ContactPage } from '../contact/contact';

@Component({
  templateUrl: 'tabs.html'
})
export class TabsPage {
  // this tells the tabs component which Pages
  // should be each tab's root Page
  tab1Root: any = HomePage;
  tab2Root: any = LocationsPage;
  tab3Root: any = ContactPage;

  constructor() { }
}
Testing
Now we have our application set up, we are ready to test it out.
Run the ionic serve command again to test out our app. You should now see something similar to the below image. (Note: you can resize your browser to achieve the phone-sized page.)
Final Thoughts
In this blog, we created a mobile application using the Ionic 2 framework that can be run in the browser, emulator, or built-out to run on a device. I hope that you found it helpful in getting to know the Ionic 2 framework a bit better. Thank you for following along!
To see the working application source, visit this link: https://github.com/costr/Keyhole-Ionic-Starter.
References
http://ionic.io/2
https://www.typescriptlang.org/
https://angular.io
| Reference: | Getting Started With Ionic 2 from our WCG partner Adam Costenbader at the Keyhole Software blog. |

I want javascript, jquery,angular js,php boooks….