The NPM registry contains many Node modules that help you to connect to a wide variety of databases including MySQL, Oracle, Mongo and even IBM DB2. This article demonstrates how to write a very simple Node module that connects to DB2 using the ibm_db Node module provided by IBM.
Key concepts covered in this article:
- Creating a simple Node module
- Using the ibm_db module to query a DB2 database
- Creating a simple test web server to output query results to the browser
- Using Nodemon to automatically reload your Node server as you make changes
This article contains various code snippets. The entire solution can be found on GitHub: https://github.com/briandesousa/node-db2
Prerequisites
You will need to have the following tools installed:
- Node – I’ll be using Node v6.9.4 (LTS) but technically the ibm_db module support goes as far back as Node v4.x.
- IBM DB2 Express-C – This is a free version of DB2 provided by IBM. You will need to register a free account with IBM before downloading. This version of DB2 may not be available in all countries.
- During installation, be sure to select the option to install a sample database. We will be using the sample database in this solution.
- Visual Studio Code is my editor of choice these days but use whatever tool you are most comfortable with to develop in JavaScript.
- A SQL client. I will be using Eclipse Database Development Perspective to connect to the local DB2 server.
Design Overview
The application we will be building consists of a simple node module (node-db2-module) that uses the ibm_db node module to connect to a SAMPLE database running on a local DB2 Express-C server. We will also build a simple Node web server (node-db2-module-test) so that we can output the contents of our databse to the browser.

Setup the Database
The first step is to install DB2 Express-C if you haven’t already. During installation, be sure to select the option to install a sample database.
After installation is complete, use your favorite SQL client to connect to the database with the credentials provided during installation, for example:
- database name = SAMPLE
- user name = db2appuser
- password = password
- host = localhost
- port = 50000
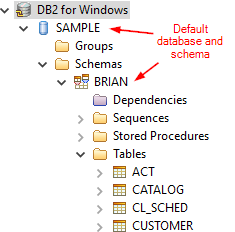
Your local database server should contain a SAMPLE database with a default schema for your user account. Here’s an example of what your database my look like on a Windows system:
We will reuse the SAMPLE database and default schema but create our own version of the CUSTOMER table. Execute the following SQL script:
DROP TABLE CUSTOMER;

CREATE TABLE "CUSTOMER" (
 "CID" BIGINT GENERATED ALWAYS AS IDENTITY,
 "FIRST_NAME" VARCHAR(100),
 "LAST_NAME" VARCHAR(100));

ALTER TABLE "CUSTOMER" ADD CONSTRAINT "PK_CUSTOMER" PRIMARY KEY ("CID");

INSERT INTO CUSTOMER (FIRST_NAME, LAST_NAME) VALUES ('Homer', 'Simpson');
INSERT INTO CUSTOMER (FIRST_NAME, LAST_NAME) VALUES ('Marge', 'Simpson');
INSERT INTO CUSTOMER (FIRST_NAME, LAST_NAME) VALUES ('Ned', 'Flanders');
Building the node-db2-module Module
The first Node module we will build is the node-db2-module. It contains our JavaScript code to retrieve records from the CUSTOMER table in the SAMPLE database.
package.json
In your workspace, create a sub-folder named node-db2-module and add the following package.json to it:
{
    "name": "node-db2-module",
    "version": "1.0.0",
    "description": "An example of a Node module that communicates with a DB2 database using IBM DB2 node drivers",
    "main": "index.js",
    "scripts": {
        "start" : "nodemon test.js"
    },
    "author": "",
    "license": "ISC",
    "private": true,
    "dependencies": {
        "ibm_db": "^1.0.1"
    },
    "devDependencies": {
        "nodemon": "^1.11.0"
    }
}
Pay particular attention to the following configurations in the package.json:
- The index.js script is the main entry point for this module.
- The test.js script contains simple tests that invokes our module for testing purposes.
- We are leveraging Nodemon to monitor our module directory for file changes and re-running our tests each time a file is modified. You can initiate this process by running the npm start command.
index.js
Next, we will add the index.js script. The entire source of index.js can be found here but I will highlight a few key snippets.
The first thing index.js does is import two other modules:
var ibmdb = require('ibm_db');
var config = require('./config');
The ibmdb object will be used to connect to the DB2 database. The config object contains database connection configuration that is defined in a separate config.json file:
{
    "database_name" : "SAMPLE",
    "database_user" : "db2appuser",
    "database_password" : "password",
    "database_host" : "localhost",
    "database_port" : "50000"
}
The index.js script also exports two different classes:
- Customer – A POJO (plain-old JavaScript object) class containing three customer properties.
- CustomerDataRetriever – A class that contains a single retrieveCustomers() method that accepts a callback function. The method asynchronously opens a DB2 connection, retrieves all customer records from the database and returns the results in a collection of Customer objects back through a parameter accepted by the callback function. The source of the retrieveCustomers() method is shown below.
retrieveCustomers(callback) {
        var customers = [];
        console.log("Opening DB2 connection");

        var connString = "DRIVER={DB2};"
            + "DATABASE=" + config.database_name + ";"
            + "UID=" + config.database_user + ";"
            + "PWD=" + config.database_password + ";"
            + "HOSTNAME=" + config.database_host + ";"
            + "port=" + config.database_port;

        console.log("DB2 connection string: " + connString);

        ibmdb.open(connString, function(err, conn) {
            if(err) {
          	    console.log("DB2 connection error: ", err.message);
                callback();
            } else {
                conn.query("select * from customer fetch first 100 rows only", function(err, customerRows, moreResultSets) {
                    if(err) {
                        console.log("DB2 query failed: ", err.message);
                    } else {
                        for(var i = 0; i <; customerRows.length; i++) {
                            customers.push(
                                new module.exports.Customer(
                                    customerRows[i].CID,
                                    customerRows[i].FIRST_NAME,
                                    customerRows[i].LAST_NAME));
                        }

                        if(typeof callback === "function") {
                            callback(customers);
                        }
                    }
                });

                conn.close(function(){
                    console.log("DB2 connection Closed");
                });
            }
        });
    }
We are using the ibmdb.open() function to open a connection to DB2 in an asynchronous fashion (passing it a callback function). The ibm_db module provides methods for connecting to DB2 synchronously but in true Node non-blocking IO fashion, we will keep everything asychronous for this example.
Aside from the asynchronous nature of the DB2 connection code, everything else should look similar to your typical connection logic written in other languages such as Java:
- The connection is opened. The driver, database name, username, password, host and port are all required to open a connection. I am pulling these values from config.json.
- A SQL query is executed using the open connection.
- The query results are mapped to an object. The result set returned by ibmdb is an array containing objects with properties named after columns in the table.
- The connection is closed.
test.js
The test.js script contains a simple integration test to validate the functions in the index.js script:
var nodeDB2 = require('./index.js');
var dataRetriever = new nodeDB2.CustomerDataRetriever();
var receivedCustomers = false;

dataRetriever.retrieveCustomers(function(customers) {
    receivedCustomers = true;
    if(Array.isArray(customers)) {
        for(var i = 0; i < customers.length; i++) {
            console.log("[" + customers[i].customerId + "] " + customers[i].firstName + " " + customers[i].lastName);
        }
    } else {
        console.log("Customer list could not be retrieved");
    }
});

continueExec();

function continueExec() {
    if(!receivedCustomers) {
        setTimeout(continueExec, 1000);
    }
}
We have to include a little timeout logic to wait for CustomerDataRetriever to return results since CustomerDataRetriever is designed to run asynchronously but we want our integration test to output the results as soon as they are ready.
Building the node-db2-module-test Module
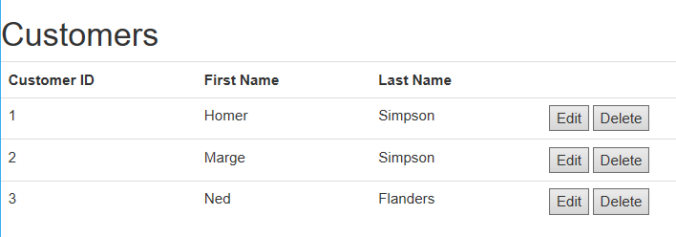
This module contains a very simple Node web server that leverages CustomerDataRetriever in the node-db2-module to retrieve a list of customers and display them in a nicely formatted table in the browser. The final result look like this in a browser:
package.json
Once again we are going to create another sub-folder in the workspace for the node-db2-module-test module. Within that sub-folder, create a package.json with the following contents:
{
  "name": "node-db2-module-test",
  "version": "1.0.0",
  "description": "Test harness for Node DB2 module",
  "main": "test.js",
  "scripts": {
    "start" : "nodemon testServer.js"
  },
  "author": "Brian De Sousa <briandesousa1@gmail.com> (briandesousa1.wordpress.com)",
  "license": "ISC",
  "private": true,
  "dependencies": {
    "node-db2-module": "..\\node-db2-module\\",
    "require": "^2.4.20"
  },
  "devDependencies": {
    "nodemon": "^1.11.0"
  }
}
Similar to the previous module’s package.json, we are going to use nodemon to detect changes to our scripts in the module directory and automatically reload the Node server as needed. The npm start command is used to initiate this process.
The package.json has a dependency on the node-db2-module so that it can make use of the CustomerDataRetriever.
testServer.js
The last piece of the puzzle is the Node server itself. The testServer.js will defined a very basic Node web server that listens on port 8080:
console.log("Initializing node-db2-module");

var http = require('http');
var nodeDB2 = require('node-db2-module');

var customers = [];

var header = `
  <html>
  <head>
    <link href="https://maxcdn.bootstrapcdn.com/bootstrap/3.3.7/css/bootstrap.min.css" rel="stylesheet" integrity="sha384-BVYiiSIFeK1dGmJRAkycuHAHRg32OmUcww7on3RYdg4Va+PmSTsz/K68vbdEjh4u" crossorigin="anonymous">
  </head>
  <body>
    <h1>Customers</h1>
    <table class="table">
    <tr>
      <th>Customer ID</th>
      <th>First Name</th>
      <th>Last Name</th>
      <th></th>
    <tr>`;

var footer = `</table>
  </body>
  </html>`;

// retrieve customer records using node-db2-module package
var dataRetriever = new nodeDB2.CustomerDataRetriever();
dataRetriever.retrieveCustomers(function(customerList) {
    console.log("Size of customer list that was retrieved: " + customerList.length);
    customers = customerList;
});

// create web server and output customer records HTML
http.createServer(function(request, response) {
    var html = header;
    console.log(customers.length);

    customers.forEach(function(customer) {
      html += "<tr><td>" + customer.customerId + "</td>";
      html += "<td>" + customer.firstName + "</td>";
      html += "<td>" + customer.lastName + "</td>";
      html += `<td>
                 <button>Edit</button>
                 <button>Delete</button>
               </td>
             </tr>`;
    });

    html += footer;
    response.end(html);
}).listen(8080, 'localhost');

console.log("Web server running at http://localhost:8080");
For the purposes of this article, I have demonstrated the creation of a very simple Node web server here. There are numerous better frameworks and ways of building a full-featured web server (for example the Express web application framework).
The testServer.js imports the node-db2-module that we created earlier, creates and instance of the CustomerDataRetriever class and uses it to retrieve a collection of Customer objects. Then a simple web server is created and some dynamic HTML is produced to output the Customer array to the browser in a nicely-formatted table.
Final Thoughts
The ibm_db modules proved to be a very easy to use Node module. Very little boiler plate code is required to setup a database connection. The ibm_db module also supports all the typical capabilities that you would expect from a typical relational database interface such as the ability to invoke stored procedures and transactions. More information is available on the ibm_db GitHub repository.
| Reference: | Building a Node Module That Connects to DB2 from our WCG partner Brian De Sousa at the Brian De Sousa’s blog blog. |
