The angular-seed project on GitHub is a great way to start playing with AngularJS. It allows you to get an AngularJS single-page web app up and running very quickly. If you want to run your web app with NodeJS then you will need to create a basic Node server. I will attempt to explain how to create a Node server configuration using some common Express framework components.
I will assume that you have the following software installed:
- JetBrains WebStorm (or another IDE of your choosing… or Notepad if you are a glutton for punishment)
- NodeJS
Getting Started with angular-seed
The angular-seed project provides a common application folder structure and basic configuration files for some popular development tools including NPM (package manager), karma (for unit testing), protractor (for end-to-end testing) and bower (a client-side package manager).
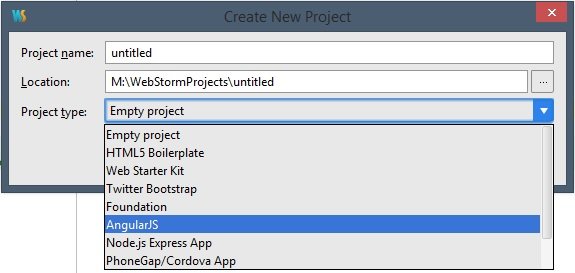
To start using the angular-seed project, you can download the source from GitHub or use your favorite Git client to clone the project. Fortunately, WebStorm allows you to skip this step and create a new project based on the angular-seed project:
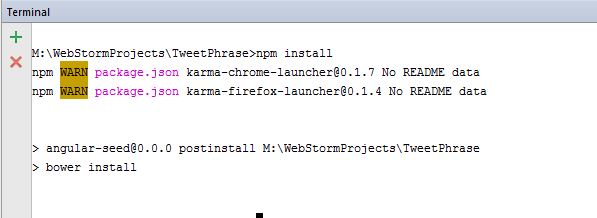
Once the project is opened in WebStorm, the first thing you’ll want to do is run npm install on the project to bring down all of the NPM (and Bower) dependencies into the project. You can run this command via the Windows command line or even through WebStorm’s Terminal view:
It can be helpful to browse through the code and configuration that is included in the seed project to get a feel for how everything is wired up. I would recommend reviewing the following files:
- package.json – This file is used by NPM to understand the project and its dependencies. Check out the devDependencies section… do you recognize any of those?
- bower.json – This file is used by Bower to understand the application and the dependencies that are required in the browser to run the application. You should see a bunch of AngularJS dependencies.
- app/index.html – This is the basis of your single-page web app, notice that there is quite a bit of HTML and wiring already done for you.
- app/app.js – This is where the root module for your AngularJS application is defined.
- app/bower_components – This folder contains all the bower dependencies required at runtime by your application. Wondering how these components got here? When your ran npm install the package.json file contained a postinstall instruction to run bower install which read your bower.json file to determine which components needed to be downloaded and added to this folder. Have I lost you yet?
Creating and Running a Node Server
NodeJS is a JavaScript platform that can be used to build fast network applications. In my case, I need to use it to run a simple web server to serve up my web app. This can be done extremely easily by creating a server configuration file and running it with the Node executable. This can be done in three easy steps…
Step 1 – Create node-server.js
The node-server.js file is a simple JavaScript file that defines how your server should be configured. You can name it whatever you like. Ultimately, this file will be passed to the Node executable to start your server. Here’s a sample server:
'use strict';


var express = require('express');
var http = require('http');
var path = require('path');
var favicon = require('serve-favicon');
var morgan = require('morgan'); // formerly express.logger
var errorhandler = require('errorhandler');
var app = express();

// all environments
app.set('port', process.env.PORT || 3000);
app.set('views', path.join(__dirname, 'views'));
app.engine('html', require('ejs').renderFile);

// express/connect middleware
app.use(favicon(__dirname + '/app/favicon.ico'));
app.use(morgan('dev'));

// serve up static assets
app.use(express.static(path.join(__dirname, 'app')));

// development only
if ('development' === app.get('env')) {
  app.use(errorhandler());
}

http.createServer(app).listen(app.get('port'), function () {
   console.log('myApp server listening on port ' + app.get('port'));
});
Notice that this file defines the port on which the server will run (3000) and the directory from which files will be served (app).
Step 2 – Install Required NPM Modules
The server depends on a few NPM modules that need to be installed into the project before you can run the server:
- requirejs – a framework for defining required modules within JavaScript
- express, serve-favicon, morgan, errorhandler – expressjs modules that enable common web server tasks (ex. running a web server, serving up favicons to the browser, logging, error handling)
- ejs – embedded JavaScript templates
Run npm install to install each of the required NPM modules:
npm install requirejs --save

npm install express --save

npm install serve-favicon --save

npm install morgan --save

npm install errorhandler --save

npm install ejs --save
Step 3 – Start the Server
The server can be started via the command line (or Terminal view in WebStorm) by passing the node-server.js file to the node command:
node node-server.js
You may want to run the Node server directly from WebStorm IDE which provides a more integrated experience. To do this, you first need to create a new Run/Debug configuration that will instruct WebStorm on how to start the server. Access the Run/Debug Configurations window from the Run menu. Click the + button to create a new Node.js configuration:
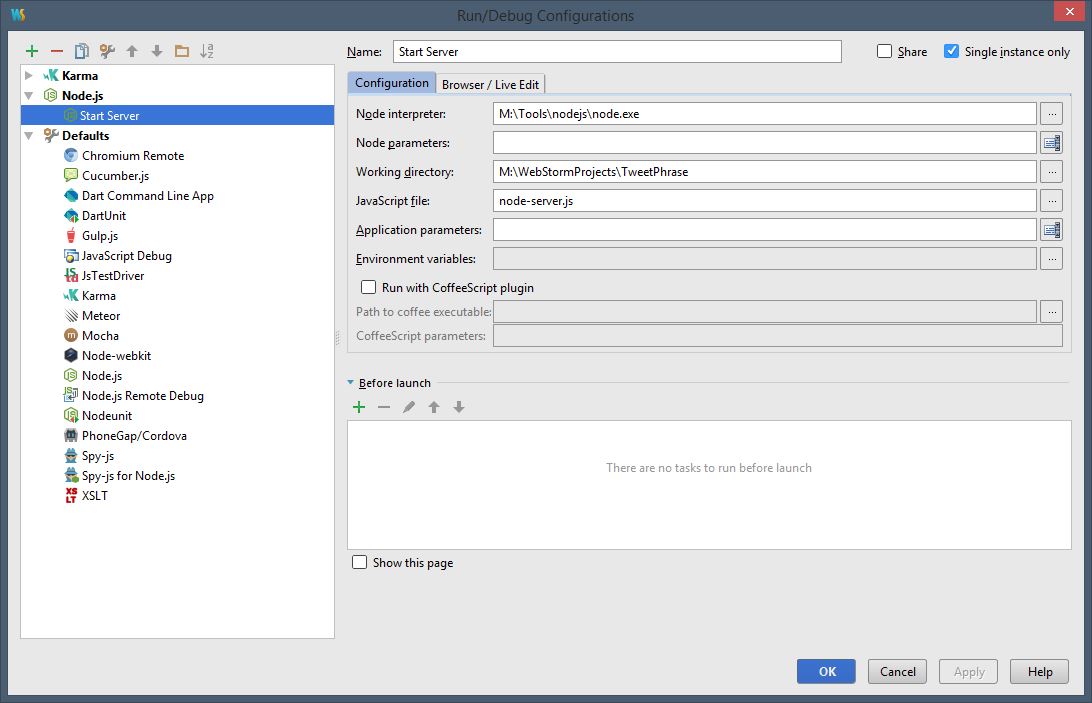
Give this configuration a name. Make sure the configuration points to the Node.exe installed on your machine and the node-server.js file you just created.
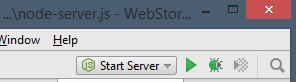
To start your server, select the configuration from the drop-down menu on the top right toolbar and hit the play button:
A new Run view will open at the bottom of your WebStorm window and you will start to see console output indicating your server has started listening on port 3000 (the same message that was defined at the end of the node-server.js file).
The final and ultimate test is to actually launch your application in the browser and see it in action. Open up your favorite browser and navigate to http://localhost:3000 to take a look.
Summary
The process for setting up a basic AngularJS app using angular-seed and running on a NodeJS server is fairly straight forward. If you are not familiar with the tools, modules and frameworks that are being used to make this all work then you might still be a bit mystified as to how everything is actually working… and that is to be expected. So what can you do about it? Start changing things… enhance… break and repair. Oftentimes this is the best way to learn.
Here are some other resources I used that may be helpful to you too:
Running and Debugging Node.js in WebStorm – instructions for using Node.js in WebStorm right from the source
Beginner’s Guide to Node.js – another great simple tutorial to create a Node server that serves up some simple static content
expressjs Modules on GitHub – list of all the expressjs modules available to construct your server
| Reference: | Creating a NodeJS Web Server to Run angular-seed from our WCG partner Brian De Sousa at the Brian De Sousa’s blog blog. |
