In this post, we take a look at one of the most exciting development in recent times. Node.js, the framework or platform that has gained favour with thousands of developers world wide. It has everybody excited with all the new possibilities it opens up. Suddenly front end developers found that they could use most of their existing skills with JavaScript to write server side code. We take a look at how to get started with Node.js with a customary Hello World Example.
1. Tools & Technologies
I used the following tools & technologies for working with this project. You can switch out some of the tools in case you are comfortable with others available out there.
On the Node.js Website you should see two versions listed. One of them an LTS one and a Current. You should install the LTS version as it is recommended for most users. The LTS version at the time of writing this was v8.9.4. Once you download and install Node, you can go to the command line and run the following commands to make sure things are setup properly.
> node -v
This should return the version of Node installed if everything went well.
> v8.9.4
The download in addition to installing Node will install npm and to check for it you can run the following command.
> npm -v
This will return the version of npm like below:
> v5.6.0
Later in the article, we will take a look at what is npm and what purpose it serves.
2. Project Layout
We will create our project using npm step by step. Firstly, we create a folder for our project. Then we navigate to it using command line window and run the following command.
> npm init
This will lead to a series of simple questions asked of us before creating our package.json file. But do not worry since the questions are pretty basic. I list the questions and the suggested answers below.
| Question | Suggested Answers |
|---|---|
| name | You can provide the name of the project, lower caps & single string. For ex: wcg_nodejs_hello_world |
| version(1.0.0) | Just press Enter key to accept the default or provide a specific one |
| description | A brief description of your project. I will just enter the title of the article, as WCG — Node.js Hello World Example |
| entry point(index.js) | Leave this setting to default. We will discuss more regarding this in the article ahead. |
| test command | A command to run test cases. Leave it blank for now. |
| git repository | URL of the git repository hosting the source code. Leave it blank for now. |
| keywords | keywords related to the project and its purpose go here. I have added Node.js and WCG |
| author | The author of the project. You can enter your name here I have entered mine. |
| license(ISC) | License terms for use of the code. Accept the default for now, i.e., ISC. |
Confirm the input which will create a package.json file in the project directory. The contents of the file look like below:
package.json
{
  "name": "wcg_nodejs_hello_world",
  "version": "1.0.0",
  "description": "WCG -- Node.js Hello World Example",
  "main": "index.js",
  "scripts": {
    "test": "echo \"Error: no test specified\" && exit 1"
  },
  "keywords": [
    "Node.js",
    "WCG"
  ],
  "author": "Siddharth Seth",
  "license": "ISC"
}
3. What is npm?
npm stands for Node Package Manager and provides access to the entire ecosystem of package libraries for different uses. This command line tool helps us manage the project dependencies and versioning for them. We will see it in action in the section below which describes using Express package for creating a Web Server.
4. Handling Web Requests
Now to write our first application we create a file named index.js at the root of the project. We chose this name since, if you remember, we provided the name as the entry point of our application after we ran npm init. In this file we write the following code to create a basic web server which handles web requests and returns the string “Hello World”.
var http = require("http");
var port = 8090;
var host = "127.0.0.1";
http.createServer(function(request, response){
    response.write("Hello World!");
    response.end();
}).listen(port, host);
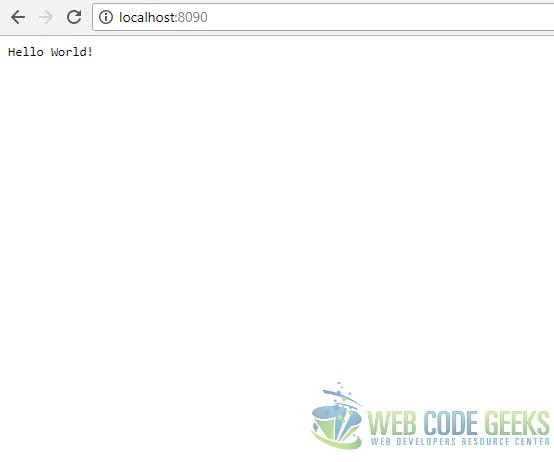
This is all it takes, to spin up a web server in Node.js. But, I think, a little bit of explanation is in order. So in the first line of code, we require the http module of node. Think of it as an import or include statement in other server side languages. Now that we have the http module available we call its createServer method and pass a callback function to it. We also chain the call to the listen method passing it a port and hostname. The callback function takes two arguments, namely, request and response and is called every time our URL is hit. The request argument wraps all the details about the incoming web request and we can control the output that is sent out through the response object. In our code, we simply return the string “Hello World!” and then close the response stream. Remember to call the end method though as otherwise our application would get hung up and be unavailable to process subsequent requests. The output of the above code looks like below when we run it using the command node index.js and navigate to the URL http://localhost:8090
5. Using Express
In previous sections I referred to npm, the Node Package Manager. It is a tool to pull in other packages built on top of Node.js that provide readymade functionality. It helps us build up applications quickly without having to reinvent the wheel so to speak. There are literally thousand of packages available out there developed by fellow developers that we can use as building blocks for our applications. NPM fits in as a tool that allows us to manage these dependencies and their versioning. As an example, in this article we will pull up the popular Express module which helps us build a server side API with a host of features without obscuring the Node.js features. To use the Express framework in our application, we need to pull it down using the following command.
> npm install --save express
This command with its save switch will pull down Express module with all its dependencies as well as save the dependency information in the package.json file. The downloaded dependencies go into a folder named node_modules. Now our package.json file looks as follows:
package.json
{
  "name": "wcg_nodejs_hello_world",
  "version": "1.0.0",
  "description": "WCG -- Node.js Hello World Example",
  "main": "index.js",
  "scripts": {
    "test": "echo \"Error: no test specified\" && exit 1"
  },
  "keywords": [
    "Node.js",
    "WCG"
  ],
  "author": "Siddharth Seth",
  "license": "ISC",
  "dependencies": {
    "express": "^4.16.2"
  }
}
Let us create a new JavaScript file to test out the express module. We will call it api.js and add the following code to the file.
api.js
var express = require("express");
var port = 8090;
var host = "127.0.0.1";
var app = express();

app.get("/api/:name", function(req, res){
    res.send("Hello " + req.params.name);
});

app.listen(port, host);
As you can see from the code we require the express module and create an instance of the same. We the wrote code to accept HTTP GET requests for the URL http://localhost:8090/api/:name. In case you are wondering what the :name does is it names the command line arguments passed in by the user as part of the URL, for example, http://localhost:8090/api/Siddharth. This argument is then made available through request object params property. We use it to return a greeting to the passed in name through the response object send method. To see all of this in action we can execute the command node api.js and navigate to the URL http://localhost:8090/api/your name. The response should look like below:

6. Running the Application
To run our application, we need to navigate to the root of the project in a command line window and execute the following command:
> npm install
To test out the http module web server, you need to execute the following command:
> node index.js
To test the Express web server, you need to execute the following command:
> node api.js
7. Download the Source Code
This wraps up this introduction to the Node.js platform.
You can download the full source code of this example here : WCG — Node.js Hello World Example

What a brilliant information you are sharing here about the relevant technology. I really appreciate your effort. I’ll visit your blog again to get some more nice information about other technologies too. Keep up the good work buddy!!
Thanks!