In this post we take a look at how to make HTTP Requests with Node.js. This feature is key and important capability for a server side language. With Node.js being positioned as one of the best options for aggregating multiple services and high throughput due to its non blocking I/O operations, it is an important feature to learn about. So let us build an example where we make exactly this in Node.js.
1. Tools & Technologies
I have used the following toolset & technologies to build the example application. The tools may be switched out with others you are more comfortable with.

Node.js is a JavaScript framework for running JavaScript on the server side. HTTP module, part of Node.js, allows us to handle requests from browser and issue HTTP Requests of our own to services. We will use the json-server module to mock a service API. I will go through, in a later section, with the details of setting all of this up. I have used the Visual Studio Code IDE as I feel most comfortable with it, though you are free to switch to one of many available IDEs out there.
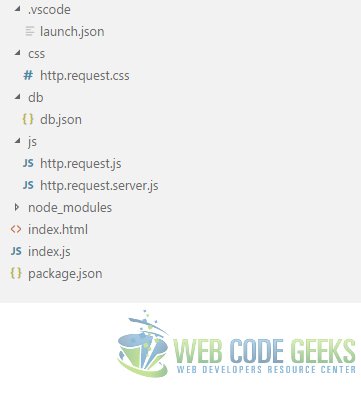
2. Project Layout
The structure of our project would look like below:
You can easily initialize and prepare an initial project structure using the commands below at the root of the folder you want it to reside in.
> npm init
This command asks a few basic questions and suggests defaults for them as well. Apart from a few you can go along with the suggestions to setup initial project structure.
You can create the css, js folders and the files in them manually using command line or GUI or from within the IDE. The two modules that our example depends on and their dependencies can be installed and saved using the following commands:
> npm install --save request
followed by
> npm install --save json-server
3. Server Side Implementation with Http & json-server Modules
We use Http to create a web server of our own. This server would listen to service requests from the browser and relaying them on to our own mock service. Apart from this it will also handle requests for resource files like JavaScript, css and Html files.
3.1 Http Module
The http module is part of Node.js and gives us the capability to create a basic web server. We include this module through a require statement and then call its createServer method. This method takes a callback to which it passes the response and request object for the incoming requests. We also specify the hostname and port to listen for requests on.
We use the url module, part of Node.js, to handle incoming requests and return appropriate responses for each. The code for this resides in the file index.js at the root of our project. Our index.js file with the web server code looks like below:
index.js
//including Node.js modules
var http = require("http");
var url = require("url");
var fs = require("fs");

//Url of our web server
var host = "localhost";
var port = 8090;

//Setting up our web server
http.createServer(function(req, res){
    var path = url.parse(req.url, true);
    if(path.pathname.endsWith("html")){
        fs.readFile("." + path.pathname, function(err, data){
            res.writeHead(200, "OK", { "Content-Type": "text/html"} );
            res.write(data);
            res.end();
        });
    } else if(path.pathname.endsWith("css")){
        fs.readFile("." + path.pathname, function(err, data){
            res.writeHead(200, "OK", { "Content-Type": "text/css"});
            res.write(data);
            res.end();
        });
    } else if(path.pathname.endsWith("js")){
        fs.readFile("." + path.pathname, function(err, data){
            res.writeHead(200, "OK", { "Content-Type": "text/javascript"});
            res.write(data);
            res.end();
        });

    } else if(path.pathname.endsWith("names")){
        switch(req.method){
            case "GET": api.getRequest(res, path.query.team);
            break;
            case "POST":
            var data = "";
            req.on("data", function(d){
                data+=d;
            });
            req.on("end", function(){
                api.postRequest(data, res);
            });
            break;
            case "DELETE":
            var delData = "";
            req.on("data", function(d){
                delData += d;
            });
            req.on("end", function(){
                api.deleteRequest(res, delData);
            });
            break;
        }
    }
}).listen(port, host);
In the Next section, we setup our mock service using the json-server module.
3.2 json-server Module
This module allows us to quickly mock a service API. The API is backed with a store of some test data in a file called db.json. Our data store is in the folder called db and its contents look as follows:
db.json
{
  "myTeam": [
    {
      "id": 1,
      "name": "Mahendra Singh Dhoni"
    },
    {
      "id": 2,
      "name": "Virat Kohli"
    },
    {
      "id": 3,
      "name": "Bhuvneshvar Kumar"
    },
    {
      "id": 4,
      "name": "Mohmd. Shami"
    },
    {
      "id": 5,
      "name": "Ishant Sharma"
    },
    {
      "id": 6,
      "name": "Ajinkya Rahane"
    },
    {
      "id": 7,
      "name": "K L Rahul"
    },
    {
      "id": 8,
      "name": "Yuvraj Singh"
    },
    {
      "id": 9,
      "name": "Harbhajan Singh"
    },
    {
      "id": 10,
      "name": "Kuldeep Yadav"
    },
    {
      "id": 11,
      "name": "Yajuvendra Chahal"
    }
  ],
  "yourTeam": [

  ]
}
As evident from the data we will build a page showing my dream cricket team whilst allowing users to create one of their own with their favorite players.
The code to setup this mock service resides in the index.js file and it looks like below:
index.js
var jsonServer = require('json-server');
var server = jsonServer.create();
var router = jsonServer.router('./db/db.json');
var middlewares = jsonServer.defaults();

server.use(middlewares);
server.use(router);

server.listen(9090, function() {
  console.log('JSON Server is running');
});
As you can notice from the snippet the mock service runs on the URL http://localhost:9090.
Now finally we create a file named http.request.server.js to organize the code for making service calls to our mock service. We later include it into our index.js file through a require statement. In this file we have methods to enable requests using different HTTP verbs like GET, POST, DELETE among others. The http.request.server.js file looks like below:
http.request.server.js
var request = require("request");
var host = "http://127.0.0.1";
var port = 9090;
var api ={
    getRequest:function(res, team){
        if(team){
            request.get(host + ":" + port + "/yourTeam", function(error, response, body){
                res.writeHead(200, "OK", { "Content-Type":"application/json", "Access-Control-Allow-Origin" : "http://localhost:8090"});
                res.write(body);
                res.end();
            });
        }
        else{
            request.get(host + ":" +port + "/myTeam", function(error, response, body){
                res.writeHead(200, "OK", { "Content-Type":"application/json", "Access-Control-Allow-Origin" : "http://localhost:8090"});
                res.write(body);
                res.end();
            });
        }
    },
    postRequest: function (player, res){
        request.post(host + ":" + port +"/yourTeam", function(error, response, body){
            res.writeHead(200, "OK");
            res.write(body);
            res.end();
        }).form(JSON.parse(player));
    },
    deleteRequest: function (res, id){
        var player = JSON.parse(id);
        request.del(host + ":" + port + "/yourTeam/" + player.playerId, function(error, response, body){
            res.writeHead(200, "OK");
            res.write(body);
            res.end();
        });
    }
};
module.exports = api;
We use the request module to make calls to the mock service. As you can see from the code above we have a method for each one of the HTTP verbs we will use in our example, although all HTTP verbs are supported by this mock service. We will stick to GET, POST, DELETE to keep things simple in our example.
4. Client Side Implementation with JavaScript, HTML & CSS
Onwards now to build our front end and make calls to the server as a result of user actions. We start off with a standard HTML and adding markup to display two teams as ordered lists. We also add html to allow the user to add players to their own team. Each team member added by the user would also have a link to remove the player from the list. We achieve the hover effect and styling by adding css in the http.request.css file. Our final Html markup looks like below:
index.html
<!DOCTYPE html>
<html lang="en">
<head>
<meta charset="utf-8">
<meta http-equiv="X-UA-Compatible" content="IE=edge">
<meta name="viewport" content="width=device-width, initial-scale=1">
<!-- The above 3 meta tags *must* come first in the head; any other head content must come *after* these tags -->
<title>WCG -- Node.js HTTP Request Example</title>

<link rel="Stylesheet" href="css/http.request.css"/>
<!-- HTML5 shim and Respond.js for IE8 support of HTML5 elements and media queries -->
<!-- WARNING: Respond.js doesn't work if you view the page via file:// -->
<!--[if lt IE 9]>
<script src="https://oss.maxcdn.com/html5shiv/3.7.3/html5shiv.min.js"></script>
<script src="https://oss.maxcdn.com/respond/1.4.2/respond.min.js"></script>
<![endif]-->
</head>
<body>
<h1>WCG -- Node.js HTTP Request Example</h1>
<div class="teams">
<div class="myteam">
My All Star Cricket 11
</div>
<div class="yourteam">
Yours?
</div>
<div class="addplayers">
<input type="text" placeholder="Player Name" id="playerName"/>
<input type="button" value="Add" id="addPlayer" />
</div>
</div>
<script src="js/http.request.js"></script>
</body>
</html>
4.1 Ajax calls with JavaScript
We use the XMLHttpRequest object to issue calls to the server which in turn makes calls to our mock service. The code for the client side resides in http.request.js file. We load both teams at startup. Apart from this we make a call to add team players in user’s team on the click of the Add button. Similarly we make a call when the delete player link is clicked. After each call we also make request for the updated team. Our client side code now looks as follows:
http.request.js
var myteam = document.getElementsByClassName("myteam")[0];
var addPlayer = document.getElementById("addPlayer");
var playerName = document.getElementById("playerName");
var deleteLink = document.getElementsByClassName("deletelink");
var yourteam = document.getElementsByClassName("yourteam")[0];
var host = "http://localhost";
var port = "8090";

function setupDeleteLink(){
    for(var l=0; l<deleteLink.length; l++){
        deleteLink[l].addEventListener("click", function(event){
            var xmlHttp = new XMLHttpRequest();
            var ctrl = event.target;
            xmlHttp.onreadystatechange = function(){
                if(xmlHttp.status === 200 && xmlHttp.readyState === 4){
                    console.log(xmlHttp.responseText);
                    refreshYourTeam();
                }
            };
            xmlHttp.open("DELETE",  host +":" + port + "/names");
            xmlHttp.send(JSON.stringify({ "playerId": ctrl.getAttribute("playerId")}));
        });
    }
}

addPlayer.addEventListener("click", function(){
    var player = {};
    player.name = playerName.value;
    var xmlHttp = new XMLHttpRequest();
    xmlHttp.onreadystatechange = function(){

        if(xmlHttp.status === 200 && xmlHttp.readyState === 4){
            console.log(xmlHttp.responseText);
            refreshYourTeam();
        }

    };
    xmlHttp.open("POST", host +":" + port + "/names");
    xmlHttp.send(JSON.stringify(player));

});

function Initialize(){
    var xmlHttp = new XMLHttpRequest();
    xmlHttp.onreadystatechange = function(){

        if(xmlHttp.status === 200 && xmlHttp.readyState === 4){
            console.log(xmlHttp.responseText);
            populateMyTeam(xmlHttp.responseText);
        }

    };
    xmlHttp.open("GET", host + ":" + port + "/names", true);
    xmlHttp.withCredentials = false;
    xmlHttp.send();
}

function refreshYourTeam(){
    var xmlHttp = new XMLHttpRequest();
    xmlHttp.onreadystatechange = function(){

        if(xmlHttp.status === 200 && xmlHttp.readyState === 4){
            console.log(xmlHttp.responseText);
            populateYourTeam(xmlHttp.responseText);
        }

    };
    xmlHttp.open("GET", host + ":" + port + "/names?team=yourTeam", true);
    xmlHttp.send();
}
function populateYourTeam(team){
    var orderedList = document.createElement("OL");
    var players = JSON.parse(team);

    for(var i=0; i < players.length; i++){
        var listItem = document.createElement("LI");
        var delLink = document.createElement("SPAN");
        delLink.className = "deletelink";
        delLink.appendChild(document.createTextNode("X"));
        delLink.setAttribute("playerId", players[i].id);
        listItem.appendChild(document.createTextNode(players[i].name));
        listItem.appendChild(delLink);
        orderedList.appendChild(listItem);

    }
    yourteam.innerHTML = orderedList.outerHTML;

    setupDeleteLink();
}
function populateMyTeam(team){
    var orderedList = document.createElement("OL");
    var players = JSON.parse(team);

    for(var i=0; i < players.length; i++){
        var listItem = document.createElement("LI");

        listItem.appendChild(document.createTextNode(players[i].name));

        orderedList.appendChild(listItem);

    }
    myteam.appendChild(orderedList);

}
Initialize();
refreshYourTeam();
5. Running the Application
To run the application you need to navigate to the root of the application and run the following command:
> node index.js
Once the command completes you can navigate to the URL http://localhost:8090/index.html in a browser.
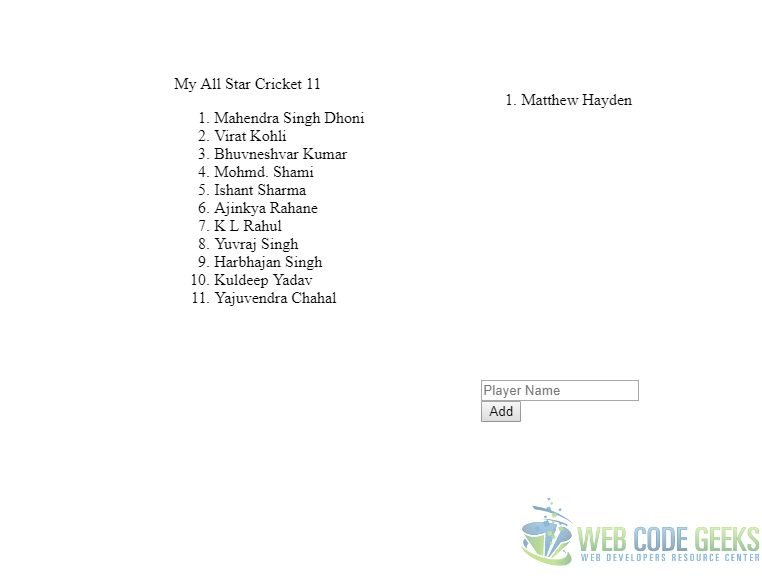
This takes you to the landing page of our application which looks like below:
6. Download the Source Code
This wraps our look at making HTTP Requests with Node.js example.
You can download the full source code of this example here : WCG — Node.js HTTP Request Example
