There’s a lot of demand for mobile application developers these days, but learning all the available platforms and toolsets can be a costly, time-consuming challenge.
The most popular solution to this problem is cross-platform application development.
The goal of cross-platform development is to create software that seamlessly runs on multiple platforms using one set of tools and programming languages. The benefits of this approach include lower costs, rapid prototyping, and skill reuse.
In part one, we implemented a web-based, cross-platform app that allows users to access the device’s camera to take and display photos. In part two, we’ll cover the steps to transform it into a native Android and iOS app using PhoneGap Build.
What Is PhoneGap Build?
Traditional methods of compiling web apps into native ones, such as the Cordova CLI, force you to maintain native software development kits (SDKs) for each platform you target. This can be challenging, as it means keeping multiple machines (PC and Mac) up to date with the latest software versions and tooling.
Adobe’s PhoneGap Build cloud tool simplifies the process of transforming your web assets (HTML, CSS, JavaScript) into native mobile apps. There are no SDKs to maintain; everything is managed in the cloud for you. Additionally, PhoneGap Build provides tools for quick deployment cycles, collaboration, and sharing apps with end users.
To get started, sign up for a free account here. Note that you’ll need to create an Adobe account if you don’t already have one.
The mobile app we’ll be creating is located here. For the rest of this article, all code referenced can be found in the “app – part two” folder.
Config.xml: Initial Configuration
Before we use PhoneGap Build to create the native versions of our app, we need to create “config.xml,” the configuration file that specifies app metadata and the native features that will be used. You can find this file in the root of the “app – part two” folder.
Let’s begin with the main app metadata:
<?xml version="1.0" encoding="UTF-8" ?>
  <widget xmlns   = "http://www.w3.org/ns/widgets"
    xmlns:gap   = "http://phonegap.com/ns/1.0"
    id          = "com.simpleprogrammer.crossplatapp"
    version     = "1.0.0">
</widget>
The config.xml file follows the W3C widget specification, which provides the standardization of packaged web apps. There are two attributes in the widget declaration to note: id and version.
The id attribute is the unique identifier for your application. Typically, you’ll see this written in reverse domain name notation; this format combines company domain plus project name. In my example here, “com.simpleprogrammer” (“simpleprogrammer.com”) is the company domain and “crossplatapp” is the name of our mobile app created in this article series.
The version attribute represents the current version number of the application and works exactly the same as with other software projects. Each time you release a new update of the app, you increment the version number here:
<name>Simple Programmer Cross-platform Camera app</name>

<description>
  This sample app is used in conjunction with the SP cross-platform development article by Matt Netkow.
</description>

<author href="http://www.example.com" email="noreply@example.com">
  Your Author Name
</author>

<!-- Build preferences for each platform. Too many to list here, see online PhoneGap docs for more. -->
<preference name='phonegap-version' value='cli-8.0.0' /> <!-- Version of PhoneGap to use -->
The next three elements, including name, description, and author, are PhoneGap Build-specific. They are not used or seen in your app at all, but rather displayed within the PhoneGap Build site on the particular app page. If you share your app with other developers or companies, the description and author information can be useful.
The last element, a preference tag named “phonegap-version,” designates the PhoneGap version to use when building the app.
<!-- https://www.npmjs.com/package/cordova-plugin-camera -->
<plugin name="cordova-plugin-camera" source="npm" spec="4.0.2" />
As you’ll recall from part one, we added the camera plugin into the app in order to use the mobile device’s camera to take photos. Using a plugin tag here informs PhoneGap Build to install the native portion of the code.
Config.xml: Adding Icons and Splash Screens
In the last section of the config file, we see a couple of “” tags, one for iOS and one for Android. Within these tags, we define various rules and configurations specific to the designated platform.
While there are many options to choose from, we’re going to focus only on icons and splash screens (full screen images displayed during app launch). These are specific to mobile applications, so we won’t see them in use when developing locally in the browser. Image dimensions for icons and splash screens vary wildly, too.
<!-- The platforms to build -->
<platform name="ios">
  <!-- Icons for iOS 8.0+, iPhone 6 / 6+ -->
  <icon src="www/icons/ios/icon-60@3x.png" width="180" height="180" />
  <!-- iOS 7.0+ -->
  <!-- iPhone / iPod Touch  -->
  <icon src="www/icons/ios/icon-60.png" width="60" height="60" />
  <icon src="www/icons/ios/icon-60@2x.png" width="120" height="120" />
  <!-- iPad -->
  <icon src="www/icons/ios/icon-76.png" width="76" height="76" />
  <icon src="www/icons/ios/icon-76@2x.png" width="152" height="152" />
  <!-- Spotlight Icon -->
  <icon src="www/icons/ios/icon-40.png" width="40" height="40" />
  <icon src="www/icons/ios/icon-40@2x.png" width="80" height="80" />
  <!-- iOS 6.1 -->
  <!-- iPhone / iPod Touch -->
  <icon src="www/icons/ios/icon.png" width="57" height="57" />
  <icon src="www/icons/ios/icon@2x.png" width="114" height="114" />
  <!-- iPad -->
  <icon src="www/icons/ios/icon-72.png" width="72" height="72" />
  <icon src="www/icons/ios/icon-72@2x.png" width="144" height="144" />
  <!-- iPhone Spotlight and Settings Icon -->
  <icon src="www/icons/ios/icon-small.png" width="29" height="29" />
  <icon src="www/icons/ios/icon-small@2x.png" width="58" height="58" />
  <!-- iPad Spotlight and Settings Icon -->
  <icon src="www/icons/ios/icon-50.png" width="50" height="50" />
  <icon src="www/icons/ios/icon-50@2x.png" width="100" height="100" />
  <!-- iPad Pro -->
  <icon src="www/icons/ios/icon-83.5@2x.png" width="167" height="167" />

  <!-- iPhone and iPod touch -->
  <splash src="www/splash/ios/Default~iphone.png" platform="ios" width="320" height="480" />
  <splash src="www/splash/ios/Default@2x~iphone.png" platform="ios" width="640" height="960" />

  <!-- iPhone 5 / iPod Touch (5th Generation) -->
  <splash src="www/splash/ios/Default-568h@2x~iphone.png" platform="ios" width="640" height="1136" />

  <!-- iPhone 6 -->
  <splash src="www/splash/ios/Default-667h.png" platform="ios" width="750" height="1334" />
  <splash src="www/splash/ios/Default-736h.png" platform="ios" width="1242" height="2208" />
  <splash src="www/splash/ios/Default-Landscape-736h.png" platform="ios" width="2208" height="1242" />

  <!-- iPad -->
  <splash src="www/splash/ios/Default-Portrait~ipad.png" platform="ios" width="768" height="1024" />
  <splash src="www/splash/ios/Default-Landscape~ipad.png" platform="ios" width="1024" height="768" />

  <!-- Retina iPad -->
  <splash src="www/splash/ios/Default-Portrait@2x~ipad.png" platform="ios" width="1536" height="2048" />
  <splash src="www/splash/ios/Default-Landscape@2x~ipad.png" platform="ios" width="2048" height="1536" />
</platform>

<!-- Android -->
<platform name="android">
  <!--
    ldpi    : 36x36 px
    mdpi    : 48x48 px
    hdpi    : 72x72 px
    xhdpi   : 96x96 px
    xxhdpi  : 144x144 px
    xxxhdpi : 192x192 px
  -->
  <icon src="www/icons/android/ldpi.png" density="ldpi" />
  <icon src="www/icons/android/mdpi.png" density="mdpi" />
  <icon src="www/icons/android/hdpi.png" density="hdpi" />
  <icon src="www/icons/android/xhdpi.png" density="xhdpi" />
  <icon src="www/icons/android/xxhdpi.png" density="xxhdpi" />
  <icon src="www/icons/android/xxxhdpi.png" density="xxhdpi" />

  <!-- Android -->
  <splash src="www/splash/android/drawable-port-ldpi-screen.png" platform="android" density="ldpi" />
  <splash src="www/splash/android/drawable-port-mdpi-screen.png" platform="android" density="mdpi" />
  <splash src="www/splash/android/drawable-port-hdpi-screen.png" platform="android" density="hdpi" />
  <splash src="www/splash/android/drawable-port-xhdpi-screen.png" platform="android" density="xhdpi" />
  <splash src="www/splash/android/drawable-port-xxhdpi-screen.png" platform="android" density="port-xxhdpi" />
  <splash src="www/splash/android/drawable-land-xxhdpi-screen.png" platform="android" density="land-xxhdpi" />
</platform>
You can create these images by hand, using tools such as Adobe Photoshop or Paint.net. This can be tedious, however, so I highly recommend the Ionic framework’s resources tool. Simply create one large icon and one large splash screen, then the tool takes care of generating all images for you. Here are the iOS icons, for example:![]()
Device Deployment Prerequisites
Interacting with the app on the web couldn’t be easier. Simply open up “index.html” in a web browser and it’s immediately usable.
Unfortunately, deploying and testing it as a native app requires a lot more steps and each platform has its own idiosyncrasies. The most challenging is Apple’s iOS platform.
iOS
Apple makes iOS development rather painful for beginners. Regardless of the development approach (cross-platform or native), there are multiple steps required to deploy an app onto a device.
The silver lining? If you have a Windows PC or a Linux machine, you’re in luck, because 99 percent of iOS app creation can be done without a Mac! The only task that requires a Mac is submission of the app binary to Apple for publication on the App Store.
Before you are able to deploy an app to your device, you’ll need to enroll in the Apple Developer Program. As of 2018, it costs $99 per year. There are ways to test locally without paying, but if you’re serious about developing an app, the cost is worth it.
Additionally, if you have a Mac, update to the latest version of MacOS and Xcode. Regardless of the operating system, download iTunes too; it is required to retrieve the device id of your mobile device.
Android
Android is significantly easier to set up than iOS, a great option for Windows, Linux, and Mac users. Only an Android device is required. You don’t need a Google Play account for local device testing.
Upload the App to PhoneGap Build
With your free PhoneGap Build account already created, sign in and click the “+ New App” button. There are two options to select from: pulling the code from GitHub or uploading a ZIP file. For simplicity’s sake, let’s upload a ZIP file.
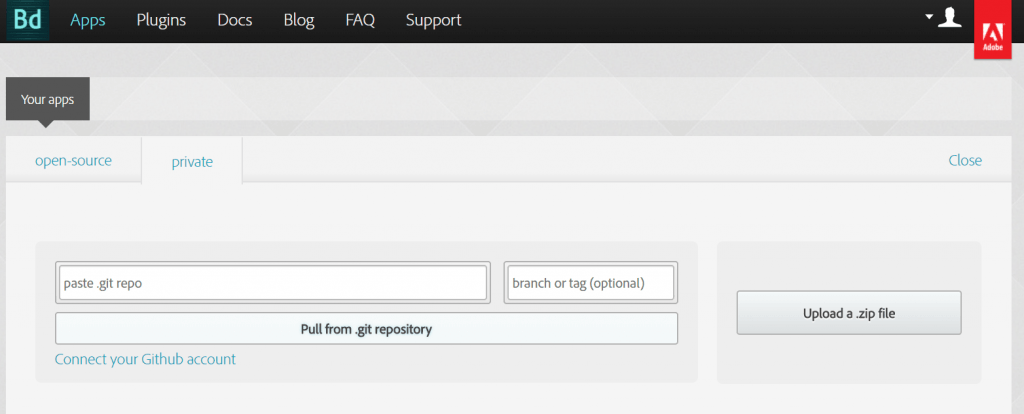
If you haven’t done so previously, download the code repository from GitHub. On the file system, navigate to the “sp-cross-platform-app” folder. Zip up the folder using your zip tool of choice.
Next, click the “Upload a .zip file” button and select “sp-cross-platform-app.zip.” After it has uploaded, click the “Ready to build” button. Next, click the “Simple Programmer Cross-…” title link.
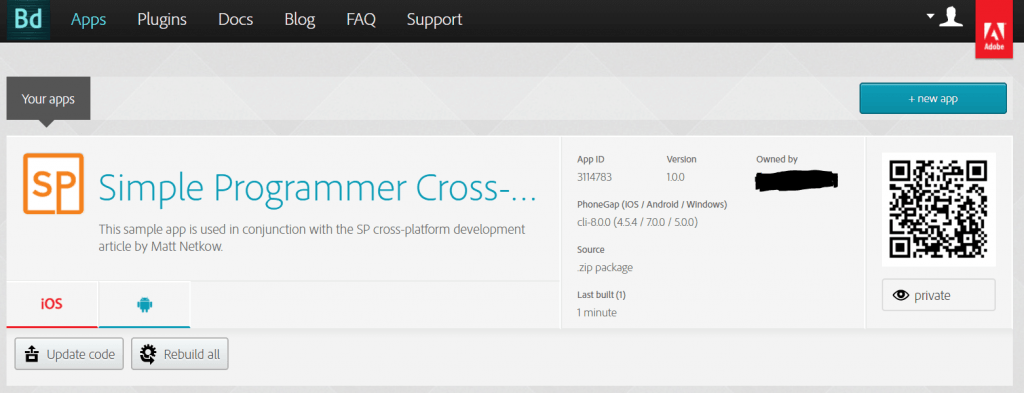
PhoneGap Build will begin creating the app for Android and iOS.
The Android version should build successfully, as evidenced by the blue “apk” button that becomes visible. The iOS build will fail, because you’ll need to follow the steps below before you’re able to build the app successfully.
There are two quick, easy ways to install the app. Sign into PhoneGap Build on your mobile device, then either tap the blue “apk” button or use a QR code scanning app to scan the QR code.
Install the Android App
By default, the installation will be blocked because the app hasn’t been signed with a developer certificate. Tap the “Settings” button that appears. Next, tap “Allow installation from unknown sources.” Navigate back to the app using the physical back button. Now, instead of seeing a “Settings” button, an “Install” button should appear. Tap it to install the app.
That’s all it takes to load the Android version of our app onto a device! To create a developer certificate for uploading onto the Google Play store, follow these instructions from the official Android developer site or from my Pluralsight course.
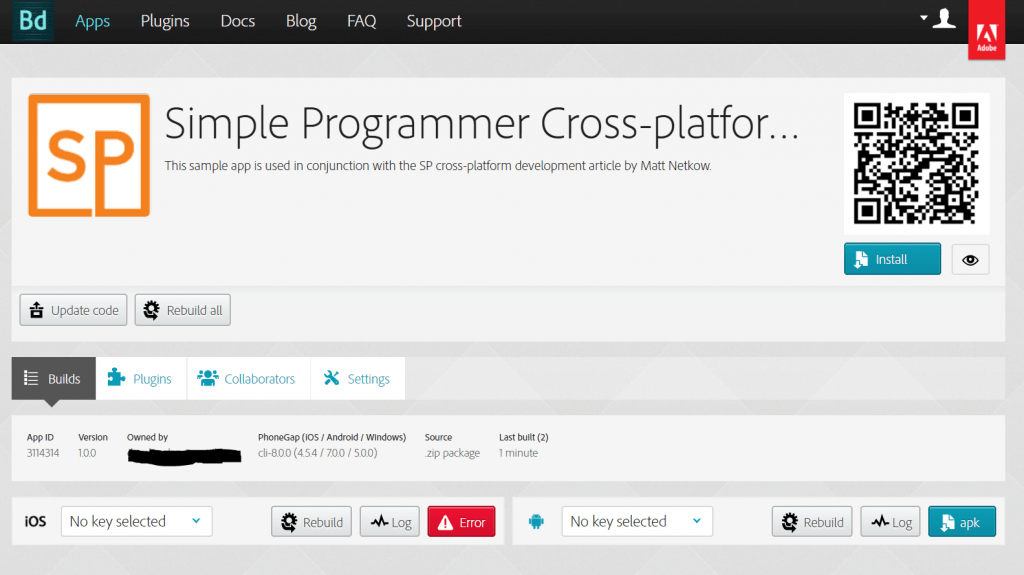
iOS Configuration
Unfortunately, getting the iOS version of the app onto a device isn’t as easy as Android. As we see here, we need a p12 certificate file and a provisioning file.
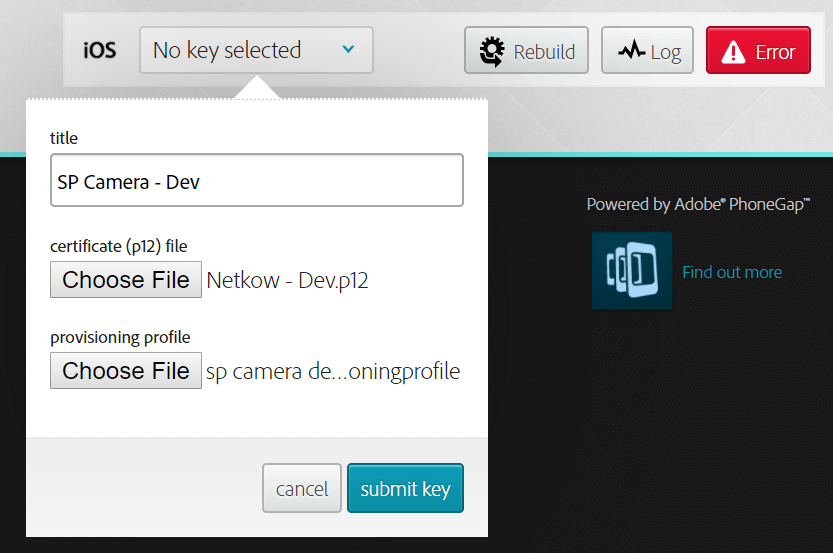
It’s not clear from this user interface, but there are multiple steps required to create those files.
Create an App ID
To begin configuring the app to build for iOS, sign into your Apple account at https://developer.apple.com. The first step involves registering an App Id. It represents a globally unique identifier (GUID) for your app. Every app requires a different App Id.
Navigate to the “Certificates, Identifiers, & Profiles” section, then the “App IDs” option, then click the plus (+) button. Enter the name of the app, such as “Simple Programmer Camera App.” Next, under the “App ID Suffix” section, choose “Wildcard App ID,” then enter com.simpleprogrammer.* for the Bundle ID field. This option permits you to use a single App Id for multiple apps—perfect for prototypes or how-to articles.
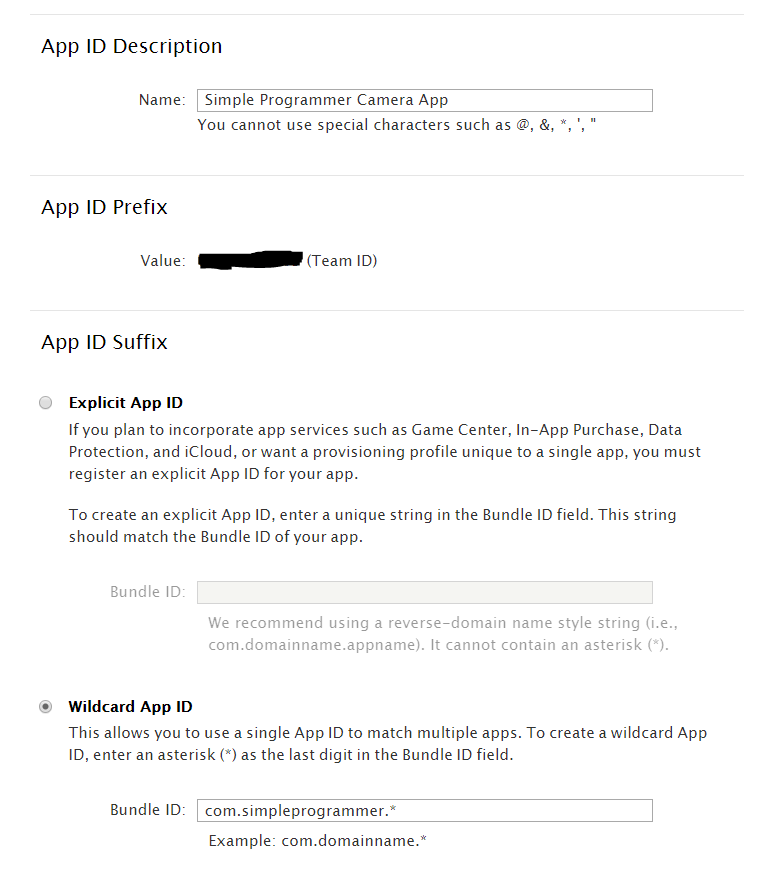
Ignore the App Services section and continue clicking through until the app has been registered.
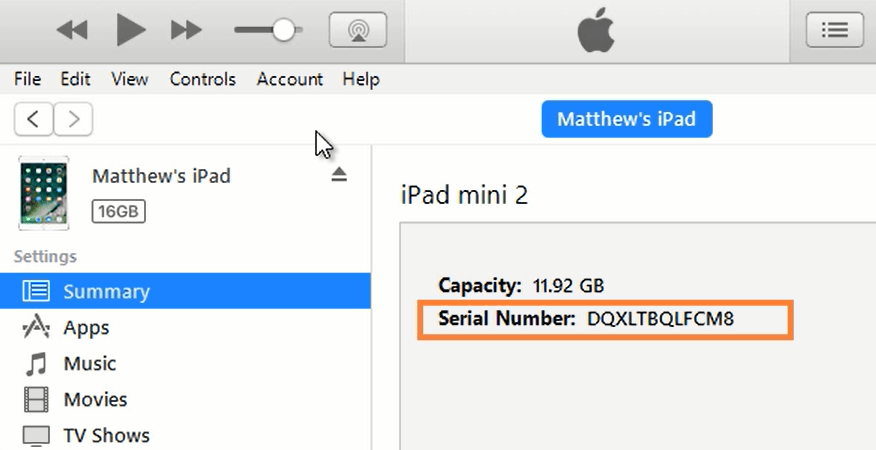
Register an iOS Device
In order to use an iOS device for app development, you must add it to your Apple Developer account. Connect your iOS device to your computer, then open iTunes. Navigate to the device summary screen. Click the Serial Number once to reveal the unique device identifier (UDID) value:
Then right-click and copy the UDID value:
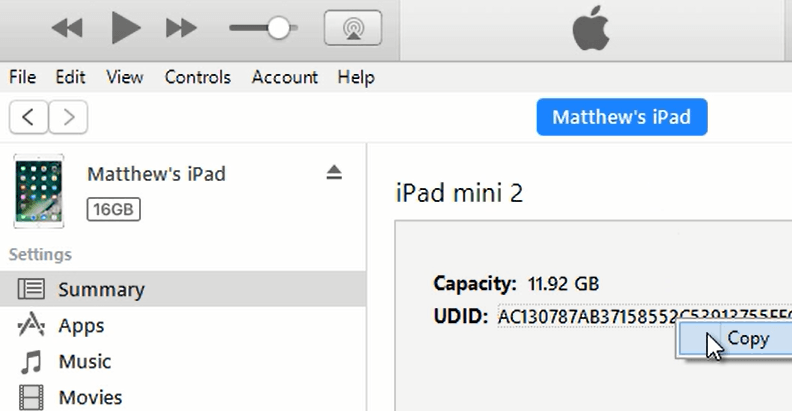
Back over in the Apple Developer site, on the “Certificates, Identifiers, & Profiles” screen, navigate to “Devices -> All.” Click the plus (+) button to add a new device. For the name field, enter something you’ll remember, such as “Matt’s iPad mini.” For the UDID field, paste in the GUID value we just copied from iTunes. Click the “Continue” button to finish registering the device.
Certificate Creation: Windows and Linux
During the app build process, PhoneGap Build will sign the app with a certificate file, which tells Apple and users that you are a verified developer.
Fortunately, we can use OpenSSL to generate the p12 certificate on Windows or Linux. By doing so, you’re able to write, debug, and test your app on an iOS device, all using PhoneGap Build and Windows/Linux only.
Start by downloading OpenSSL for Windows/Linux from openssl.org. Afterward, open up a command terminal as Admin and navigate to the OpenSSL bin folder. On my Windows system, it can be found in C:\Program Files\OpenSSL-Win32\bin. The first command to run will create a 2,048 bit private key:
openssl genrsa -out output/privateKey.key 2048
The next command will generate a certificate signing request (CSR) using that newly created private key:
openssl req -new -key output/privateKey.key -out output/CertificateSigningRequest.certSigningRequest -subj “/emailAddress=your.email@email.com, CN=Matt Netkow – Dev, C=US”
Use everything as-is in this command, except the last few details: “email address” should be your own, of course, and “CN” (common name) should be your name along with a designation of whether the certificate is for development or distribution. The “c” portion means country—“US” for the United States in this example, or another two-character country code.
Back over on the Apple Developer account, we take the newly generated CSR and convert it to a certificate. On the “Certificates, Identifiers, & Profiles” page, navigate to “Certificates -> All.” Click the plus (+) button to get started. You’ll be prompted to upload the CSR that we just created. After uploading the CSR, download the newly created certificate (a CER file) and copy it to the OpenSSL output folder.
With the downloaded certificate in place, we now need to convert it into a PEM file:
openssl x509 -in output/ios_development.cer -inform DER -out output/app_pem_file.pem -outform PEM
For the last step, we convert the PEM file to the p12 certificate file that PhoneGap Build needs:
openssl pkcs12 -export -inkey output/privateKey.key -in output/app_pem_file.pem -out output/dev_p12.p12
Before the p12 file is created, you’re prompted to password protect it. With a p12 certificate in hand, skip to the “Create a Provisioning Profile” section below.
Certificate Creation: Mac
In order to generate a certificate, you must first create a CSR from your Mac computer.
Generate a CSR
Begin by opening the Keychain Access program. Within the Keychain Access dropdown menu, select “Certificate Assistant -> Request a Certificate from a Certificate Authority.” There are a few details to fill in:
- User Email Address: I recommend using the same email as your Apple developer program account.
- Common Name: Input the name of the certificate. I highly recommend using your personal name or company name along with some designation between “development” and “distribution.” Since we’re creating a development certificate here, let’s use “development.”
- CA email address: Leave this empty. It’s not actually required despite saying so.
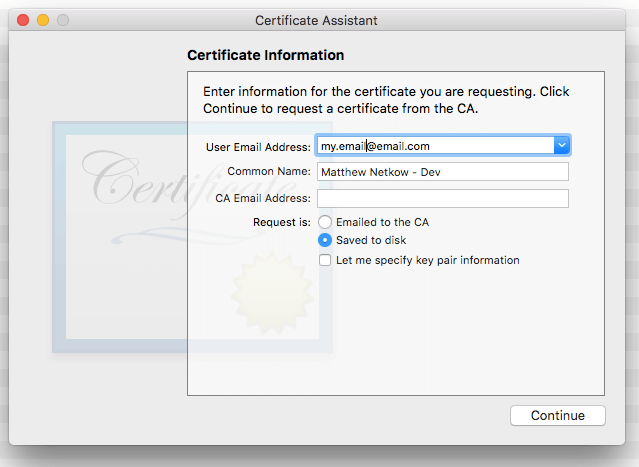
Choose the “Saved to disk” option because we want to upload this certificate request file to Apple right away. Next, click “Continue,” then save the file somewhere easily accessible. Consider using the common name you’ve already entered above.
Back over in the browser, on the “Certificates, Identifiers, & Profiles” screen, navigate to “Certificates -> All.” Click the plus (+) button to add a new certificate. Choose the “iOS App Development” option, then click “Continue.” Upload the recently created CSR file. Apple converts the CSR into a development certificate.
Downloading the certificate gives us a CER file, but PhoneGap Build actually requires a p12. The CER file only contains the public key of the developer, but in order for PhoneGap Build to properly sign the app for Apple’s acceptance, the public and private keys are required, which a p12 file provides.
Export the p12 Certificate
Double-click on the downloaded CER file to import it into the Keychain Access program. It shows up under the “login” keychain and the “My Certificates” category on the left-hand side. One year after the certificate has been created and/or your Apple Developer account is renewed (also on a yearly basis), you’ll need to go through this certificate request process again.
We can export a p12 version of our certificate rather easily. Expand the iPhone Developer certificate, then select both items that appear, the certificate and private key. Select the certificate first, then hold the “command” key and click on the “private” key. Next, right-click and choose the “export two items” option. You’ll be prompted to save the export as a p12 file. As we did when saving the CSR, I recommend using the Common Name when saving the p12.
Create a Provisioning Profile
Certificates represent us and/or our company and are used to sign all of the apps we create. Provisioning profiles allow us to control which Apple devices are allowed to run an app. We create a unique one for each app.
Back over on the Apple Developer site, on the “Certificates, Identifiers, & Profiles” screen, navigate to “Provisioning Profiles -> All.” Click the plus (+) button. We’re creating an app for local testing purposes, so choose “iOS App Development” instead of one of the Distribution options. Next, select the “Simple Programmer Camera App” App ID from the dropdown box.
Next, select the certificate. It will be labeled in a format similar to “[Your Name] (iOS Development).” Then, select the iOS device that we added in a previous step. Finally, enter the Profile Name. Because you’ll typically create many of these over time, it helps to specify the app and its purpose. In this case, “SP Camera App – Dev” works perfectly. Click “Continue” then download the profile.
Configure PhoneGap Build
With both the p12 and provisioning files in hand, we’re ready to build our app on PhoneGap Build!
Next, go to the iOS entry, click the “No Key Selected” dropdown option, then choose “Add a Key.” Enter a Title, then upload the p12 certificate and the provisioning file:
Click “submit key.” The build will fail right away—click the yellow padlock icon and enter the certificate password, then click the “submit key” button:
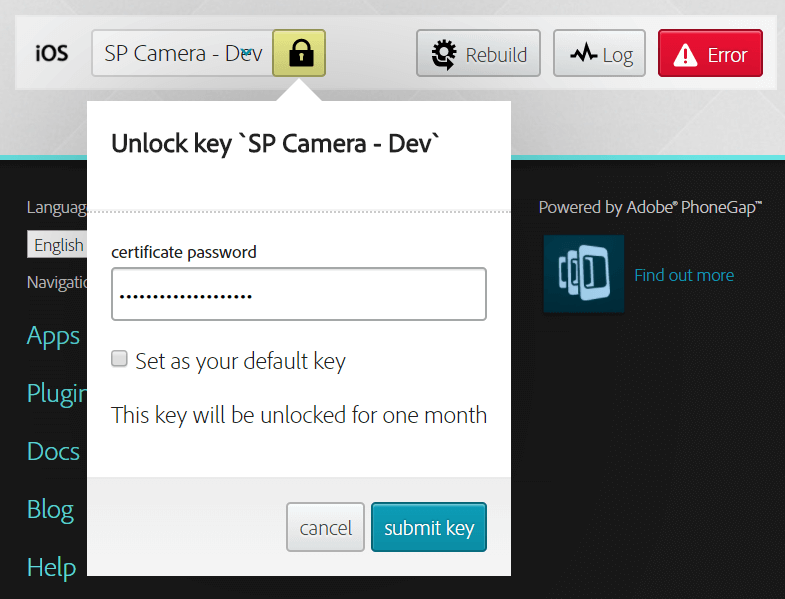
Click the “Rebuild” button to attempt another iOS build, which should complete successfully now.
Install the iOS App
And now, the moment we’ve all been waiting for!
After successfully creating a p12 certificate and provisioning profile, an iOS version should be created. Sign into PhoneGap Build on your mobile device, then tap the “ipa” button to install the app.
What’s Next?
We now have a fully implemented, web-based, cross-platform app that allows users to access the device’s camera to take and display photos. Using PhoneGap Build, we created both an Android and an iOS version of the app using the same codebase.
Interested in learning more about the cross-platform development approach? Check out my Pluralsight course, PhoneGap Build Fundamentals. It covers everything you need to go from zero to app store, including in-depth coverage of native plugins, testing and debugging on mobile devices, and app store submission.
After learning the fundamentals via my course, adopting a robust, mature web framework for serious app development will be a piece of cake! Two contenders I really like are React paired with React Native as well as Ionic. With either of them, you can create apps that run everywhere; on the desktop, mobile devices, and more.
| Published on Web Code Geeks with permission by Matt Netkow, partner at our WCG program. See the original article here: From Zero to App: The Cross-Platform Development Approach Simplified: Part Two Opinions expressed by Web Code Geeks contributors are their own. |
