This article is part of our Academy Course titled Building web apps with Node.js.
In this course, you will get introduced to Node.js. You will learn how to install, configure and run the server and how to load various modules.
Additionally, you will build a sample application from scratch and also get your hands dirty with Node.js command line programming.
Check it out here!
Table Of Contents
- 1. Introduction
- 2. What makes Node any different from the rest?
- 3. Event Driven Programming Model
- 4. Node.js non blocking I/O
- 5. Node.js as a tool
- 6. The REPL
- 7. Parallel Code Execution
- 8. DOM Handling in Node.js
- 9. NPM- The Node Package Manager
- 10. Understanding Node.js Event Loop
- 11. Node.js Event Driven Programming
- 12. Asynchronous Programming in Node.js
- 13. Event Emitter in Node.js
- 14. Creating a Event Emitter
- 15. Download the Source Code
1. Introduction
In recent times, one of the most hyped topics in the web programming world is Node.js. Almost all modern developers have at least heard about this. Some of them have coded and executed their projects using it as well. But still, many of the programming people find it hard to grasp the concepts of node.js programming.
When we introduce Node.js we can simply describe Node as Server-side javascript.
The learnign curve ofor writing Server Side JavaScript applicaiton cab be mitigated of course if we already have experience with client side Javascript. But easiness of development is not the only reason to choose node.js as our server side platform. There are also many others: Node.js is performance oriented and functional code centric.
Also keep in mind that any other full functional server can be build with node.js, like a mail server(SMTP), a server for chat applications and many others.
2. What makes Node any different from the rest?
Node.js is a platform built on the V8 javascript engine which is based on an event driven programming model and adopts a non-blocking I/O approach.
V8 is Google’s JavaScript implementation that is used in Chrome browser as a runtime. V8 achieves a great speed of executing javascript which is allmost similar to the performance of dynamic languages like Ruby or Python.
Also the closure feature of the javascript language (essentially using callback functions) makes event driven programming even easier to implement.
Node uses a single non-blocking thread with an event loop in order to serve the incoming client requests on the web. Javascript is designed to serve a single threaded event-loop based model in the client side. Additionally, it is used often to serve the dynamic nature of the client side work in different browsers.
See for example the following code:
var server = http.createServer(function (request, response) {
  	response.writeHead(200, {"Content-Type": "text/plain"});
  	response.write("Hello World");
  	response.end();
}).listen(8124,"127.0.0.1");
Here, we make a call to the createServer method and the anonymous function works as a callback function. The request and response parameters, as well as the server variable will be in ready state when the callback function is invoked.
We install the library using the npm command like this:
npm install <>
This will actually download and install the library within the node repository, either local or global. Then, we can use the methods of the library as per our requirement in the node.js application development. We generally need to add the library using the require function. This function returns the object of the particular library (in node convention this is called module) as a variable which we declare in our application source code file (in node convention this is called namespace).
See how this is achieved in the code below:
var http = require('http');

var server = http.createServer(function (request, response) {
	// Some code here
}).listen(8124,"127.0.0.1");
The variable http will hold the full functionality of the node.js http server, which calls the createServer method and returns the object in the server variable.
2.1. Explanation of source code of a http server creation
We create a file with name sampleserver.js as follows:
sampleserver.js:
// Creation and running of the Server
var http = require('http');

function dealWithWebRequest(request, response) {
  response.writeHead(200, {"Content-Type": "text/plain"});
  response.write("Hello Node.js");
  response.end();
}

var webserver = http.createServer(dealWithWebRequest).listen(8124,"127.0.0.1");

webserver.once('listening', function() {
	console.log('Server running at http://127.0.0.1:8124/');
});
Now we will run the following command (in a Linux terminal) using the node.js executable.
node sampleserver.js
We will have the following message in the console:
Server running at http://127.0.0.1:8124/
2.2. Explanation of the above node.js code
1. var http = require('http');
We are using the Node.js http module. We are doing a lookup for the HTTP module in the function call. We are actually calling the http module and assign its functionality to any variable (here it is ‘http’). This variable further serves for functional references in any subsequent calls.
2. var webserver = http.createServer(dealWithWebRequest).listen(8124,"127.0.0.1");
http.createServer will create a http server and assign it to the variable webserver. Also note that at the end of the closure, the TCP port and server address are provided. These parameters define where the server will execute. Here the server address is 127.0.0.1 and the TCP port is 8124.
Withe above lines, we’re binding the function to the server request event. This event will fire when the server will receive an HTTP request. This function will be called for every request that this server receives, and we need to pass two objects as arguments:
- HTTP request
- HTTP response.
The response object will be responsible for the reply message to the client.
3.
function dealWithWebRequest(request, response) {

	//Some code here
}
This is the callback function, which is passed as argument in htttp.createServer(…) module. We use a normal function passing as an argument in javascript.
4. Let’s now see the following three inner lines in the function:
    response.writeHead(200, {'Content-Type': 'text/plain'});
    response.write('Hello Node.js\\n');
    response.end();
We are writing the HTTP header specifying the content type of the response. For this sample server we have set the content type as text/plain (see first line).
Next, we are writing the message with response.write and “ending” the HTTP server response object to render the message to the browser. This means the response.end will send the message to browser and instruct the HTTP Protocol to end the response:
response.write('Hello Node.js\\n');
response.end();
5. After completing the whole work we have the listener setup for the server:
     server.once('listening', function() {
        console.log('Server running at http://127.0.0.1:8124/');
     });
Once the server is listening on that port, it will listen for event that are firing. We have defined a log message for that particular listening event. The message will fire only the first time, when the server will emit the message and so the server.once function will have been called.
In Node.js all files have their own module level scope to which all global declarations belong. Note that in Node.js, it is not possible to call a function that blocks for any reason. At least most of the functions residing in the various modules are designed based on this principle.
3. Event Driven Programming Model
As we have mentioned, Node.js programming is an event driven programming model. Here, the execution of a function or a set of code is driven by events.
Here are some events that are of interest:
- when someone clicks on the mouse to press one button, some functionality is triggered in the application or
- when the remote control button is pressed, the TV Channel changes
These are example of real world callbacks in the case of some event execution.
4. Node.js non blocking I/O
A web request comes in the node.js web server and the web server accepts this request and routes it to a listener object to process the response. Also this web server will remain ready to accept any new web requests. The previous response handling will remain in a queue in order to perform the rest of operations. The node.js environment takes care of preparing the web response which again can be a database call from the actual application.
5. Node.js as a tool
Node.js can also be used as a command line tool. We can get the Windows Distribution (MSI/EXE) or the Linux/ Mac Binary to install node.js. Also we can get the node.js source code to build the binaries from it.
After installing Node.js, when we write node in a command prompt, we will be presented with an intaractive javascript console for it, where we can execute various node.js commands. We can run node.js based programs with node ourprogram.js as a usual convention.
6. The REPL
In node.js the REPL represents for Read-Eval-Print-Loop which is a simple program that accepts tasks, evaluates the input, and prints their results back. In the node.js interactive console, we can execute most of the commands without creating separate files and it prints the results as we expect.
7. Parallel Code Execution
In node.js every workable unit will run in parallel, except the code that runs in only one process. The main process gets the user request and routes it to various workable modules in order to be executed and to be acknowledged by those corresponding modules. The main process in node.js constantly runs a loop after delegeting the work to different callback handlers for various modules as necessary. The main process always checks for any new request to be served. Also when we the completion acknowledgement comes from different sub-modules, it shows the outcome (in web convention we can call it response or deferred response).
8. DOM Handling in Node.js
Nowadays, there are helper libraries available to manipulate DOM from node.js modules. Here is an useful link. But as we understand, the DOM Manipuation is still a client side concept which is not the main focus of the node.js platform.
9. NPM- The Node Package Manager
Node.js is having an ever growing repository of different utilities and server side tasks. These modules can be installed through the Node Package Manager (NPM) in our local development environmen. The general syntax for installing a new module is:
npm install modulename.
10. Understanding Node.js Event Loop
In a traditional web programming model, such as in a JEE Environment, each web request is served by one thread. This thread usually has less CPU overhead than a standalone process, but all operations in that thread are synchronous. Usuall, the thread functionality is not implemented with asynchronous programming in mind. As those models are synchronous, the application behaves like a blocking operation to the end user and can also be memory-expensive.
Within a web request-response cycle, most of the the time is spent in order to complete the I/O Operations. So these I/O operations can have a significant performance impact on the application, especially if the application is processing thousand of hits per minute or more.
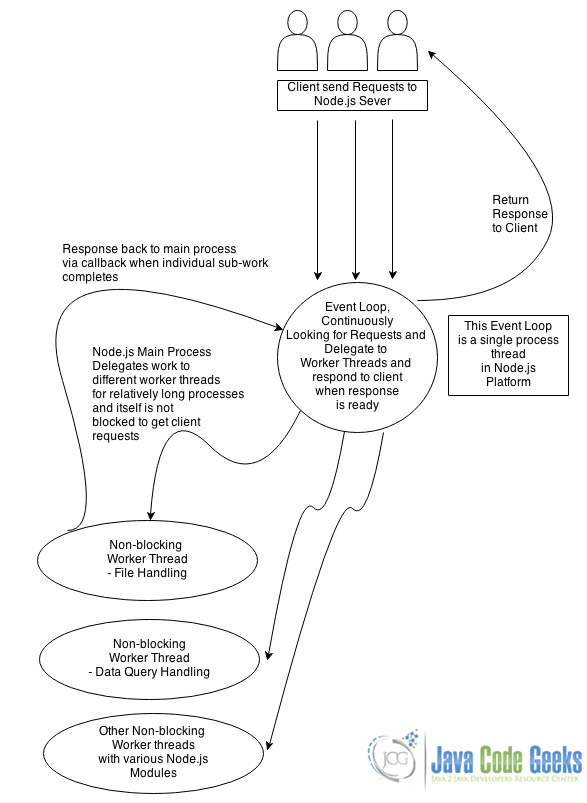
And here is how the node.js non-blocking programming models works efficiently. In contrast to the traditional web programming model, node.js platform works in one single process which handles the web requests.
But all the IO operations and the other function calls are asynchronous in nature. They are “waked” by a callback listener from the node.js main process and they run each of the calls in different threads (Child Processes).
In the main process, the node.js server call is never blocked as this process only delegates the IO tasks to the sub processes (worker threads) and the response to the client whenever the sub processes are completed. Additionally, the main process continuously loops over to handle new web requests and to respond to the client to handle over the results as found from the relatively long running sub-processes.
So, all the works in the main process in node.js are notification/event driven and continuous in nature. That is the reason why the node.js main process is known as the node.js event loop.
All the child threads are handled by the node.js platform itself and the application programmer does not need to know about the inner details (though conceptually knowing the architecture of the platform will definitely help the programmer to code more efficiently).
We can derive a flow as follows:
11. Node.js Event Driven Programming
According to wikipedia:
“In computer programming, event-driven programming (EDP) or event-based programming is a programming paradigm in which the flow of the program is determined by events—e.g., sensor outputs or user actions (mouse clicks, key presses) or messages from other programs or threads.”
Event driven programs are driven by two factors – one is the Event Occurance or Event Invocation/Generation and another is some unit of work executed upon listening to the Event.
Now, from the node.js perspective, we need to understand how the platform approaches the event driven programming model. The underlying architechture of the node.js platform is different from the traditional runtimes for java, ruby, php etc.
Let see the following code:
var file = fileSystem.read("big.txt");
console.log(file.toString());

var takeAnotherFile = fileSystem.read("anotherbigfile.txt");
console.log(takeAnotherFile.toString());
Here the file can be very big in size and it may take some time to read in memory. After the reading of the content in memory is completed, the application will proceed to the next execution line where the file contents will be shown. Please note, this samples does not actually belong to some language, but is used for illustration purposes only.
After the above operation, the program will continue to the next file, also reading it and so on. It is thus clear that the next lines of code will “wait”, until the execution of the previous line is complete.
In node.js, there is completely different approach to solve the wait-until-previous-work-complete scenario. Here is an introduction to the “asynchronous callbacks per event” approach, used like in the following code:
fileSystem.read("big.txt", function(data) {
  console.log(data.toString());
});

fileSystem.read("anotherbigfile.txt", function(anotherdata) {
  console.log(another.toString());
});
So, by providing the fileSystem.read function and making it asynchronous in nature, the application will show the content of the file when reading is complete and it will not wait until the content is completely ready. Instead, it will go proceed to the next execution, i.e. another file read.
Here, the sub-processes that are delegated from the main process will work in self-contained threads. At the same time, the main process will wait for new events, such as requests or notifications from the sub processes about work being completed (this is the famous Event Loop of the node.js platform).
In general, the architecture for Node.js is as follows:
- Receive all of the event generation notification with attached Data.
- There should be a central unit which decides the delegation sequence for the various sub-processes/handlers.
- Handlers which run in self-contained threads, which execute the delegated work unit separately from the main process and notify it about the work completion.
Following is a flow to describe the above:

12. Asynchronous Programming in Node.js
In the general context of programming, programmers generally think of code which will execute serially. But this approach is not a good solution for an application where users are interacting with it in real time.
IN sequential execution of code, any I/O operations (usually calls to the various operating system specific functions or network specific functions) will cause the code block to wait. The particular operation will have to be completed in order to proceed. The code will block and eventually the application will seem as a halted process to the end user, preventing him/her to operate further.
The Node.js main process, which continuously listens for server requests, runs as a single process and delegates the sub-operations to the appropriate data handlers for execution and then “listens” for any notification from the sub-process regarding the completion of the assigned work. The main process will never be blocked for any sub-operations from the handlers. So this approach is truly an asynchronous operation.
But please keep in mind that not all functions in node.js are asynchronous. For example, some of the core functions related to file handling are utilizing functions which are synchronous in nature. (Example: readFileSync function in FileSystem module).
12.1. Code snippet for asynchronous programming
Here the single threaded node.js will behave as multi-threaded assigning tasks to the corresponding worker threads. The pattern here is to execute the work from a callback function. The general format for the operation will be like this:
(The following code will execute without waiting for the the callback function response)
var callback = function() {
   // return to the response
};
thisIsAsynchronousCall(callback);
With this approach, the caller function will need to pass the code to the callee function.
But there is also another promising approach. Here the callee function will not need to know about the callback. And it will remain as a separate function with self-contained code. So, in this method we will have code like this:
var callback = function() {
   // return to the response
};

Promise.when(thisIsAsynchronousCall())
.then(callback);
Here the callback function will never be passed to the asynchronous thisIsAsynchronousCall() function. The functions whether synchronous or asynchronous, will be handled by the “Promise” concept.
A popular implementation of the promise concept in node.js is Q.
13. Event Emitter in Node.js
On Node many objects can emit events. To have access of the events module, we need to install it accordingly. The installation command will be:
npm install events
13.1. The .on method
We can listen for these events by calling one of these objects’ on method, passing in a callback function. For example, a file ReadStream can emit a data event every time there is some data available to read.
Here is the code example:
var fs = require('fs'); // get the fs module
var readStream = fs.createReadStream('/etc/passwd');

readStream.on('data', function(data) {
	console.log(data);
});

readStream.on('end', function() {
	console.log('file ended');
});
Here we are binding to the readStream’s data and end events, passing in callback functions to handle each of these cases. When one of these events happens, the readStream will call the callback function.
There are 2 ways of doing the above operation:
- Pass in an anonymous function.
- Pass a function name for a function available on the current scope, or a variable containing the function.
13.2. The .once method
When we want the callback method to be called only once, we use this approach in our work:
server.once('connection', function (stream) {
	console.log('We have our first call!');
});
This will have the same effect as calling the function and then removing the relevant listener:
function connectAndNotify(stream) {
	console.log('We have our first call!');
	server.removeListener('connection', connectAndNotify);
}
server.on('connection', connectAndNotify);
The removeListener function takes the event name and then removes it from the current context of code execution. To remove all Listeners from the current context we should use removeAllListeners function.
14. Creating a Event Emitter
We have to use the events package in node.js.
var EventEmitter = require('events').EventEmitter,
util = require('util');
Now the Costructor:
var eventEmitterClass = function() {
	console.log("The Class Constructor Example");
}

util.inherits(eventEmitterClass, EventEmitter);
util.inherits will set up the prototype chain so that the EventEmitter prototype methods will be available in eventEmitterClass instances.
With this way, instances of eventEmitterClass can emit events:
eventEmitterClass.prototype.emitMethod = function() {
	console.log('before the emitevent');
	this.emit('emitevent');
	console.log('after the emitevent');
}
Here we are emiting an event named emitevent.
Now clients of eventEmitterClass instances can listen to emitevent events like this:
var evtEmitInstance = new eventEmitterClass();

evtEmitInstance.on('emitevent', function() {
	console.log('We have got the functionality of Event Emitter');
});
Now the calling part from the instance of the class:
evtEmitInstance.emitMethod();
Here we have got the custom event from the class and work within the event.

15. Download the Source Code
The source code for the file is attached here: Node_Introduction.zip
So, in this article we have covered basic node.js concepts and some of the advanced topics. We will discuss again about those in our next lessons.

please tell me how should I do and learn node js in more detail.I am very interested in node js. So I request you to tell me what book I should read.Please explain about how we can node js and javascript.