Table Of Contents
1. Introduction
In this post we are striving to build a Bootstrap Calendar. Our calendar lets user navigate dates one month at a time choosing one. It is attached to an input control which displays the date selected by the user. The input will act as a trigger to display the calendar. As and when the user sets focus on the input, the calendar appears right below it. We will leverage the modal component of Bootstrap and write JavaScript to implement the desired behavior.
2. Tools
The tools I used for the example are:
1. Bootstrap v3.3.7
2. JQuery v1.12.4
3. Node.js v6.3.0
4. Express v4.15.3
5. Visual Studio Code IDE
Let us briefly talk about the tools used. Bootstrap is a popular framework for developing responsive websites. These websites look good on regardless of screen size. As a result a lot of burden is reduced on developers working on sites accessed from devices with varying screen sizes. Moving to JQuery, it is a JavaScript library with a solid reputation and has made life easier when writing JavaScript that works on all browsers in the same way. Node.js allows us to write JavaScript that runs on the server side and the Express module allows us to quickly setup a Web Server using its JavaScript API. The Visual Studio Code IDE is a lightweight IDE for writing Node application among other types of projects. Now let us get started writing our Bootstrap Calendar.
3. Project Layout
The project layout that we will follow for this example is illustrated in the Screen Capture below
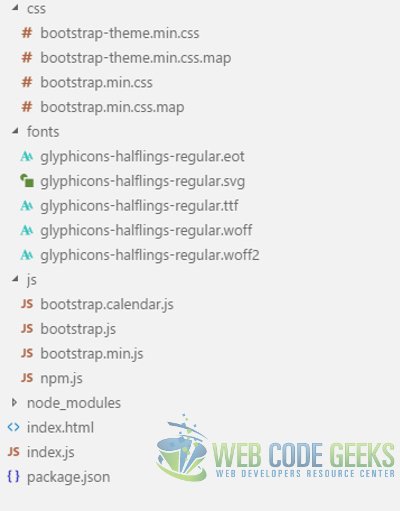
css
The css folder holds the Bootstrap css files taken from the Bootstrap download.
fonts
The fonts that came with the Bootstrap download are placed in this folder.
js
All Bootstrap JavaScript files and the ones we create reside in this folder.
index.js
This file is placed in the root of our project and contains code for a bare minimum web server for our use.
index.html
The index.html file contains all the HTML markup. I have used the template provided in the Getting Started section of the Bootstrap website as a starter.
bootstrap.calendar.js
This file in the js folder is where we will write JavaScript to enable functionality of our Calendar control.
4. HTML Markup
In this section we will setup and write the HTML markup for our example in the index.html page. Lets add an input tag with a corresponding label above it. These will prompt the user to enter or rather select their birth date.
<label for="birthday">Enter Birth Date</label>
<input class="form-control" id="birthday" data-calendar="" placeholder="Select Birth Date..." autocomplete="off" />
Now our index page should look like below. Do notice the addition of data-calendar attribute to the input tag. It helps select inputs for which we will show our calendar control.
index.html
<!DOCTYPE html>
<html lang="en">
<head>

    <metacharset="utf-8">
    <metahttp-equiv="X-UA-Compatible"content="IE=edge">
    <metaname="viewport"content="width=device-width, initial-scale=1">
    <!-- The above 3 meta tags *must* come first in the head; any other head content must come *after* these tags -->
    <title>Bootstrap Calendar Example - Web Code Geeks</title>
    <!-- Latest compiled and minified CSS -->
    <linkrel="stylesheet"href="/css/bootstrap.min.css">
    <!-- Optional theme -->
    <linkrel="stylesheet"href="/css/bootstrap-theme.min.css">
    <!-- HTML5 shim and Respond.js for IE8 support of HTML5 elements and media queries -->
    <!-- WARNING: Respond.js doesn't work if you view the page via file:// -->
    <!--[if lt IE 9]>
    <script src="https://oss.maxcdn.com/html5shiv/3.7.3/html5shiv.min.js"></script>
    <script src="https://oss.maxcdn.com/respond/1.4.2/respond.min.js"></script>
    <![endif]-->
</head>
<body>

    <divclass="panel panel-info">
        <div class="panel-heading">
            <h1>WebCodeGeeks - Bootstrap Calendar</h1>
        </div>
        <div class="panel-body">
            <div class="form-group">
                <labelfor="birthday">Enter Birth Date</label>
                <inputclass="form-control"id="birthday"data-calendar=""placeholder="Select Birth Date..." autocomplete="off" />
            </div>
        </div>
    </div>
    <!-- jQuery (necessary for Bootstrap's JavaScript plugins) -->
    <scriptsrc="https://ajax.googleapis.com/ajax/libs/jquery/1.12.4/jquery.min.js"></script>
    <!-- Include all compiled plugins (below), or include individual files as needed -->
    <!-- Latest compiled and minified JavaScript -->
    <scriptsrc="./js/bootstrap.min.js"></script>
    <scriptsrc="./js/bootstrap.calendar.js"></script>
    <styletype="text/css">
    .activeDate{
        background-color:lightskyblue;
        color:white;
    }

    .inactiveDate{
        background-color:grey;
        color:black;
    }

    .modal{
        right:auto;
    }
    </style>
</body>
</html>
5. JavaScript
Now let us bring our calendar control to life through some JavaScript. Remember we created a file specifically to write the behavior of the control called bootstrap.calendar.js. The behavior that we will script in order are as described below.
5.1 Build the markup of the Calendar
We write a function called createCalendar() to build our calendar from scratch. The first function builds the final Html markup from scratch to represent a bootstrap modal on the outside. The inside of this shell first contains the previous and next button with a text indicating the current month and year in the middle. Below this, is the Table with weekday names as headers and the dates in the tbody of the table. The second function updates the calendar with new values.
5.2 Update the Calendar
A function called updateCalendar handles updating calendar without having to recreate the calendar from scratch. It updates the calendar in case the user switches from one month to another.
5.3 Allow selection of date
When the user clicks a date in the calendar to select it we highlight the same by applying the .selected css class to the table cell.
5.4 Navigate dates for desired month
The two buttons surrounding the month name and year at the top of the calendar allow the user to navigate between months. On clicking these buttons either the previous or the next month’s calendar is displayed in the control.
5.5 Update/Populate the selected date
When the user selects a date in the calendar by clicking on it, we update the text control by populating it with the date selected by the user.
5.6 The completed calendar control
Now our finished bootstrap.calendar.js should look like this:
bootstrap.calendar.js
"use strict";
var calendarWidget;
var weekDays =['Sun', 'Mon', 'Tue', 'Wed', 'Thu', 'Fri', 'Sat'];
var monthNames = ['January', 'February', 'March', 'April', 'May', 'June', 'July',
'August', 'September', 'October', 'November', 'December'];
var currentMonth = (new Date()).getMonth();
var currentYear = (new Date()).getFullYear();
var selectedDate = new Date();
$(document).ready(function () {

    //Setup the input tags to display calendar by binding to their focus event
    $("input[data-calendar]").on("focus", function (event) {

        var element = event.target || event.srcElement;

        //Display calendar if the inputs receive focus or are clicked
        if(calendarWidget){

            updateCalendar(element, element.value);
        }else{

            createCalendar(element, element.value);
        }
        showCalendar(element);

    });
    $(document).on("click", function(event){
        var element = event.target|| event.srcElement;
        if($.contains($("#wcg-modal")[0], $(element)[0]) == false &&
        $(element).is("input[data-calendar]") == false){
            hideCalendar(element);
        } else if($(element).hasClass("activeDate") == true){
            setInputValue($(element));
        } else if($(element).hasClass("leftChevron") == true){
            changeMonth(element, -1);
        } else if ($(element).hasClass("rightChevron") == true){
            changeMonth(element, 1);
        }

    });
});
function setInputValue(element){
    selectedDate = new Date(currentYear, currentMonth, $(element).text());
    $(calendarWidget['selectedElement']).val(selectedDate.getMonth() + 1 + '/' +
    selectedDate.getDate() +'/'+ selectedDate.getFullYear());
    $(calendarWidget).find(".selected").removeClass("selected");
    $(element).addClass("selected");
};
function changeMonth(ctrl, month){
    var currentValue = new Date(currentYear, currentMonth, selectedDate.getDate());
    updateCalendar(ctrl, currentValue.setMonth(currentValue.getMonth() + month));
}
function showCalendar(element){
    calendarWidget["element"] = element;
    $(calendarWidget).modal('show');
}
function hideCalendar(element){

    $(calendarWidget).modal('hide');
}

function updateCalendar(element, date){
    var calendarDate = date? new Date(date): new Date();
    $(calendarWidget).find("#monthYear").first().text(calendarDate.toString());
    $("#dateChart").find("tbody").first().replaceWith(getDateTable(calendarDate));

    currentMonth = calendarDate.getMonth();
    currentYear = calendarDate.getFullYear();
    selectedDate = calendarDate;
}
function createCalendar(element, date) {

    var calendarDate = date == true? new Date(date): new Date();
    var calendarDiv = $('<div id="wcg-modal" class="modal fade" ' +
    'data-backdrop="false" role="dialog" >' +
    '<div class="modal-dialog modal-sm" role="document" >' +
    '<div class="modal-content" >' +
    '<div class="modal-body" ></div></div></div></div>');
    var infoDiv = $('<div class="container-fluid" ><div class="row" ></div></div>');
    var leftChevron = $('<button type="button" class="leftChevron btn-info col-xs-3" >' +
    '<span class="glyphicon glyphicon-chevron-left" ></span></button>');
    var rightChevron = $('<button type="button" class="rightChevron btn-info col-xs-3" >' +
    '<span class="glyphicon glyphicon-chevron-right"></span></button>');
    var monthYear = $('<span id="monthYear" class="col-xs-6" >' +
    calendarDate.toString() + '</span>');
    var dateChart = $('<table id="dateChart" class="table table-condensed '+
    'table-hover table-bordered" ></table>');
    var weekdayTitleRow = $('<thead id="weekdayTitles" ><tr></tr></thead>');
    weekDays.forEach(function(item, index){
        $(weekdayTitleRow).find("tr").first().append($('<th>' + item + '</th>'));
    });
    $(infoDiv).find(".row").first().append(leftChevron);
    $(infoDiv).find(".row").first().append(monthYear);
    $(infoDiv).find(".row").first().append(rightChevron);
    $(calendarDiv).find(".modal-body").first().html(infoDiv);
    $(dateChart).append(weekdayTitleRow);
    $(dateChart).append(getDateTable(calendarDate));
    $(calendarDiv).find(".modal-body").first().append(dateChart);
    calendarWidget = $(calendarDiv);

    $(document.body).append(calendarWidget);

    //Place the calendar under the correct input tag
    $(calendarWidget).css({
        left: $(element).position().left + "px",
        top: $(element).position().top + $(element).height() + 8 + "px"
    });
    calendarWidget["selectedElement"] = $(element);
    currentMonth = calendarDate.getMonth();
    currentYear = calendarDate.getFullYear();
    selectedDate = calendarDate;
};

function getDateTable(date){
    var fullDate = date;
    var selectedMonth = date.getMonth();
    var dateTable = $("<tbody></tbody>");
    var startDate = new Date(fullDate.getFullYear(), fullDate.getMonth(), 1);
    do {
        startDate.setDate(startDate.getDate() - 1);

    }while(startDate.getDay() > 0)
    for(var j = 0 ; j < 6; j++){
        $(dateTable).append($("<tr></tr>"));
        var row = $(dateTable).find("tr").last();
        for(var i = 0; i < 7; i++){
            if(selectedMonth === startDate.getMonth()){
                row.append($('<td class="activeDate" >' + startDate.getDate() + '</td>'));
            } else {
                row.append($('<td class="inactiveDate" >' + startDate.getDate() + '</td>'));
            }

            startDate.setDate(startDate.getDate() + 1);
        }
    }

    return dateTable;

}

Date.prototype.toString = function(){

    var formattedDate = monthNames[this.getMonth()];
    formattedDate += (" " + this.getFullYear());
    return formattedDate;
}
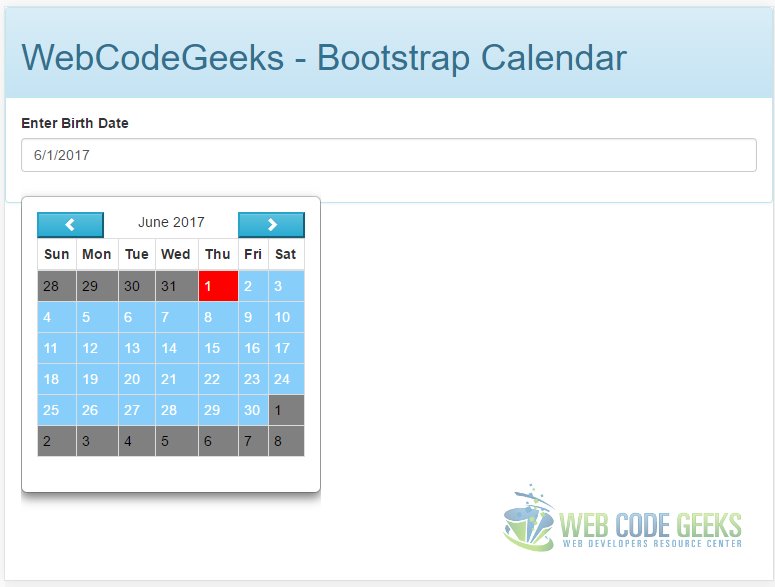
6. Running the example
Now that we are done building our calendar, lets run it to see it in action.
At the root of the application type the below commands:
npm install
node index.js
Now open a browser and navigate to http://localhost:8090
You should see the output below in the browser:
7. Download the Source Code
This wraps up the Example wherein we looked at building a Bootstrap Calendar.
You can download the full source code of this example here: Bootstrap Calendar Example
