In this article we will explore the integration of Bootstrap with the Grails web framework. After a discussion on Grails framework we look at using Bootstrap framework with a grails application. For versions lower than 2.4.4 of Grails framework we need to enable a plugin to integrate the two but with version 2.4.4 and above, much less effort is required. We will look at all scenarios with different versions in this tutorial.

Table of Contents
1. Grails
Grails is a groovy based web framework which promotes Convention over configuration paradigm. “Convention over Configuration” essentially means that the framework makes many of the decisions for us by using sensible defaults. Only when we need to deviate or implement customized functionality we need to make effort for those changes. For the most part the defaults make sense and we can go along with them thus reducing our workload and increasing productivity manifolds.
Grails is built on top of existing technologies like Hibernate and Spring MVC using existing codebases to enable quick development and increased developer productivity.
2. Tools
We will use the following toolset for this tutorial:
- Grails Framework v3.2.9
- Grails Framework v2.4.4
- Grails Framework v2.3.9
- Bootstrap
- Notepad++
- JDK v1.8.0_u31
3. Get Started
Firstly we will create an application using Grails v3.2.9 and take a look at the way Bootstrap is used with it. Next we will generate a sample application using Grails v2.3.9 & v2.4.4. We will use the UI generated with latest version which uses bootstrap and make it work with these versions of grails.
Now that we have our work cut out let’s get started.
3.1 Grails v3.2.9 Application
This is the latest version of Grails Framework at the time of this article. To create a grails application, we open a command prompt at the root of the folder where we want to place the project. Type in the following command to have an application scaffolded for us.
grails create-app WCGBootstrapGrails329
Once this command is executed we have a starter application ready and placed in the folder WCGBootstrapGrails329. To run this application we type in the following command after switching to this folder.
grails run-app
It might take a while but eventually a message should show to the effect that the application is running at http://localhost:8080. Once we navigate to this address in a browser we should see the following on our screens.
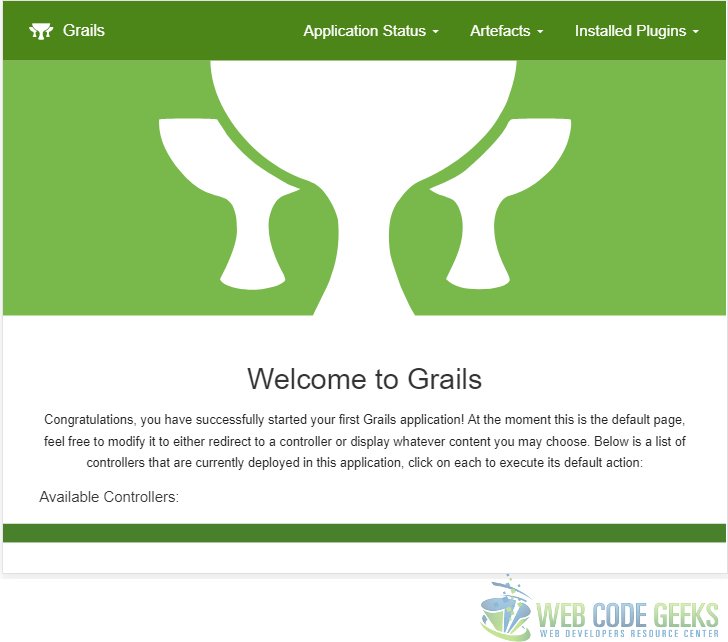
The Html rendered above is built from two files, namely main.gsp and index.gsp. Their content is below:
main.gsp
<!doctype html>
<html lang="en" class="no-js">
<head>
<meta http-equiv="Content-Type" content="text/html; charset=UTF-8"/>
<meta http-equiv="X-UA-Compatible" content="IE=edge"/>
<title>
<g:layoutTitle default="Grails"/>
</title>
<meta name="viewport" content="width=device-width, initial-scale=1"/>
<asset:stylesheet src="application.css"/>
<g:layoutHead/>
</head>
<body>
<div class="navbar navbar-default navbar-static-top" role="navigation">
<div class="container">
<div class="navbar-header">
<button type="button" class="navbar-toggle" data-toggle="collapse"
data-target=".navbar-collapse">
<span class="sr-only">Toggle navigation</span>
<span class="icon-bar"></span>
<span class="icon-bar"></span>
<span class="icon-bar"></span>
</button>
<a class="navbar-brand" href="/#">
<i class="fa grails-icon">
<asset:image src="grails-cupsonly-logo-white.svg"/>
</i> Grails
</a>
</div>
<div class="navbar-collapse collapse" aria-expanded="false" style="height: 0.8px;">
<ul class="nav navbar-nav navbar-right">
<g:pageProperty name="page.nav" />
</ul>
</div>
</div>
</div>
<g:layoutBody/>
<div class="footer" role="contentinfo"></div>
<div id="spinner" class="spinner" style="display:none;">
<g:message code="spinner.alt" default="Loading…"/>
</div>
<asset:javascript src="application.js"/>
</body>
</html>
index.gsp
<!doctype html>
<html>
<head>
    <meta name="layout" content="main"/>
    <title>Welcome to Grails</title>

    <asset:link rel="icon" href="favicon.ico" type="image/x-ico" />
</head>
<body>
    <content tag="nav">
        <li class="dropdown">
            <a href="#" class="dropdown-toggle" data-toggle="dropdown" role="button" aria-haspopup="true"
aria-expanded="false">Application Status <span class="caret"></span></a>
            <ul class="dropdown-menu">
                <li><a href="#">Environment:
${grails.util.Environment.current.name}</a></li>
                <li><a href="#">App profile: ${grailsApplication.config.grails?.profile}</a></li>
                <li><a href="#">App version:
<g:meta name="info.app.version"/></a></li>
                <li role="separator" class="divider"></li>
                <li><a href="#">Grails version:
<g:meta name="info.app.grailsVersion"/></a></li>
                <li><a href="#">Groovy version: ${GroovySystem.getVersion()}</a></li>
<li><a href="#">JVM version: ${System.getProperty('java.version')}</a></li>
                <li role="separator" class="divider"></li>
                <li><a href="#">Reloading active: ${grails.util.Environment.reloadingAgentEnabled}</a></li>
            </ul>
        </li>
        <li class="dropdown">
            <a href="#" class="dropdown-toggle" data-toggle="dropdown" role="button" aria-haspopup="true"
aria-expanded="false">Artefacts <span class="caret"></span></a>
            <ul class="dropdown-menu">
                <li><a href="#">Controllers: ${grailsApplication.controllerClasses.size()}</a></li>
                <li><a href="#">Domains: ${grailsApplication.domainClasses.size()}</a></li>
                <li><a href="#">Services: ${grailsApplication.serviceClasses.size()}</a></li>
                <li><a href="#">Tag Libraries: ${grailsApplication.tagLibClasses.size()}</a></li>
            </ul>
        </li>
        <li class="dropdown">
            <a href="#" class="dropdown-toggle" data-toggle="dropdown" role="button" aria-haspopup="true"
aria-expanded="false">Installed Plugins <span class="caret"></span></a>
            <ul class="dropdown-menu">
                <g:each var="plugin" in="${applicationContext.getBean('pluginManager').allPlugins}">
                    <li><a href="#">${plugin.name} - ${plugin.version}</a></li>
                </g:each>
            </ul>
        </li>
    </content>

    <div class="svg" role="presentation">
        <div class="grails-logo-container">
            <asset:image src="grails-cupsonly-logo-white.svg" class="grails-logo"/>
        </div>
    </div>

    <div id="content" role="main">
        <section class="row colset-2-its">
            <h1>Welcome to Grails</h1>

            <p>
Congratulations, you have successfully started your first Grails application! At the moment
this is the default page, feel free to modify it to either redirect to a controller or display
whatever content you may choose. Below is a list of controllers that are currently deployed in
this application, click on each to execute its default action:
            </p>

            <div id="controllers" role="navigation">
                <h2>Available Controllers:</h2>
                <ul>
                    <g:each var="c" in="${grailsApplication.controllerClasses.sort { it.fullName } }">
                        <li class="controller">
                            <g:link controller="${c.logicalPropertyName}">${c.fullName}</g:link>
                        </li>
                    </g:each>
                 </ul>
            </div>
        </section>
    </div>

</body>
</html>
As we can see from close inspection of css classes, this UI makes extensive use of the Bootstrap Framework. The same framework and its dependencies are included into the page as well. Now let us use this UI for the other Grails applications where the integration requires a bit of work on our part. Our aim is to make this same UI work flawlessly with those other versions of Grails Framework.
3.2 Grails v2.4.4 Application
To create a Grails application with version 2.4.4 we need to follow the same course of action. We need to type the following command to generate our scaffolded application.
grails create-app WCGBootstrapGrails244
After the completion of this command our new application should be ready and seated in the folder “WCGBootstrapGrails244”. Let us navigate to this folder and execute the following command to check if things look right.
grails run-app
Once this is completed, we will see a message that our application is running at http://localhost:8080/WCGBootstrapGrails244. When we navigate in a browser we will see the following screen.

3.2.1 Html Markup Change
We will make changes in two files for Html Markup. First up, copy the contents of main.gsp in the project WCGBootstrapGrails329 to the main.gsp file of this project. Next we do the same for the index.gsp file.
3.2.2 Changes to JavaScript Assets
Now to make the pages work we need to make changes to the assets folder under grails-app folder. First we copy the images folder from the WCGBootstrapGrails329 project. Next we make changes to the JavaScript and StyleSheets.
The application.js file’s content needs to change from
application.js
// This is a manifest file that'll be compiled into application.js.
//
// Any JavaScript file within this directory can be referenced here using a relative path.
//
// You're free to add application-wide JavaScript to this file, but it's generally better
// to create separate JavaScript files as needed.
//
//= require jquery
//= require_tree .
//= require_self

if (typeof jQuery !== 'undefined') {
	(function($) {
		$('#spinner').ajaxStart(function() {
			$(this).fadeIn();
		}).ajaxStop(function() {
			$(this).fadeOut();
		});
	})(jQuery);
}
to this
application.js
// This is a manifest file that'll be compiled into application.js.
//
// Any JavaScript file within this directory can be referenced here using a relative path.
//
// You're free to add application-wide JavaScript to this file, but it's generally better
// to create separate JavaScript files as needed.
//
//= require jquery-2.2.0.min
//= require bootstrap
//= require_tree .
//= require_self

if (typeof jQuery !== 'undefined') {
    (function($) {
        $(document).ajaxStart(function() {
            $('#spinner').fadeIn();
        }).ajaxStop(function() {
            $('#spinner').fadeOut();
        });
    })(jQuery);
}
As you can see we have added to the requires at the top one for bootstrap.js and the other for JQuery version 2.2.0. We have also replaced the other require for JQuery already in the file. We do need to place these two files referenced in the requires in the same folder to finalize the changes.
3.2.3 Changes to StyleSheet Assets
Now it is the turn of the StyleSheet file for changes. We change the contents of application.css file from
application.css
/*
* This is a manifest file that'll be compiled into application.css, which will include all the files
* listed below.
*
* Any CSS file within this directory can be referenced here using a relative path.
*
* You're free to add application-wide styles to this file and they'll appear at the top of the
* compiled file, but it's generally better to create a new file per style scope.
*
*= require main
*= require mobile
*= require_self
*/
to this
application.css
/*
* This is a manifest file that'll be compiled into application.css, which will include all the files
* listed below.
*
* Any CSS file within this directory can be referenced here using a relative path.
*
* You're free to add application-wide styles to this file and they'll appear at the top of the
* compiled file, but it's generally better to create a new file per style scope.
*
*= require bootstrap
*= require grails
*= require main
*= require mobile
*= require_self
*/
As you can see we have required the bootstrap and grails css files in addition to the ones which were already their. Like with JavaScript files we need to place the additional files and replace the older ones with new copies from WCGBootstrapGrails329 project we created in the previous section.
This wraps up the changes needed to use Bootstrap with version 2.4.4 of a grails web application. To verify our changes we will run the following command from the root of the project.
grails run-app
We will see a message to the effect that the application is running at http://localhost:8080/WCGBootstrapGrails244 URL. When we navigate to it using a browser we should see the below screen.

3.3 Grails v2.3.9 Application
In this section we will attempt to use the Bootstrap Framework with Grails v2.3.9. First off, we need to create an application using Grails v2.3.9 by running the following command at the root of the project folder.
grails create-app WCGBootstrapGrails239
Once this command is completed we should have a folder named WCGBootstrapGrails239 with our newly created application.
Next, let us run the application to see how the landing page looks like using the command at the root of the application, i.e., WCGBootstrapGrails239.
grails run-app
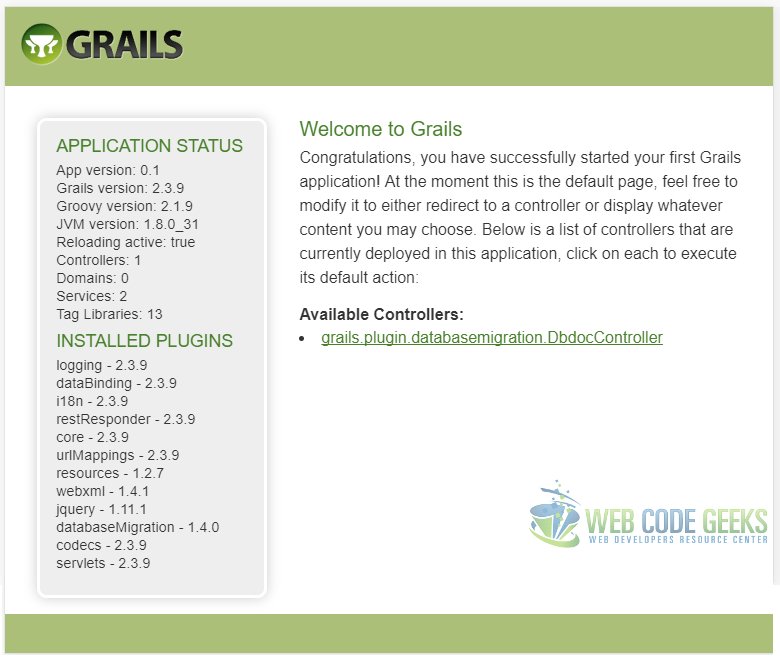
Once this command is completed we should get a message to the effect that the application is running at http://localhost:8080/WCGBootstrapGrails239. Navigating to the address in a browser we should see the below screen.
3.3.1 Html Markup Change
Now let us replace the existing UI with the one from grails v3.2.9 project.
We need to make the main.gsp and index.gsp file look exactly like their v3.2.9 counterparts.
3.3.2 Enable Asset Pipeline Plugin
We will enable the Asset pipeline which makes the static assets number one citizens like all the other artifacts. To do this we need to edit the BuildConfig.groovy file which is located in the WCGBootstrapGrails239\grail-app\conf folder.
We need to uncomment the following line in the file //compile ":asset-pipeline:1.6.1". Apart from this, copy over the assets folder from the 2.4.4 version project to this one.
After making these changes, our application is setup to use the Bootstrap framework. So lets run it to see the output. Navigate to the root of the project in a console and run the following command:
grails run-app
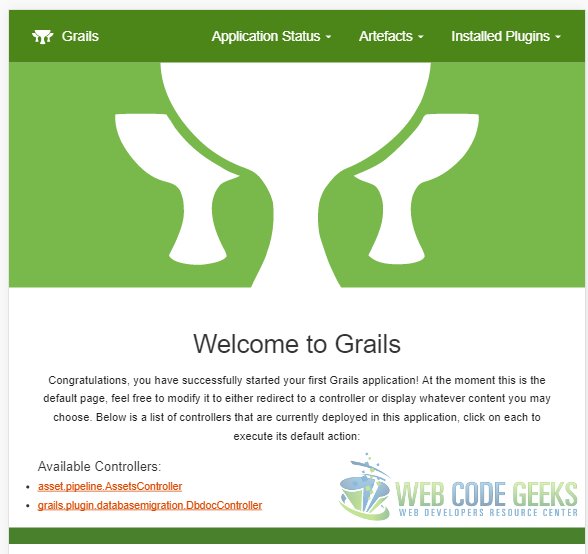
A message should appear indicating that the application is running at http://localhost:8080/WCGBootstrapGrails239. We should see the below screen upon navigating to the address in a browser.
4. That’s a Wrap
Now that we were able to do the same UI layout based on Bootstrap using 3 different versions of Grails, namely v2.3.9, v2.4.4 and v3.2.9 we can call it a day.
5. Running the Sample
To run each of our applications on, in my case Windows 10, we need to change the path environment variable to reflect the bin directory of the desired Grails version. That is the only step required to switch. All the other commands remain the same. Lets list the ones we used most often:
Create a new Application
grails create-app appname
Run the Application
grails run-app
6. Download the Source Code
You can download the full source code of this example here : WCG — Bootstrap Grails Tutorial
