In today’s article, we will be looking into how to get started quickly with Bootstrap’s datepicker, and explore a few of the different options, methods and events that are available. To follow this example, all you need is a text editor; I will be using Notepad++.
1. Introduction
1.1. Date what?
If you’re building a website that at some stage, needs to allow the user to select one or several dates, then you’ll need to use what’s called a datepicker. A datepicker, to simply put it, is a nice little calendar widget, which allows the user to browse a calendar and select one or several dates. Today, we’ll be looking into Bootstrap’s implementation of the datepicker.
Using Bootstrap’s date picker isn’t as straightforward as using other Bootstrap components, because it’s not included in the core library. You’ll need to include additional dependencies to be able to use it. Besides that, it’s pretty much the same as all the other components.
1.2. Who should read this article?
The goal of this article is to get developers or architects started on Bootstrap’s datepicker quickly. Most other datepicker references on the web – including the documentation – are complete, but hard to get into. This article aims to get you started fast and easily, for the scope of a POC or a simple requirements application.
1.3. Before we get started…
A few things I like to make clear in my articles:
– In Bootstrap projects, I prefer to use data-* attributes rather than use JavaScript. When creating a UI in HTML, it usually makes more sense to…uh…not use JavaScript. So I’m going to be using Bootstrap’s data-* attributes on my HTML tags; just know that it can be done in JavaScript as well.
– I always cut down my code examples down to the absolute bare minimum, to remove any clutter and make my example as clear and concise as possible. The goal in my articles isn’t to create beautiful web pages, it’s to demonstrate how a given feature is used.
Nuff said. Let’s get our hands dirty.
2. Getting started
Let’s start by setting up the dependencies we need. You’ll notice we’ve included all the libraries required for a standard Bootstrap project (Bootstrap JS, CSS and jQuery), as well as two new ones: Bootstrap datepicker JS and CSS.
Datepicker setup.html
<!DOCTYPE html>
<html>
<head>
	<!-- Bootstrap JS and CSS + jQuery -->
	<link rel="stylesheet" href="https://maxcdn.bootstrapcdn.com/bootstrap/3.3.7/css/bootstrap.min.css"></link>
	<script src="http://code.jquery.com/jquery-3.1.1.min.js"></script>
	<script src="https://maxcdn.bootstrapcdn.com/bootstrap/3.3.7/js/bootstrap.min.js"></script>

	<!-- Bootstrap datepicker JS and CSS -->
	<script src="https://cdnjs.cloudflare.com/ajax/libs/bootstrap-datepicker/1.6.4/js/bootstrap-datepicker.js"></script>
	<link rel="stylesheet" href="https://cdnjs.cloudflare.com/ajax/libs/bootstrap-datepicker/1.6.4/css/bootstrap-datepicker.css"></link>
</head>
<body>
</body>
</html>
Now, let’s create a datepicker. Unlike most Bootstrap components (and this is important!), you’ll need to explicitly instantiate the datepicker yourself. This can be done in two ways:
– Either you can add a data-provide attribute to the HTML tag you wish to instantiate a datepicker on, associated to the value datepicker
– Or you can use JavaScript to instantiate that same tag using the datepicker() method.
See examples below.
Instantiate with data attributes.html
<!DOCTYPE html>
<html>
<head>
	<title>Instantiate a datepicker with data-provide attribute</title>
	<link rel="stylesheet" href="https://maxcdn.bootstrapcdn.com/bootstrap/3.3.7/css/bootstrap.min.css"></link>
	<script src="http://code.jquery.com/jquery-3.1.1.min.js"></script>
	<script src="https://maxcdn.bootstrapcdn.com/bootstrap/3.3.7/js/bootstrap.min.js"></script>

	<script src="https://cdnjs.cloudflare.com/ajax/libs/bootstrap-datepicker/1.6.4/js/bootstrap-datepicker.js"></script>
	<link rel="stylesheet" href="https://cdnjs.cloudflare.com/ajax/libs/bootstrap-datepicker/1.6.4/css/bootstrap-datepicker.css"></link>
</head>
<body>
	<input type="text" data-provide="datepicker" />
</body>
</html>
Instantiate with JavaScript.html
<!DOCTYPE html<
<html<
<head<
	<title<Instantiate a datepicker with JavaScript</title>
	<link rel="stylesheet" href="https://maxcdn.bootstrapcdn.com/bootstrap/3.3.7/css/bootstrap.min.css"<>/link>
	<script src="http://code.jquery.com/jquery-3.1.1.min.js"<</script>
	<script src="https://maxcdn.bootstrapcdn.com/bootstrap/3.3.7/js/bootstrap.min.js"></script>

	<script src="https://cdnjs.cloudflare.com/ajax/libs/bootstrap-datepicker/1.6.4/js/bootstrap-datepicker.js"></script>
	<link rel="stylesheet" href="https://cdnjs.cloudflare.com/ajax/libs/bootstrap-datepicker/1.6.4/css/bootstrap-datepicker.css"></link>

	<script>
		function instantiateMyDatePicker() {
			$('#myDatePickerId').datepicker();
		}
	</script>

</head>
<body onload="instantiateMyDatePicker()">
	<input type="text" id="myDatePickerId" />
</body>
</html>
In both cases, we result with an input which displays a datepicker when it receives focus.

Fig. 1: Instantiation
3. Different kinds of markups
You can instantiate a datepicker on just about any HTML tag, and it will be displayed when that tag receives focus. Obviously however, there are tags that are logically better suited for instantiating datepickers:
- Text inputs: pick a date and have it show in the input
- An empty div if you want to embed your datepicker into your page
- A div which contains different tags (such as, an input and an associated button) if you want several tags to be able to open the same datepicker.
Let’s have a look at a few examples.
3.1. Input markup
Instantiate a datepicker on a text input. Probably the simplest and most obvious case.
Input markup
	<!-- Markup 1: "input". The input will show the picker when it receives focus. -->
	<input
		type="text"
		data-provide="datepicker"
	/>
3.2. Component markup
If you have an input group (with class input-group) which contains an input and some addons (with class input-group-addon), you can allow the addons to open the datepicker as well as the input. Proceed as follows:
- Add class “date” to your input group
- Instantiate the datepicker on the input group.
Component markup
	<!-- Markup 2: "component". On your datepicker, set class "input-group", then add the "date" class to it, and you can then show the datepicker when components with class "input-group-addon" receive focus. -->
	<div class="input-group date" data-provide="datepicker">
		<input type="text" class="form-control">
		<span class="glyphicon glyphicon-calendar input-group-addon"></span>
	</div>
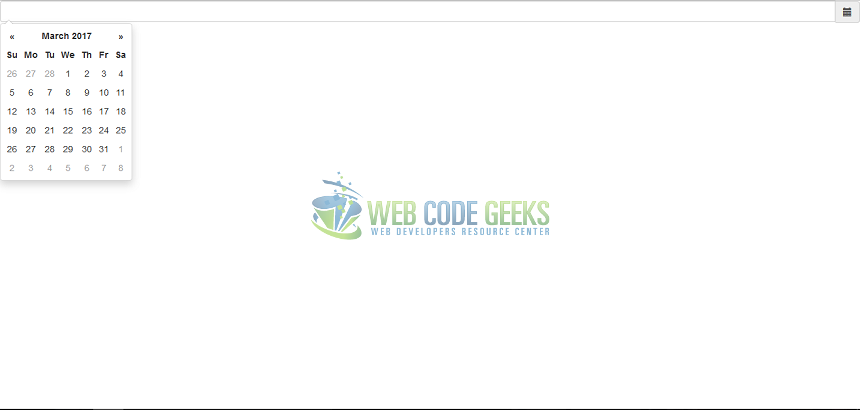
Fig. 2: Component markup
If you’re not familiar with input groups, you can read up about them on Web Code Geek’s introduction to Bootstrap: https://www.webcodegeeks.com/css/bootstrap/bootstrap-tutorial/#input-groups
3.3. Date range markup
In an input group, you can add several inputs which open datepickers which are linked. This allows you to select date ranges.
- Add class “input-daterange” to your input group, and instantiate the datepicker on it
- Add several inputs to your input group.
Date range markup
	<!-- Markup 3: "date-range". On your datepicker, set class "input-group" then "input-daterange", then each input will instantiate a picker when it receives focus. These pickers will be linked together, so you can select ranges. -->
	<div class="input-group input-daterange" data-provide="datepicker">
		<input type="text" />
		<span class="input-group-addon">to</span>
		<input type="text" />
	</div>

Fig. 3: Date range markup
4. Options
4.1. Most used options
I won’t be providing all the options; that’s the job of the documentation. Instead, I’ll just focus on the most frequently used ones. If you’re interested in seeing all available options, refer to the documentation: https://bootstrap-datepicker.readthedocs.io
You can use these options in JavaScript or with data attributes:
- Using JavaScript: pass the options in an object when you instantiate the datepicker:
$('.datepicker').datepicker({ format: 'mm/dd/yyyy', startDate: '-3d' }); - Using data attributes: for each option name, replace each uppercase letter with its lowercase version preceded by a dash, then prepend the whole with “data-date”. This is the attribute you need to assign to your HTML component. For example:
<input data-date-format="dd MM yyyy" />
Now that we know how to implement these options, let’s explore the most commonly used ones.
- autoclose: if true, the datepicker will close as soon as a date is selected. By default: false.
- clearBtn: if true, a “Clear” button will be displayed at the bottom of the datepicker. By default: false.
- startDate and endDate: specifies the start and end date of the calendar. By default, respectively beginning of time (January 1st of year 0, I presume) and end of time (uh… you just keep going forever). These can be either hardcoded dates, or relative to the current date (-9d: nine days ago, +8w: in eight weeks, etc).
- format: date format. Default: mm/dd/yyyy.
- language: language of the datepicker. For this to work, you need to include the Bootstrap datepicker JavaScript library in the locale of your choice. By default: english.
- todayBtn: if true, displays a “Today” button at the bottom of the datepicker, which selects the current date. By default: false.
See below for an example.
Options.html
<!DOCTYPE html>
<html>
<head>
	<title>Datepicker options</title>
	<link rel="stylesheet" href="https://maxcdn.bootstrapcdn.com/bootstrap/3.3.7/css/bootstrap.min.css"></link>
	<script src="http://code.jquery.com/jquery-3.1.1.min.js"></script>
	<script src="https://maxcdn.bootstrapcdn.com/bootstrap/3.3.7/js/bootstrap.min.js"></script>

	<script src="https://cdnjs.cloudflare.com/ajax/libs/bootstrap-datepicker/1.6.4/js/bootstrap-datepicker.js"></script>
	<script src="https://cdnjs.cloudflare.com/ajax/libs/bootstrap-datepicker/1.6.4/locales/bootstrap-datepicker.fr.min.js"></script>

	<link rel="stylesheet" href="https://cdnjs.cloudflare.com/ajax/libs/bootstrap-datepicker/1.6.4/css/bootstrap-datepicker.css"></link>
</head>
<body>
	<input
		type="text"
		data-date-autoclose="true"
		data-date-clear-btn="true"
		data-date-format="dd MM yyyy"
		data-date-language="fr"
		data-date-today-highlight="true"
		data-date-end-date="+2m"
		data-date-start-date="-3d"
		data-provide="datepicker" />
</body>
</html>

Fig. 4: Options
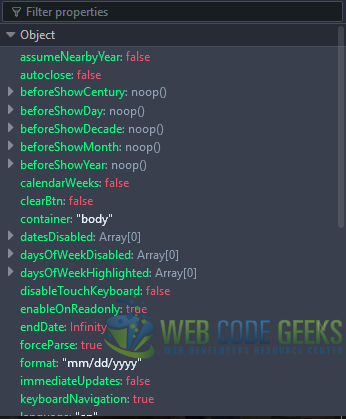
4.2. Overriding default options
You can override the default options at any times by changing the value of $.fn.datepicker.defaults. This is an object which represents the default options for your datepickers, and contains a key for every possible option, with an associated value. As such, you can override a default option at any time by using the following syntax: $.fn.datepicker.defaults.optionName = optionNewDefaultValue;. See the example below.
Override default format option
	<script>
		$.fn.datepicker.defaults.format = "dd/mm/yyyy";
	</script>
Here is what the $.fn.datepicker.defaults objects contains (inspected with Firefox Developer Edition).
5. Methods
The datepicker exposes methods which you can call in JavaScript. Here are some of the ones you’re most likely to use.
- show: shows the picker. hide: hides the picker.
- setDate: set a date on the picker. getDate: retrieve the picker’s date.
- clearDates: clear the picker’s dates.
The syntax for calling the methods is quite particular. You’ve got to pass them as arguments to the datepicker method, on your datepicker. Something like this: $(‘.datepicker’).datepicker(‘setDate’, ’04/08/1994′);.
See the examples below.
Methods.html
<!DOCTYPE html>
<html>
<head>
	<title>Datepicker methods</title>
	<link rel="stylesheet" href="https://maxcdn.bootstrapcdn.com/bootstrap/3.3.7/css/bootstrap.min.css"></link>
	<script src="http://code.jquery.com/jquery-3.1.1.min.js"></script>
	<script src="https://maxcdn.bootstrapcdn.com/bootstrap/3.3.7/js/bootstrap.min.js"></script>

	<script src="https://cdnjs.cloudflare.com/ajax/libs/bootstrap-datepicker/1.6.4/js/bootstrap-datepicker.js"></script>
	<link rel="stylesheet" href="https://cdnjs.cloudflare.com/ajax/libs/bootstrap-datepicker/1.6.4/css/bootstrap-datepicker.css"></link>

	<script>
		function hideTheDatePicker() {
			$('.datepicker').datepicker('hide');
		}

		function showTheDatePicker() {
			$('.datepicker').datepicker('show');
		}

		function setDateOnDatePicker() {
			$('.datepicker').datepicker('setDate', '04/08/1994');
		}

		function getAndDisplayDateOnDatePicker() {
			var sDateAsString = $('.datepicker').datepicker('getDate');
			alert(sDateAsString);
		}

		function clearDatesOnDatePicker() {
			$('.datepicker').datepicker('clearDates');
		}
	</script>
</head>
<body>
	<input
		id="myDatePickerId"
		type="text"
		class="datepicker"
		data-provide="datepicker" />

	<input
		type="button"
		value="Hide the picker"
		onclick="hideTheDatePicker()" />
	<input
		type="button"
		value="Show the picker"
		onclick="showTheDatePicker()" />
	<input
		type="button"
		value="Update the picker"
		onclick="updateTheDatePicker()" />
	<input
		type="button"
		value="Set a date on the picker"
		onclick="setDateOnDatePicker()" />
	<input
		type="button"
		value="Get the picker date"
		onclick="getAndDisplayDateOnDatePicker()" />
	<input
		type="button"
		value="Clear the picker"
		onclick="clearDatesOnDatePicker()" />
</body>
</html>

6. Events
The datepicker fires different events when actions occur. Here are some of the main ones.
- show and hide: fired when the datepicker is respectively shown and hidden.
- clearDate: fired when the clear date button is pressed.
- changeDate: fired when the date is changed.
- changeMonth, changeYear, changeDecade, changeCentury: I really hope the names are intuitive enough.
Again, let’s see a little example below.
Events.html
<html>
<head>
	<title>Datepicker events</title>
	<link rel="stylesheet" href="https://maxcdn.bootstrapcdn.com/bootstrap/3.3.7/css/bootstrap.min.css"></link>
	<script src="http://code.jquery.com/jquery-3.1.1.min.js"></script>
	<script src="https://maxcdn.bootstrapcdn.com/bootstrap/3.3.7/js/bootstrap.min.js"></script>

	<script src="https://cdnjs.cloudflare.com/ajax/libs/bootstrap-datepicker/1.6.4/js/bootstrap-datepicker.js"></script>
	<link rel="stylesheet" href="https://cdnjs.cloudflare.com/ajax/libs/bootstrap-datepicker/1.6.4/css/bootstrap-datepicker.css"></link>

	<script>
		function initDatepicker() {
			$('#myDatePickerId').datepicker()
				.on('show', function() {
					console.log('show');
				})
				.on('hide', onHide)
				.on('clearDate', onClearDate)
				.on('changeDate', onChangeDate)
				.on('changeMonth', onChangeMonth);
		}

		function onHide() {
			console.log('on hide');
		}

		function onClearDate() {
			console.log('on clear date');
		}

		function onChangeDate(dateParam) {
			console.log('Date changed! New date: ' + dateParam.date);
		}

		function onChangeMonth() {
			console.log('Month changed');
		}

	</script>

</head>
<body onload="initDatepicker();">
	<input type="text" id="myDatePickerId"
		data-date-clear-btn="true" />
</body>
</html>

7. Summary
We’ve learnt how to get started on Bootstrap’s datepicker widget, and explored the different options, events and methods available. For more, have a look at the documentation: https://bootstrap-datepicker.readthedocs.io/en/latest/.
8. Download the source code
You can download the full source code of this example here: Bootstrap datepicker
